
Lab 13: Server Side Rendering
🎯 Lab ObjectiveIn this lab, you will learn some basic Server Side Rendering
This lab teaches the following concepts:
- What is Server Side Rendering? (SSR)
- How to use EJS
- Paginate a large dataset
Table of Contents
Client Side Rendering (CSR) is using JavaScript (browser side) to render HTML. Usually with the DOM API to create elements, remove elments, etc… Though it’s more common (thesedays) to use a CSR Framework like React, Angular, or Vue.
CSR is great for responsive interactions (e.g. social media). But it’s not great when we have LOTS of data. We can’t expect a browser to process large amounts of data, especially for low spec phones and smart TVs.
Server Side Rendering (SSR) is when the server processes the data and renders the HTML.
✅ TipIn this context “render” simply means to assemble HTML
<tags>It should not be confused with video rendering, or other kinds of computer graphics rendering.
SSR is less interactive than CSR; since we need to wait for a page fetch to load new data. But it’s far easier to implement.
SSR is also much better for SEO (Search Engine Optimization). A web-crawler (like Google Search) can index a SSR website much easier, as web-crawlers rarely execute any JavaScript.
eCommerce marketplaces (Trade Me, eBay, Amazon, …) all use SSR because they have large amounts of data AND they definitely want search engines to index their website.
We’re going to build this simple product browser using SSR.
We have obtained a public domain dataset containing 11,605 different shoes from Amazon UK. https://data.world/crawlfeeds/amazon-uk-shoes-dataset
We’ll use the data in a JSON format, but real world eCommerce marketplaces would use a database.
We will again use Node and Express to write our web server.
📝 Task 1: Create a Node project
- In a new directory, create a Node project
npm init -y- Install dependencies
npm install nodemon express ejs- Create
server.jsin the project directory- Inside
package.json
- change
"main": "index.js",to"main": "server.js",- add a start script:
"start": "nodemon server.js"- Copy the following into
server.jsconst path = require('path'); const express = require('express'); const app = express(); app.get('/', (req, res) => { res.send('<h1>It works!</h1>'); }); const port = 8080; app.listen(port, () => { console.log(`Server (re)started: http://localhost:${port}`); });
- If you don’t understand what this code is doing, review Lab 11.
- Start the server with
npm run start
There are dozens of SSR libraries we could use. In INFO 202 we use a Java based Framework for SSR (Jakarta Server Pages (JSP)). In this lab (and asgn2) we’ll use EJS (Embedded JavaScript), largely because it’s most similar to JavaScript.
This .ejs file:
<ul>
    <% for (let i = 0; i < 5; i++) { %>
        <li>item: <%= i %></li>
    <% } %>
</ul>

Sorry for the weird syntax highlighting.
…will render this HTML
<ul>
    <li>item: 0</li>
    <li>item: 1</li>
    <li>item: 2</li>
    <li>item: 3</li>
    <li>item: 4</li>
</ul>
Super simple!
📝 Task 2: Setup EJSLet’s create some templates for EJS
- In your project
- create the sub directory:
/views/
- Below is
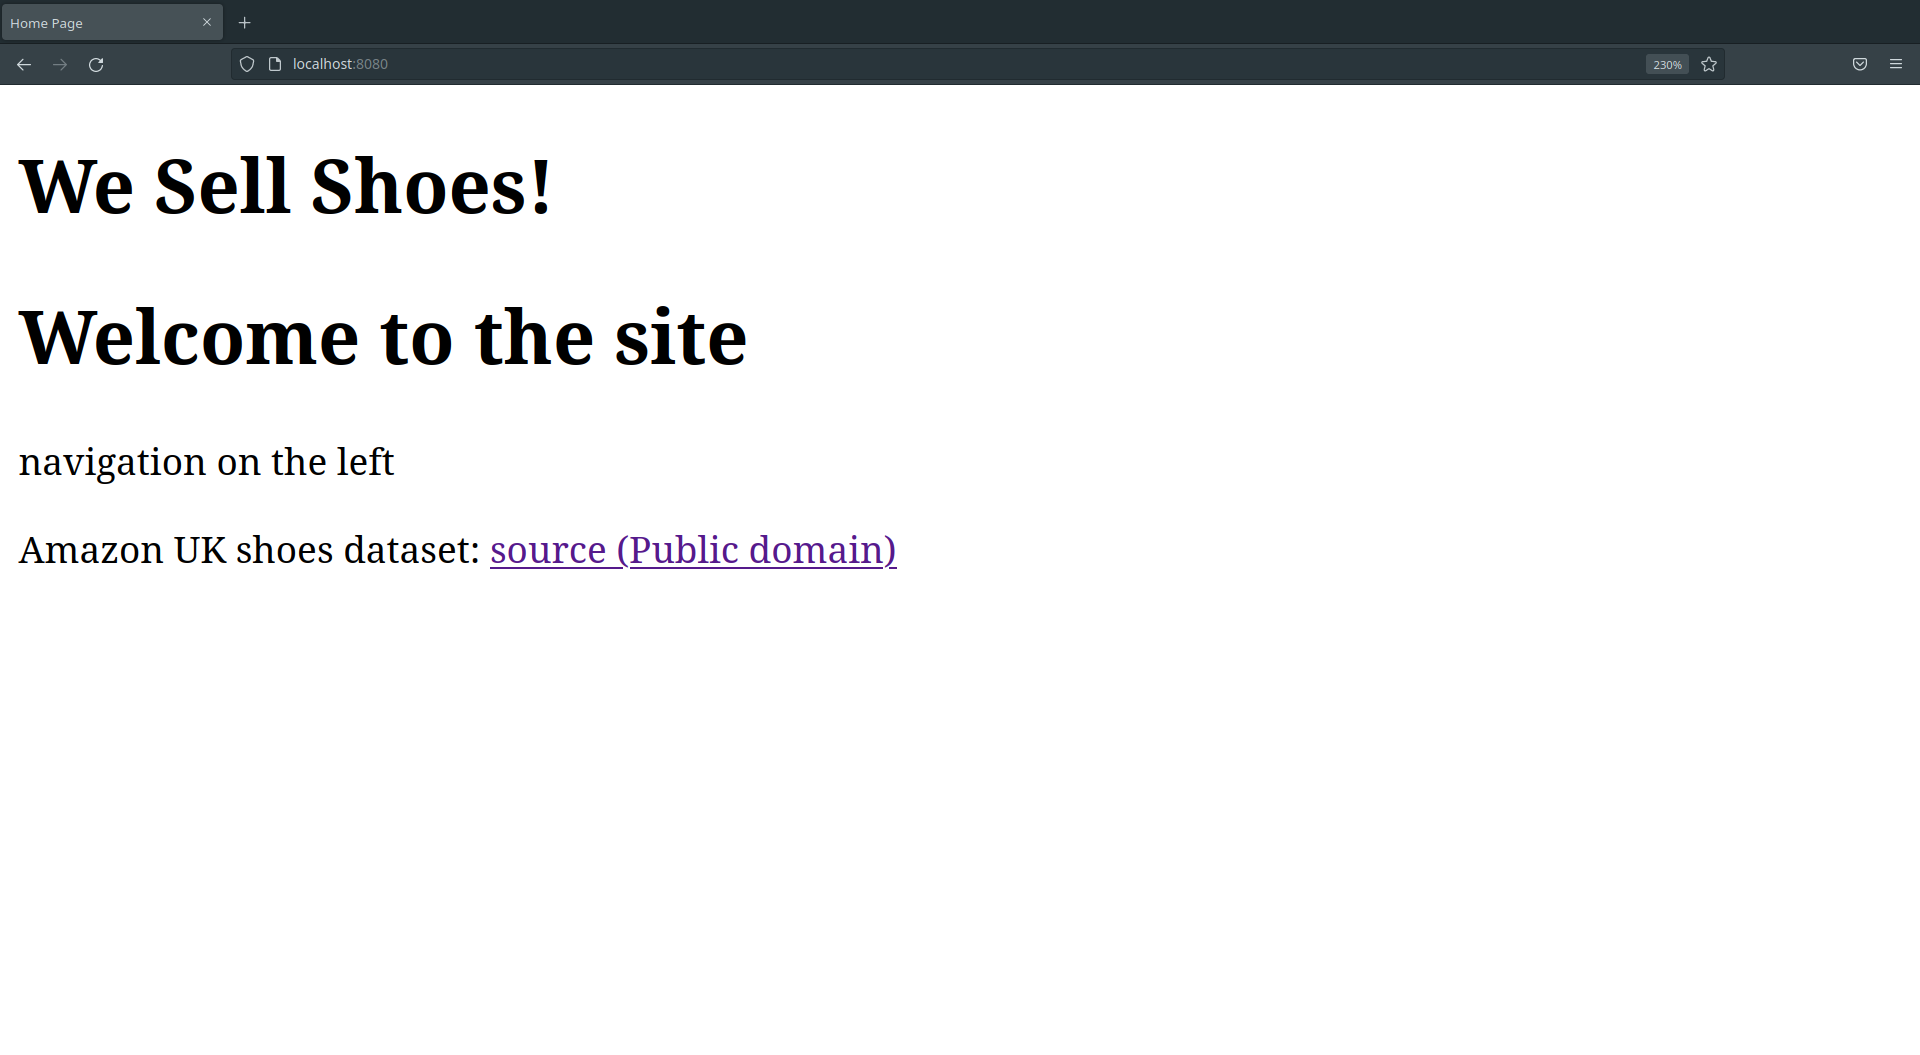
/views/partials/header.ejs<header> <h1>We Sell Shoes!</h1> </header>
- Below is
/views/partials/footer.ejs<footer> <p>Amazon UK shoes dataset: <a href='https://data.world/crawlfeeds/amazon-uk-shoes-dataset'>Source (Public domain)</a> </p> </footer>
- Below is
/views/index.ejs<!DOCTYPE html> <html lang="en"> <head> <title>Home Page</title> <meta charset="utf-8"> <meta name="viewport" content="width=device-width, initial-scale=1"> </head> <body> <%- include('partials/header') %> <main> <h1>Welcome to the site</h1> <p>navigation on the left</p> </main> <%- include('partials/footer') %> </body> </html>
- You should note that
index.ejsreferences both:header.ejsandfooter.ejs.
<%- include('partials/header') %><%- include('partials/footer') %>
Tell Express to render everything in /views with EJS
Visit your server with a browser, and ensure everything works. You should see this:📝 Task 3: Use EJS
- Inside
server.js, add this code:// setup EJS as a view engine (SSR engine) app.set('views', path.join(__dirname, 'views')); app.set('view engine', 'ejs');
- Modify our default route to render
index.ejs
- Replace the
/route with the following:// default route app.get('/', (request, response) => { response.render('index') });Note: here we use
response.render()instead ofresponse.send(). Since the page needs to be rendered (with EJS) before it is sent to the client.
Let’s make the site look better with some CSS.
📝 Task 4: Static host filesWe don’t need EJS to render CSS. We only need Express to host the
.cssas a static file.
- Create a directory
/public/- Create the file
/public/style.css- Inside
views/index.ejs
- Link the CSS file into your EJS template, with:
<link rel='stylesheet' href='/style.css' />
- Inside
server.js
- Host
/pubic/as static files with:app.use(express.static(path.join(__dirname, '/public/')));
- Below is some CSS for
/public/style.css
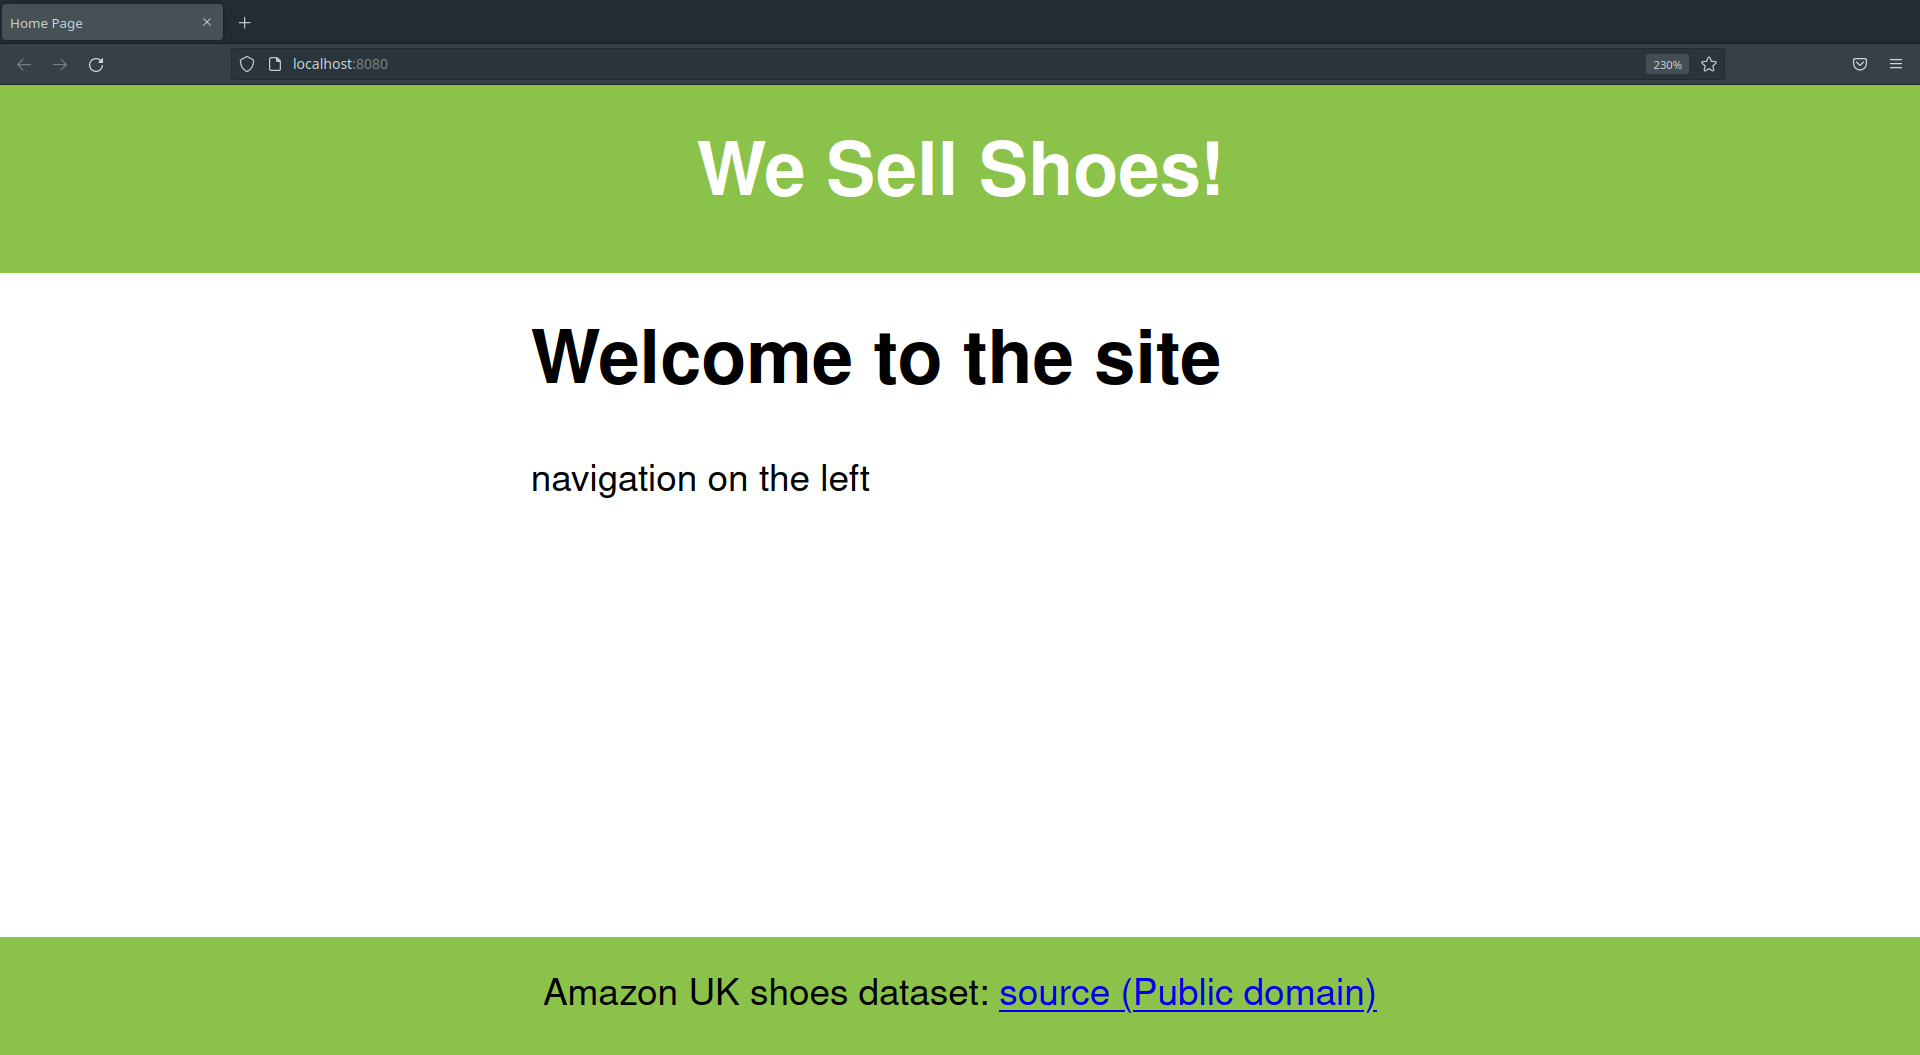
- adds some green colour
- a grid, similar to assignment 1
:root {
    --primary: #8bc34a;
    --primary-light: #a2cf6e;
    --primary-dark: #618833;
}
body {
    font-family: Helvetica, Arial, sans-serif;
    margin: 0;
    min-height: 100vh;
    display: grid;
    grid-template-columns: 200px 1fr;
    grid-template-rows: min-content 1fr min-content;
}
header {
    background: var(--primary);
    color: white;
    text-align: center;
    grid-column: span 2;
}
nav {
    background: var(--primary-dark);
    padding: 0;
}
nav ul {
    list-style: none;
    padding: 0;
    margin: 0;
}
nav ul li {
    display: block;
}
nav a {
    display: block;
    padding: 10px;
    color: white;
    text-decoration: none;
    font-weight: bold;
}
nav a:hover {
    background: var(--primary-light);
}
main {
    padding: 0 30px;
    grid-column-start: 2;
}
footer {
    background: var(--primary);
    grid-column: span 2;
    text-align: center;
}
If everything worked, the site should now be prettier!
Let’s create a sidebar with some page navigation links.
📝 Task 5: Nav EJS component
- Create the file:
/views/partials/nav.ejs
- copy the below content:
<nav>
    <ul>
        <li>
            <a href="/">Home</a>
        </li>
        <li>
            <a href="/shoe"> All Products</a>
        </li>
    </ul>
</nav>
- Inside the file:
/views/index.ejs
- Insert:
<%- include('partials/nav') %>- After
header, but beforemain
✅ TipThe CSS for our<nav>should already be inpublic/style.css
If everything worked, you should now have a side bar!

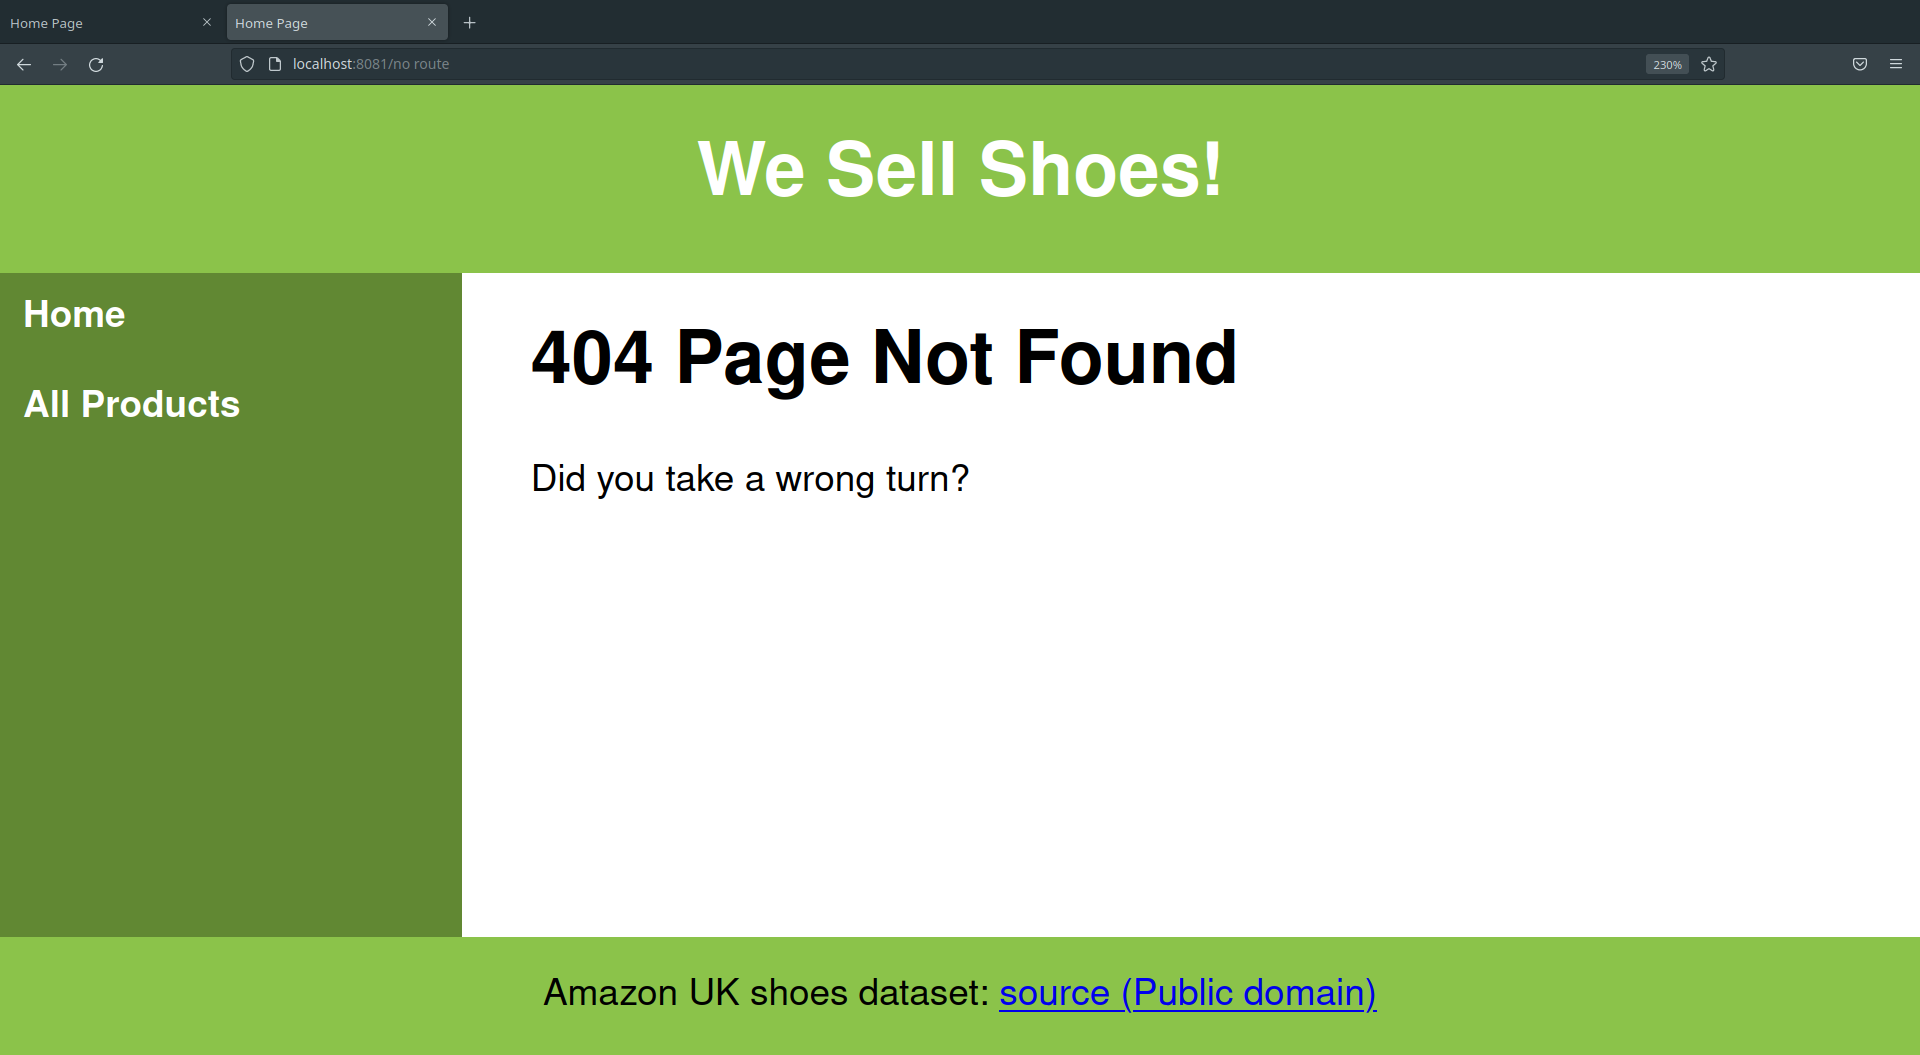
Clicking on “All Products” will respond with an ugly 404 page.
Cannot GET /shoe
Let’s create a custom 404 page
📝 Task 6: Custom 404 page
- Create the file:
/views/404-page.ejs- Copy the contents of
index.ejsinto404.ejs- Modify
404-page.ejsso it displays the 404 error message
- change the contents of
h1- change the contents of
p- Inside
server.jscreate a route for 404 paths
- (We did this in Lab 11)
- Tips:
- path:
'*'response.status(404)response.render('404-page')- put the 404 route LAST inside
server.js
- as the
*will greedily match any/all URL
Lets start using some real data!
📝 Task 7: Download the eCommerce dataset
- Download this dataset of dataset of shoes on Amazon UK
- amazon_uk_shoes_dataset.json (Right Click; Save Link As..)
- Save the JSON in your project directory
The dataset is quite large. It contains an array of 11,605 json objects. Each object has many key: value pairs. The keys we are most interested in are:
title:price:url:product_details:- and the
image_list: []array.
[
  {
    "url": "https://www.amazon.co.uk/dp/B08BLP231K",
    "title": "Geox Jr Sandal Strada B Fisherman, Brown Red, 2.5 UK Child",
    "price": "\u00a350.00",
    "brand": "Visit the Geox Store",
    "product_details": "Package Dimensions\n\u200f\n:\n\u200e\n\n31.2 x 21.4 x 11.4 cm; 820 Grams...",
    "breadcrumbs": "Shoes/Boys' Shoes/Sandals",
    "images_list": [
      "https://m.media-amazon.com/images/I/41OuvqjhaqL.jpg",
      "https://m.media-amazon.com/images/I/51zt+Bb48FL.jpg",
        "..."
    ],
    ...
  },
  ...
]
We are going to code the routes to process and render the dataset.
We’ll try and wrte clean code by creating a separate script for all our dataset routes. Just like the birds_router.js from Lab 11.
📝 Task 8: The Shoe Router
- Create the directory:
/routers/- Create a file:
/routers/shoe_router.js- Import
shoe_routerintoserver.jsconst shoe_router = require('./routers/shoe_router');
- Use the
shoe_routerto route all paths starting with/shoe/
- Inside
server.jscopy:app.use('/shoe/', shoe_router);
- Copy the below into
shoe_router.js:const express = require('express'); const router = express.Router(); const product_list = require('../amazon_uk_shoes_dataset.json'); router.get('/', (request, response) => { response.send('default route for /shoe'); }); module.exports = router;
Visiting http://localhost:8080/shoe/ should now render "default route for /shoe".
Not very interesting yet…
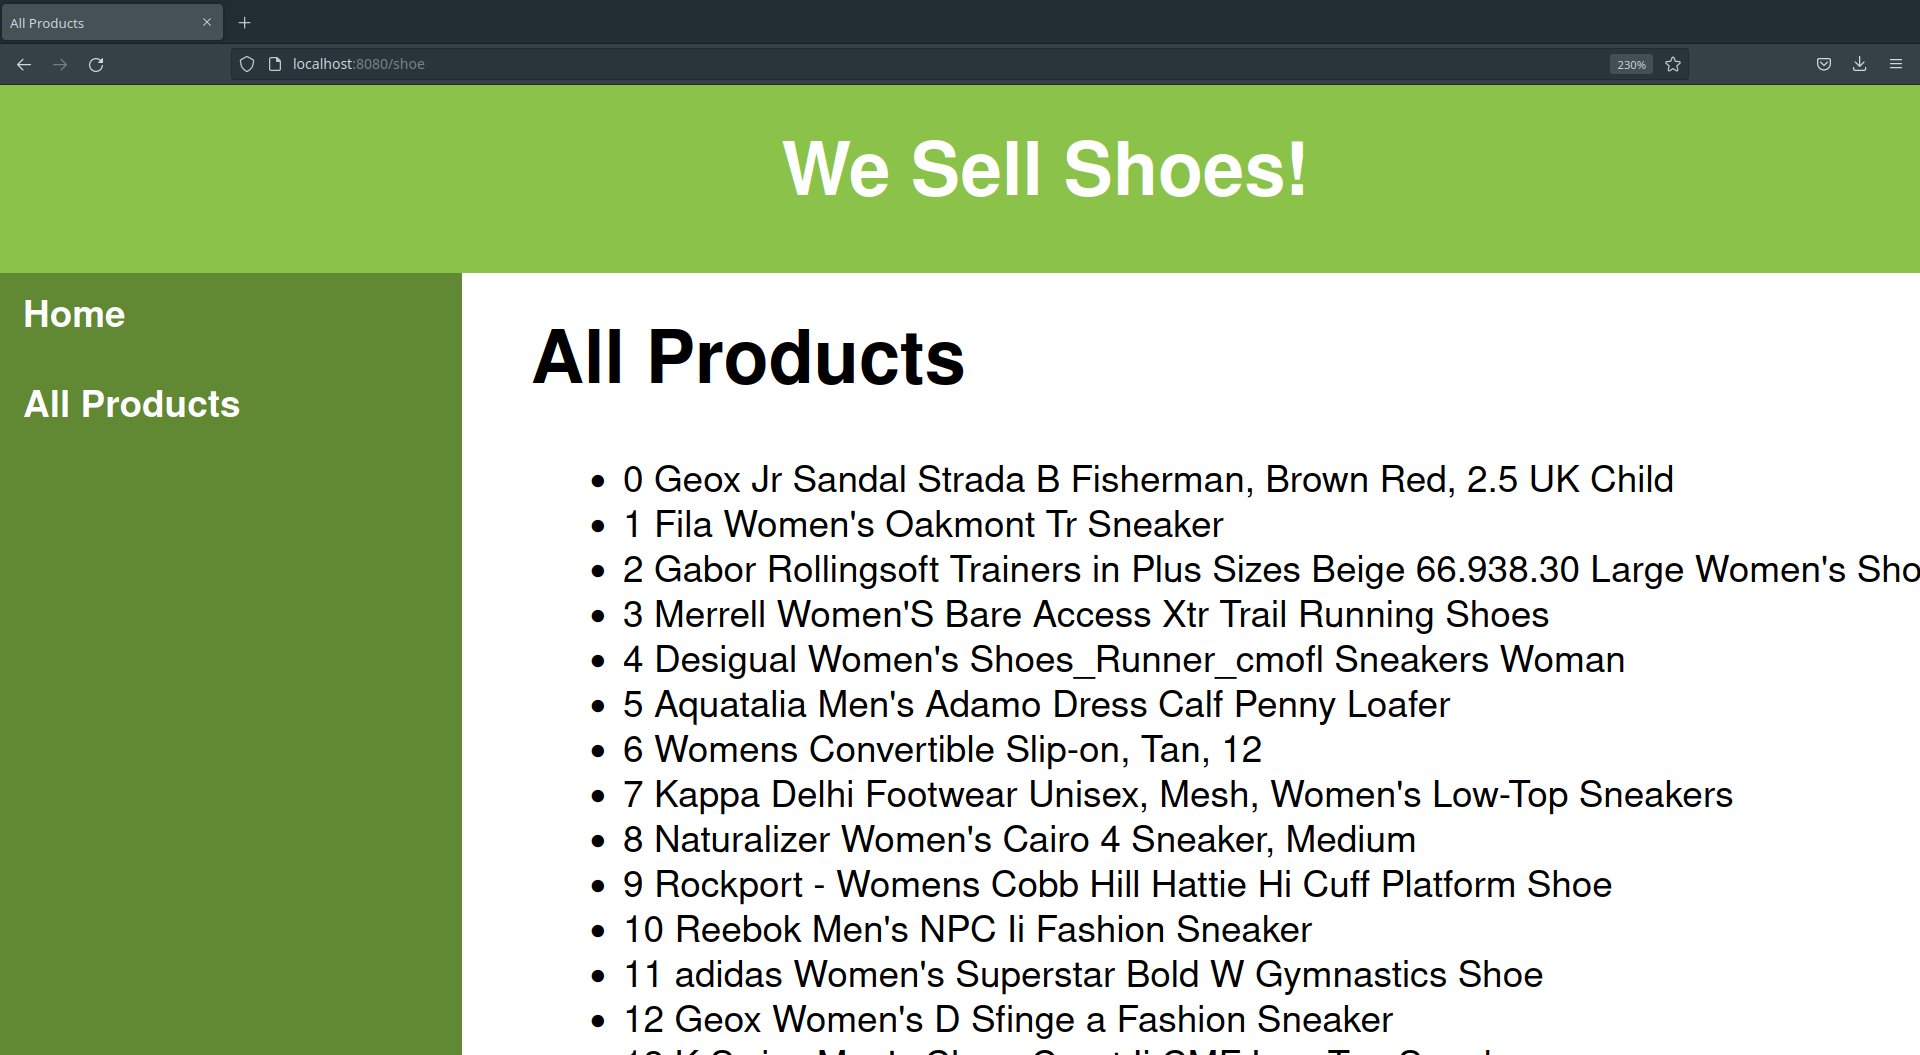
Let’s create a simple EJS template which lists all the shoes by name.
📝 Task 9: List All Shose
- Create the file:
/views/render_all_shoes.ejs- Inside
shoe_router.js
- Change the
'/'route:
- it should render the
render_all_shoestemplate- in the second paramter of
response.render():
- pass the entire dataset as:
{ data: product_list }- Something like the below:
router.get('/', (req, res) => {
    res.render('render_all_shoes', {
        data: product_list
    })
});
- Inside
views/render_all_shoes.ejs
- Insert the following code:
<!DOCTYPE html>
<html lang="en">
<head>
    <meta charset="UTF-8">
    <meta name="viewport" content="width=device-width, initial-scale=1.0">
    <title>All Products</title>
    <link rel="stylesheet" href="/style.css">
</head>
<body>
    <%- include('partials/header') %>
    <%- include('partials/nav') %>
    <main>
        <h1>All Products</h1>
        <ul>
            <% for(let i = 0; i < data.length; i++) { %>
                <li><%= i + " " + data[i].title %></li>
            <% } %>
        </ul>
    </main>
    <%- include('partials/footer') %>
</body>
</html>
This template is very similar to
index.ejsIt links our
css, and includesheader.ejs,nav.ejs, andfooter.ejs.Under
<main>there is afor (... )loop, which renders<li>elements, for each shoe.
Visiting http:localhost:8080/shoe/ should now render every shoes name.
Next we will create a route for each product, for each shoe.
That’s right, over 11,000 routes to over 11,000 different pages!!
The path names for each route will follow this pattern:
/shoe/0//shoe/1//shoe/2/- …
/shoe/2074- …
/shoe/11604/
This will be easy with path parameters:
📝 Task 10: Route each Product
- Inside
shoe_router.js
- Create a route for path
'/:id/'idis the parameter:0,1,2…2074…11604- The route should render the EJS template
product_view
- (The template doesn’t yet exist)
- Pass 1 array element from the dataset
- the element corresponding to index:
idrouter.get('/:id/', (req, res) => { const id = req.params.id; res.render('product_view', { data: product_list[id]}); });The route won’t do anything, not without the corresponding template.
Next we will create the product_view EJS template
📝 Task 11: Product Template
- Create the EJS template:
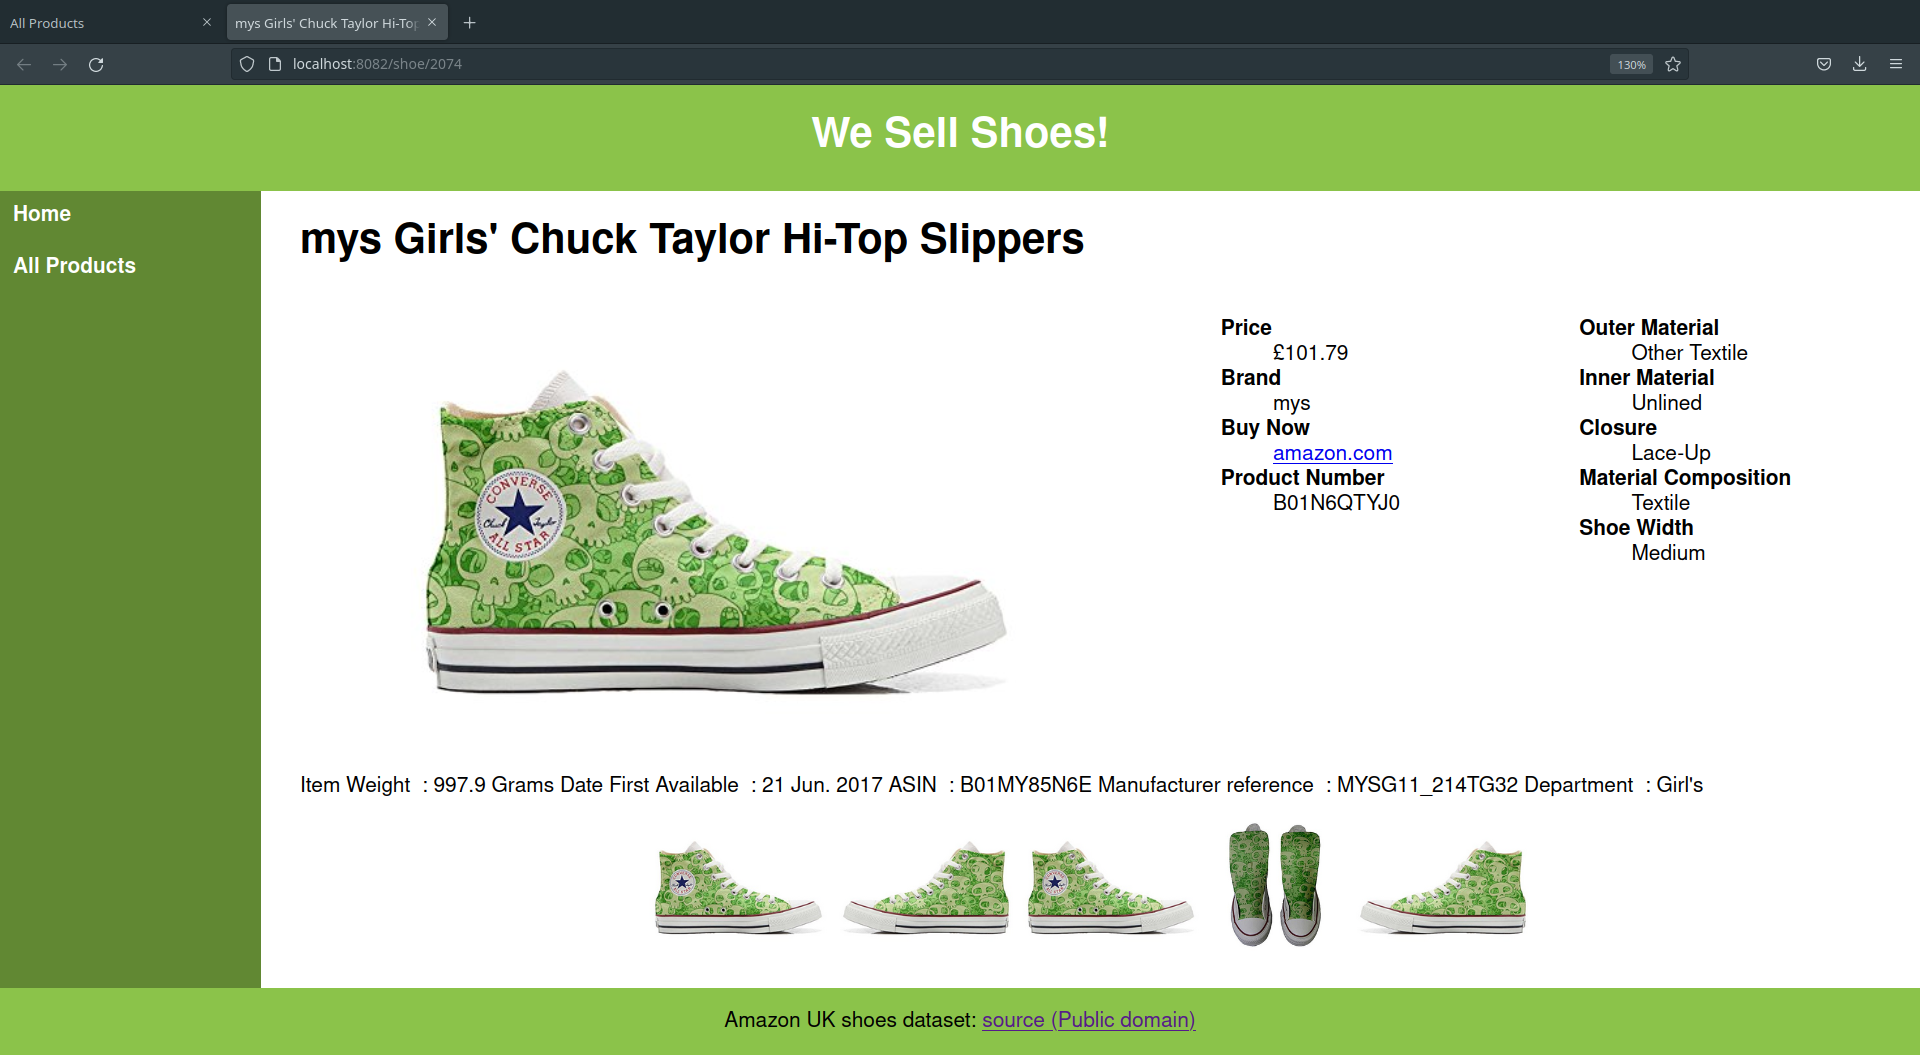
views/product_view.ejs<!DOCTYPE html> <html lang="en"> <head> <meta charset="UTF-8"> <meta name="viewport" content="width=device-width, initial-scale=1.0"> <title><%= data.title %></title> <link rel="stylesheet" href="/style.css"> </head> <body> <%- include('partials/header') %> <%- include('partials/nav') %> <main> <h1><%= data.title %></h1> <img src="<%= data.images_list[0] %>"> </main> <%- include('partials/footer') %> </body> </html>It’s very similar to the previous templates.
Except here,
data, is a single entry from the eCommerce dataset.
data.titleis the product titledata.image_list[0]is the first product imageThe template renders the product title in a
<h1>; and the first image in a<img>
Now, your website can render over 11,000 pages!
- http://localhost:8080/shoe/0
- http://localhost:8080/shoe/1
- http://localhost:8080/shoe/2074
- http://localhost:8080/shoe/11050
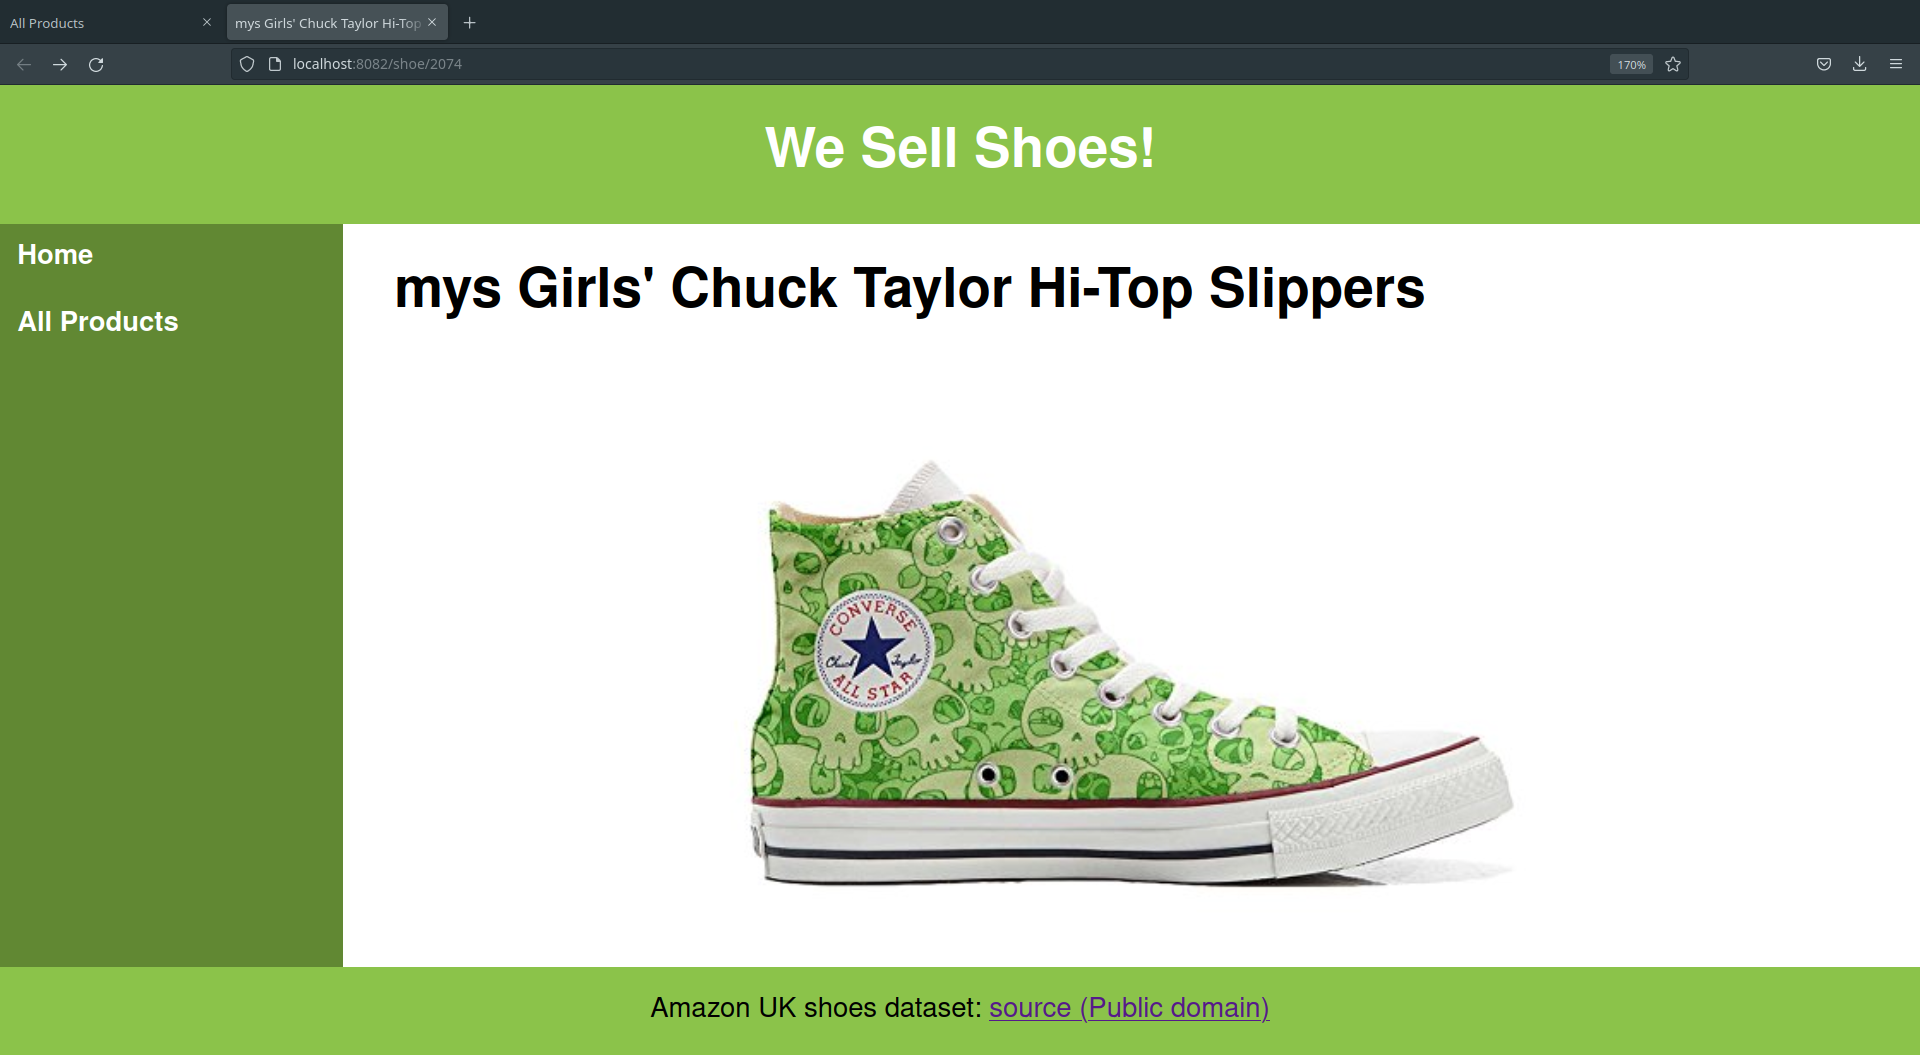
✅ Tip
Something like this?📝 Task 12: Modify product_view.ejs
- Modify the
product_view.ejstemplate to show some if the below
- product_details
- brand
- url
- price
- features
✅ TipDon’t forget you can edit:public/style.css
- Use a loop to display each item in
images_list
Now that we can render a page for every shoe. We can create links to each of these pages.
Lets Modify the “All Products” page, so that every item actually links to their product page.
📝 Task 13: Link each ProductEdit
ulinrender_all_shoes.ejsChange it, from this:
    <% for(let i = 0; i < data.length; i++) { %>
        <li><%= i + " " + data[i].title %></li>
    <% } %>
To this:
    <% for(let i = 0; i < data.length; i++) { %>
        <li>
            <a href="/shoe/<%= i %>">
                <%= data[i].title %>
            </a>
        </li>
    <% } %>
- Visit http://localhost:8080/shoe and test the links.
- (You don’t need to test all 11,605 links)
Rendering all 11,605 links in a list isn’t great UI design… so lets implement a more usable interface with Pagination.
Pagination is where a website will devide a large data set into smaller pages. Where each page will show a small subset of the data.
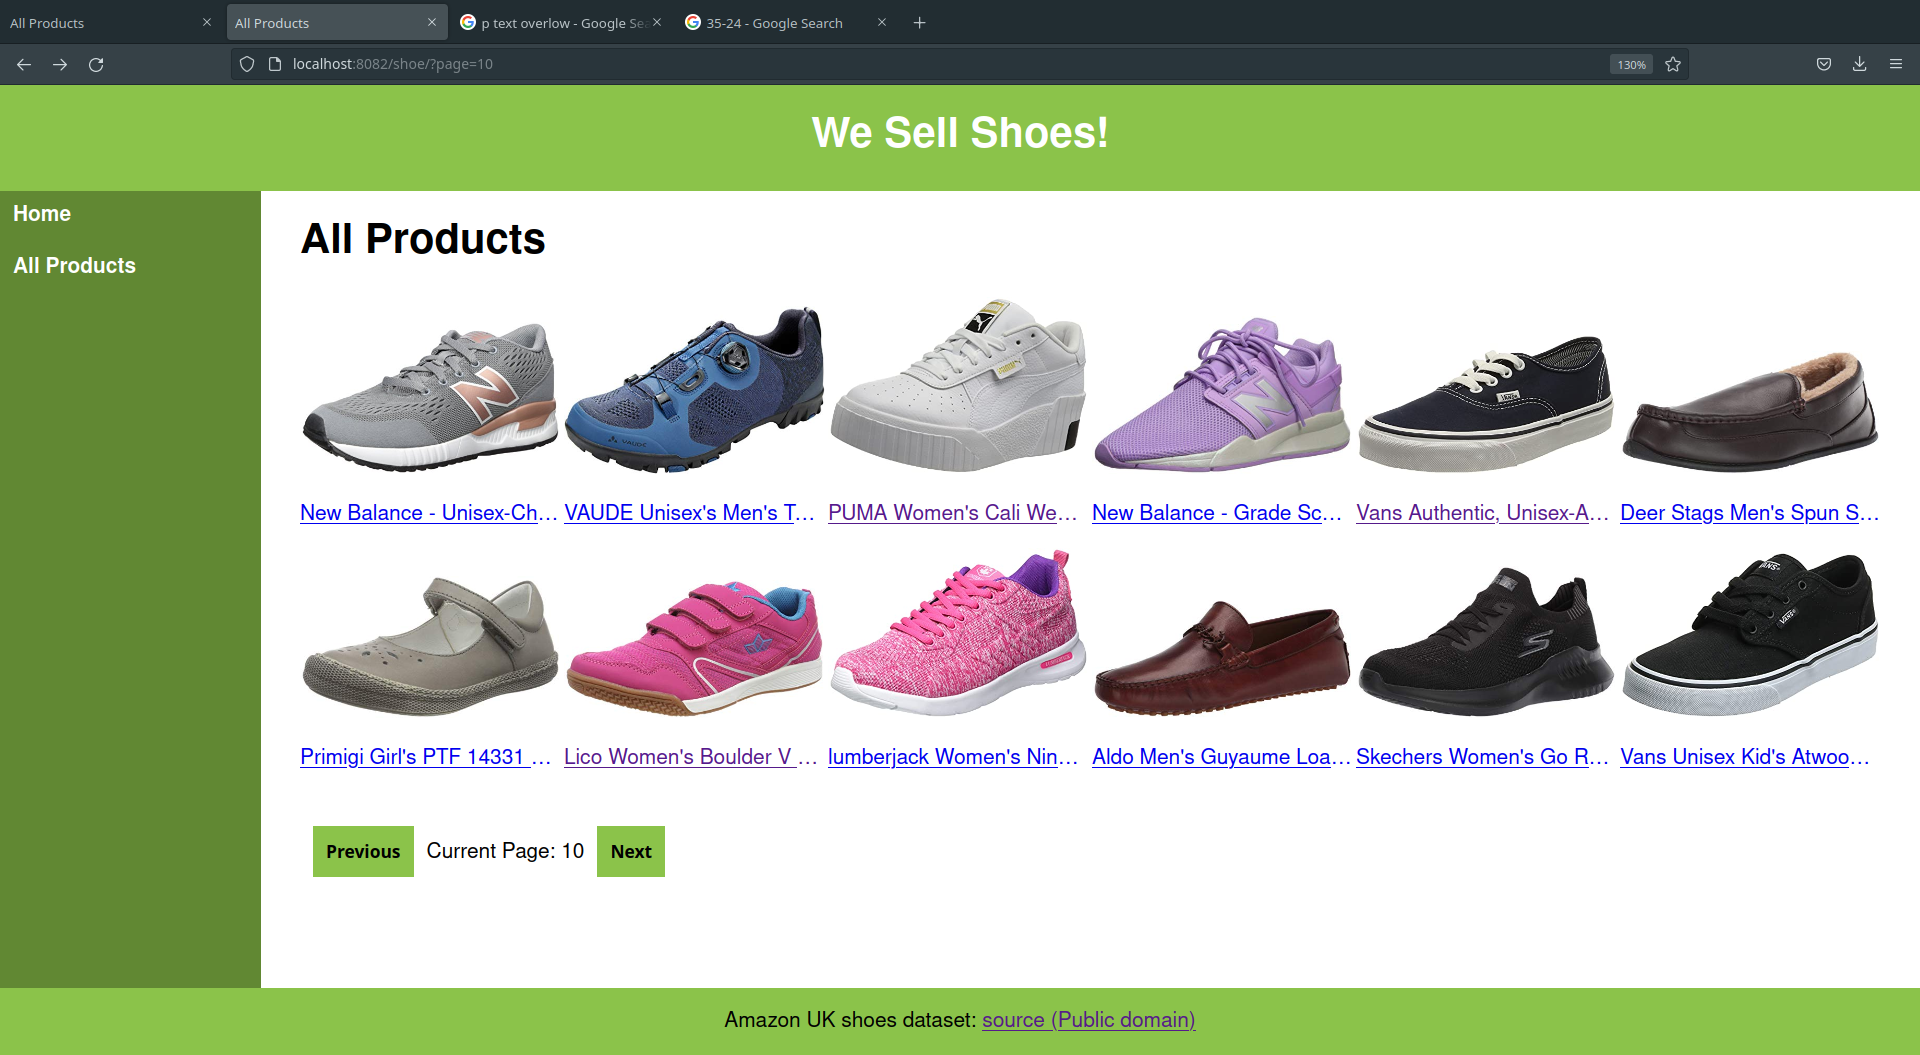
As mentioned in the previous lab, path parameters should be used to select which data to render (i.e. which shoe etc..). And query parameters should be used to filter/sort data.
So, Let’s use a query paramter.
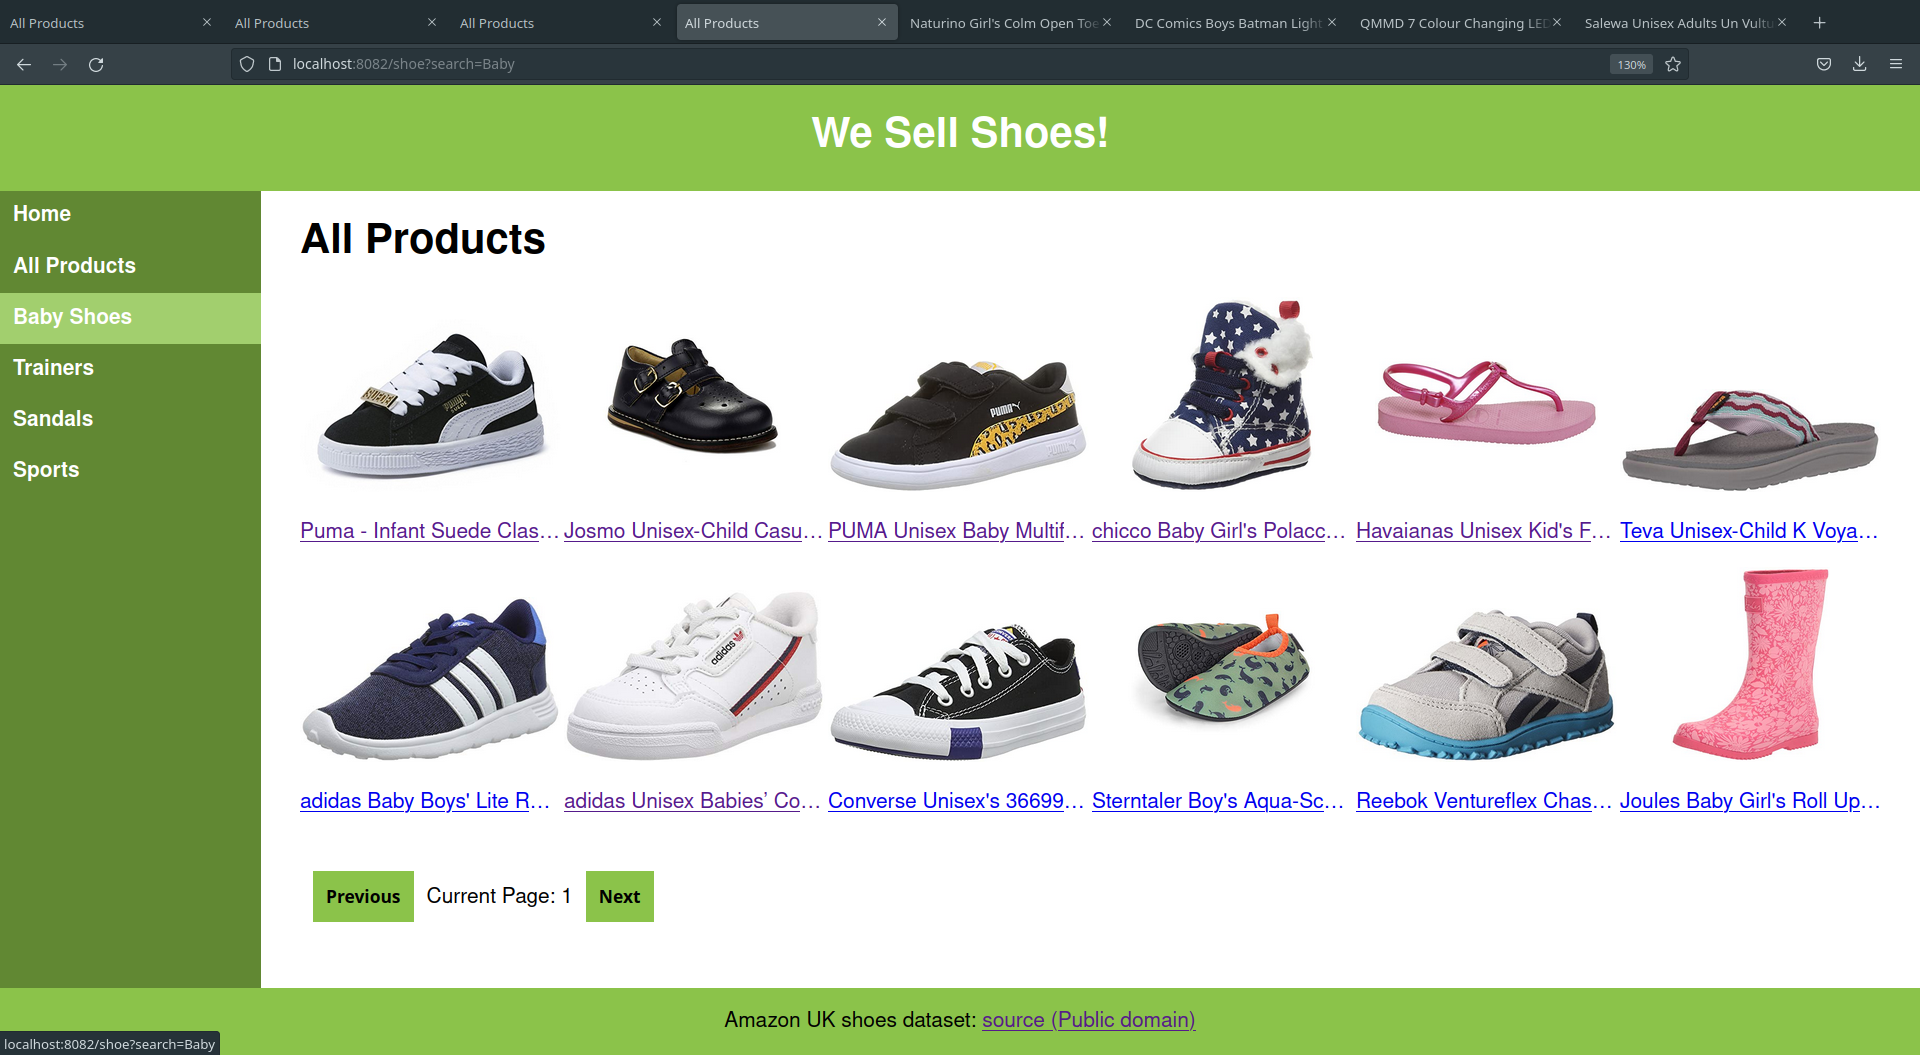
/shoe/?page=1show products 0-11/shoe/?page=2show products 12-23/shoe/?page=3show products 24-35/shoe/?page=101show products 1200-1211/shoe/defaults to page 1
For usability we will start from page 1. (0 indexed arrays aren’t great for UX design)
📝 Task 15: Finish the PaginationCreate the rest of the Pagination
- Create your own solution.
- Or use the code below
In shoe_router.js read the page number as a query parameter, then pass it to the template, along with the desired page size (12 is a good number).
router.get('/', (request, response) => {
    let page = request.query.page;
    if (page === undefined) {
        page = 1;
    }
    page = parseInt(page);

    response.render('render_all_shoes', {
        data: product_list,
        page: page,
        pageSize: 12
    })
});
In render_all_shoes.ejs use the page number and page size to render the correct products. Along with some links to navigate to prev / next page.
<main>
    <h1>All Products</h1>
    <div class="product-list">
        <% for(let i = 0; i < pageSize; i++) { %>
            <% let shoe_id = ((page-1) * pageSize) + i %>
            <div>
                <a href="/shoe/<%= shoe_id %>">
                    <img src="<%= data[shoe_id].images_list[0] %>">
                    <p><%= data[shoe_id].title %></p>
                </a>
            </div>
        <% } %>
    </div>
    <a href="?page=<%= page - 1 %>">
        <button>Previous</button>
    </a>
    Current Page: <%= page %>
    <a href="?page=<%= page + 1 %>">
        <button>Next</button>
    </a>
</main>
The main trick above is to convert the 1-based page number, to a 0-indexed array index. (page-1) * pageSize + i
Since we’re only rendering 12 products per page, we can safely load their images (as oppossed to 11,000 products earlier).
And here is somes CSS to be added to style.css
.product-list {
    display: flex;
    flex-wrap: wrap;
    justify-content: space-between;
    align-items: baseline;
}
.product-list div {
    width: 200px;
}
.product-list img {
    max-height: 150px;
    width: 100%;
    object-fit: contain;
}
.product-list p {
    text-overflow: ellipsis;
    overflow: hidden;
    white-space: nowrap;
}
And here is the final route (in shoe_router.js), with some extra bounds checking.
// route: /shoe/
router.get('/', (request, response) => {
    let page = request.query.page;

    const pageSize = 12;
    if (page === undefined) {
        page = 1;
    } else {
        page = parseInt(page);
        if (page < 1) {
            page = 1;
        }
        if (page >= product_list.length / pageSize) {
            page = (product_list.length - 1) / pageSize;
        }
        page = Math.floor(page);
    }

    response.render('render_all_shoes', {
        data: product_list,
        page: page,
        pageSize: pageSize
    })
});
📝 Task 16: The Final TaskCreate a page which renders a random shoe
- It needs a route
/shoe/random/- The route should be added to
nav.ejs- For the template
- Use:
/views/product_view.ejs
- Can you modify the “All Products” route to sort the data?
- Can you modify the “All Products” route to search the data?
- Maybe using query parameters?
For example, in nav.ejs:
    <li><a href='/shoe?search=Baby'>Baby Shoes</a></li>
    <li><a href='/shoe?search=Boots'>Trainers</a></li>
    <li><a href='/shoe?search=Sandals'>Sandals</a></li>
    <li><a href='/shoe?search=Sports'>Sports</a></li>

This lab is worth marks. be sure to get signed off.