
Lab 12: Web Services: RESTful API
🎯 Lab ObjectiveIn this lab, you will build a proper back-end for the chat application
This lab teaches the following concepts:
- Use PocketBase as a backend
- Use Node/Express/MySQL as a backend
- Communicate with MySQL from express.js
Table of Contents
In a web application, the frontend presents information to the user. While the back-end powers the logic and data interactions.
The front-end, often referred to as the client-side powers the UI, and handles user interaction. Usually HTML, CSS, and JavaScript.
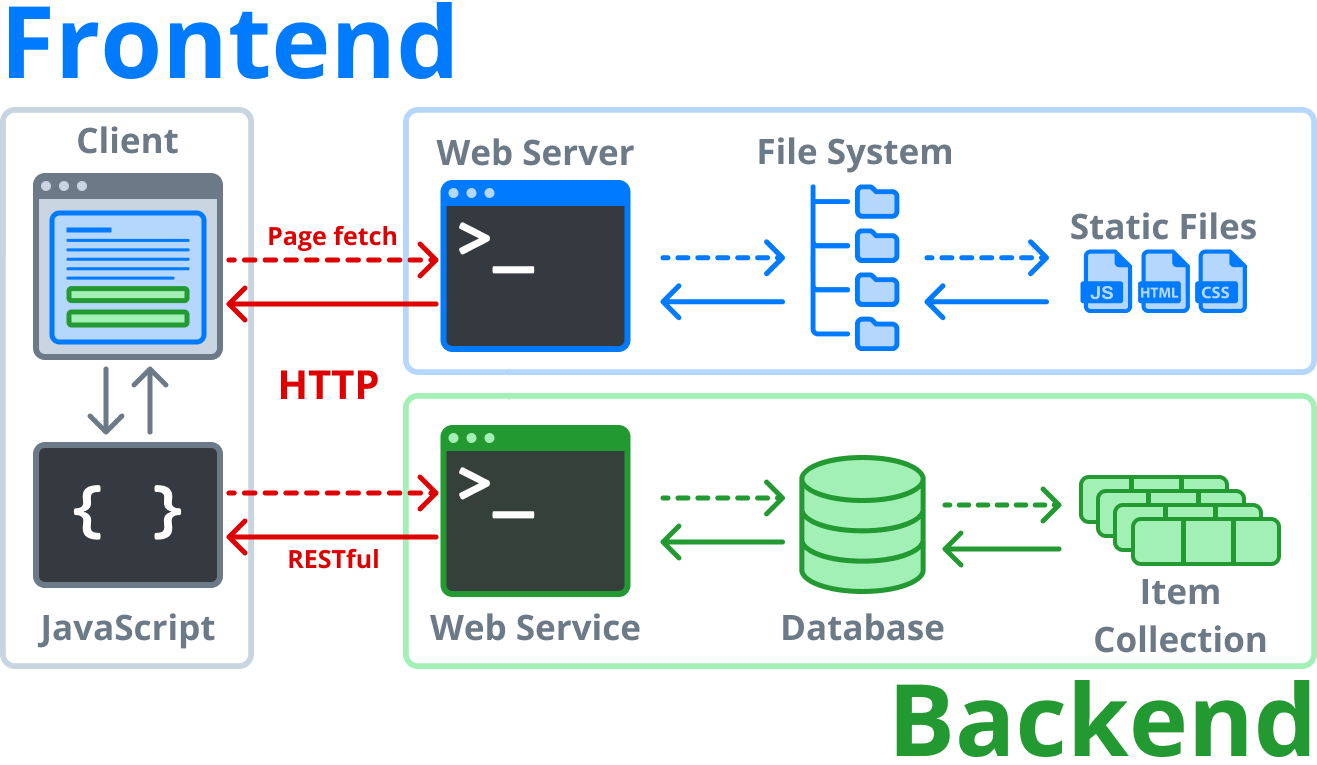
The back-end (or server-side) manages the logic, processing, and database interactions. It recieves HTTP requests from the front-end, processes them, and sends back any results. These interactions often occur through a RESTful API that supports CRUD (Create, Read, Update, Delete) operations on a database, to store, retrieve, update, or delete data as needed.
In this lab we will build 2 backends. The first with PocketBase, and the second we will build form scratch using Node, Express, and MySQL.
PocketBase is a prebuilt backend and Content Management System. It’s not super powerful, but great for small projects.
📝 Task 1: Download PocketBase
- Download PocketBase
- https://github.com/pocketbase/pocketbase/releases/tag/v0.17.5
- Windows 10/11
- pocketbase_0.17.5_**windows_amd64**.zip
- macOS (Intel)
- pocketbase_0.17.5_darwin_**amd**64.zip
- macOS (M1/M2)
- pocketbase_0.17.5_darwin_**arm**64.zip
- Extract the zip file somewhere on your computer
- WarpDrive recommended for lab machines
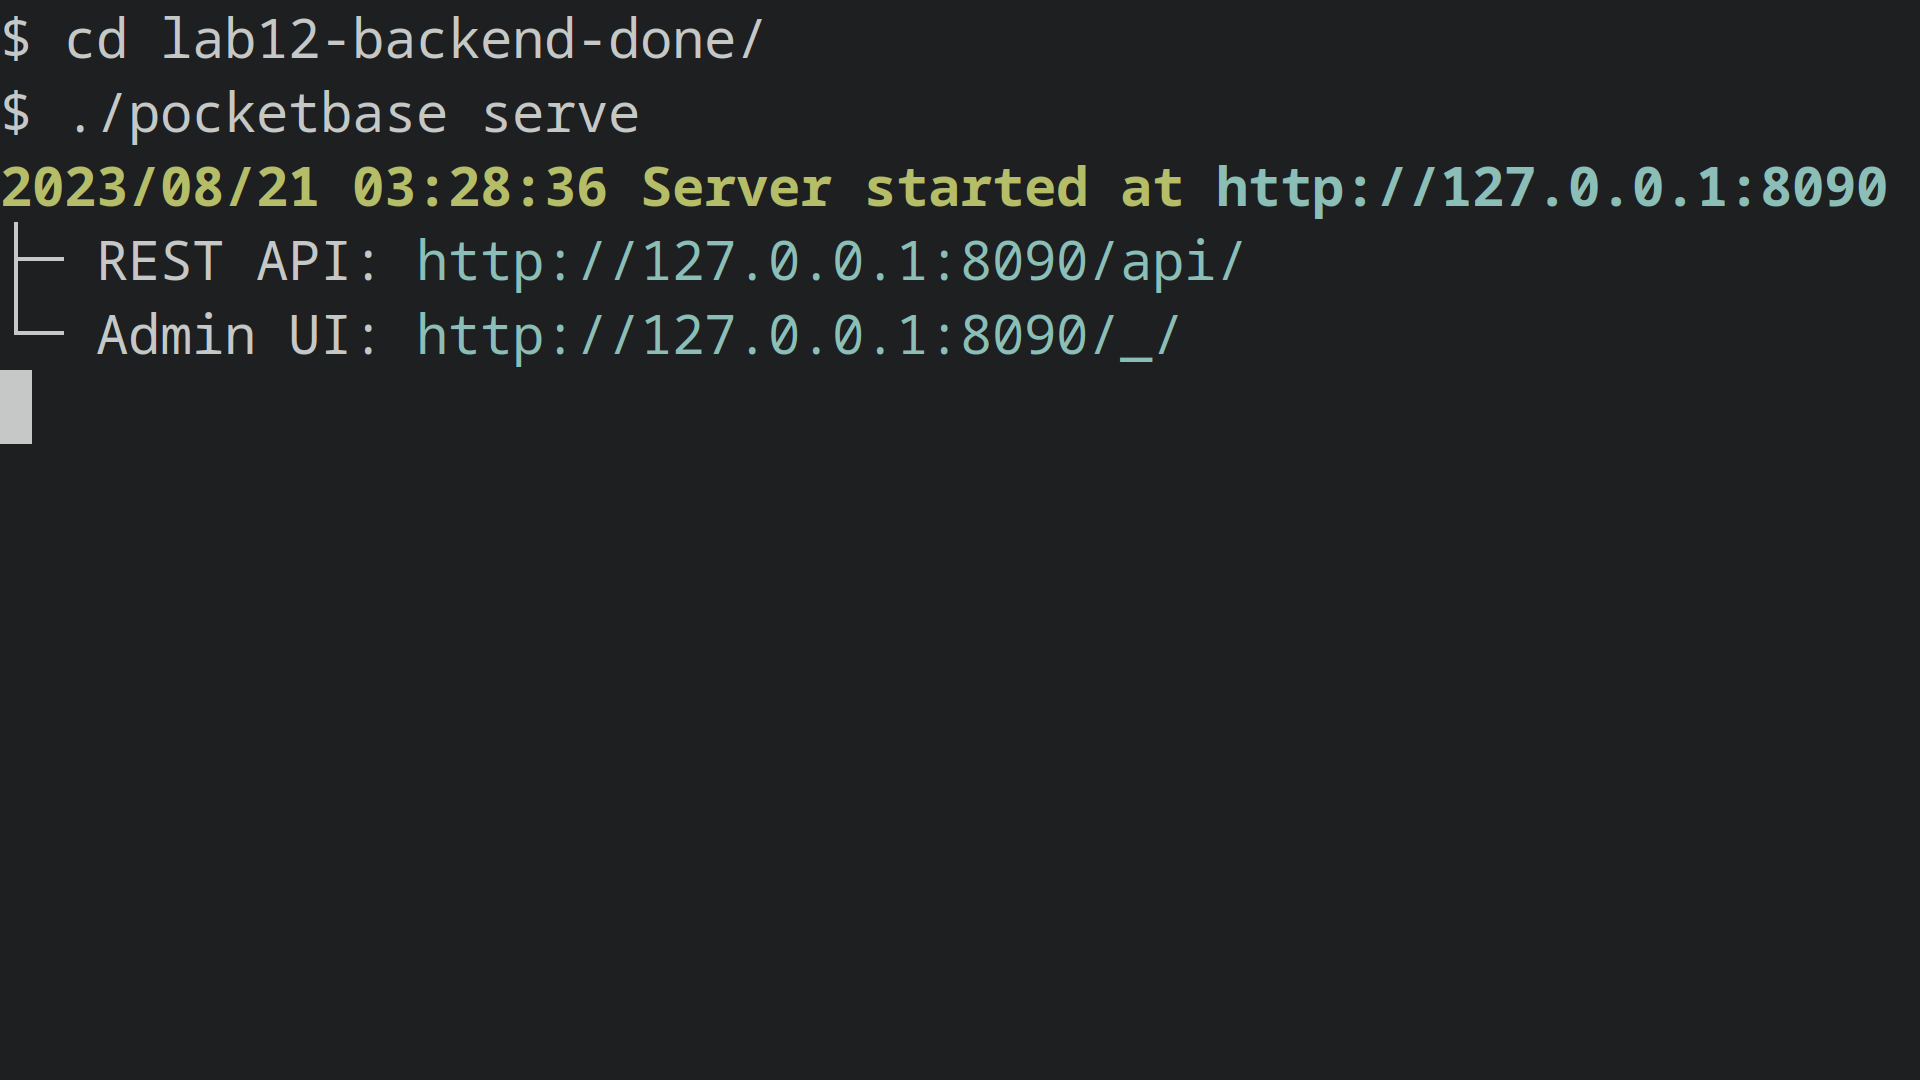
J:\...\lab12\- Run pocketbase from a terminal
./pocketbase serve- DONE!
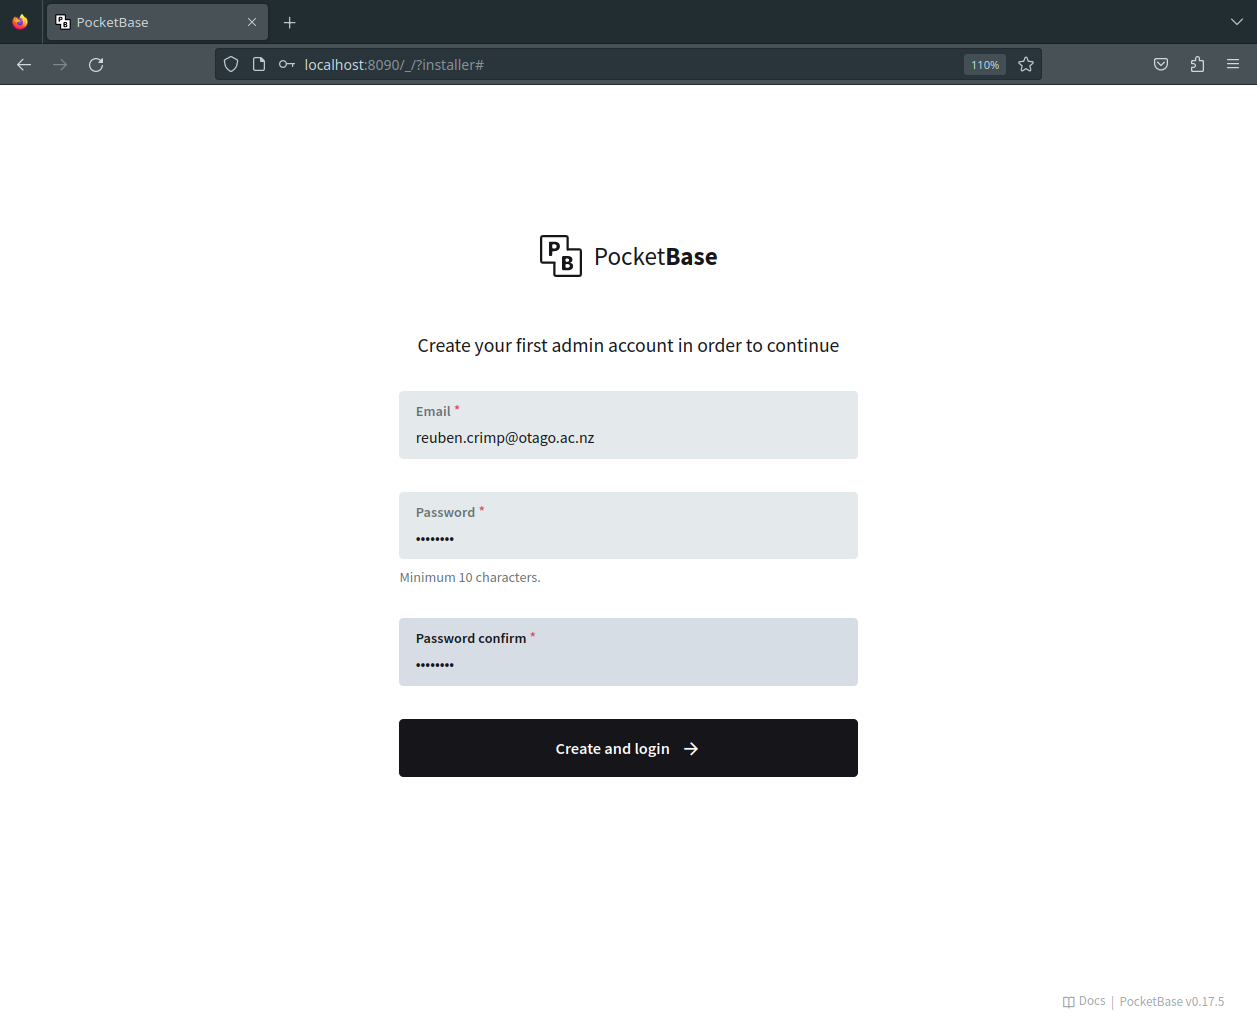
- You can now visit the admin page
- http://localhost:8090/_
- and create a local admin account
./pocketbase serve
For our chat application we want our backend to store and manage chat messages. Each message needs an “author”, “content”, and “timestamp”. PocketBase will automatically generate a unique ID (primary key) for each message, and a “created” field which we can use as the timestamp.
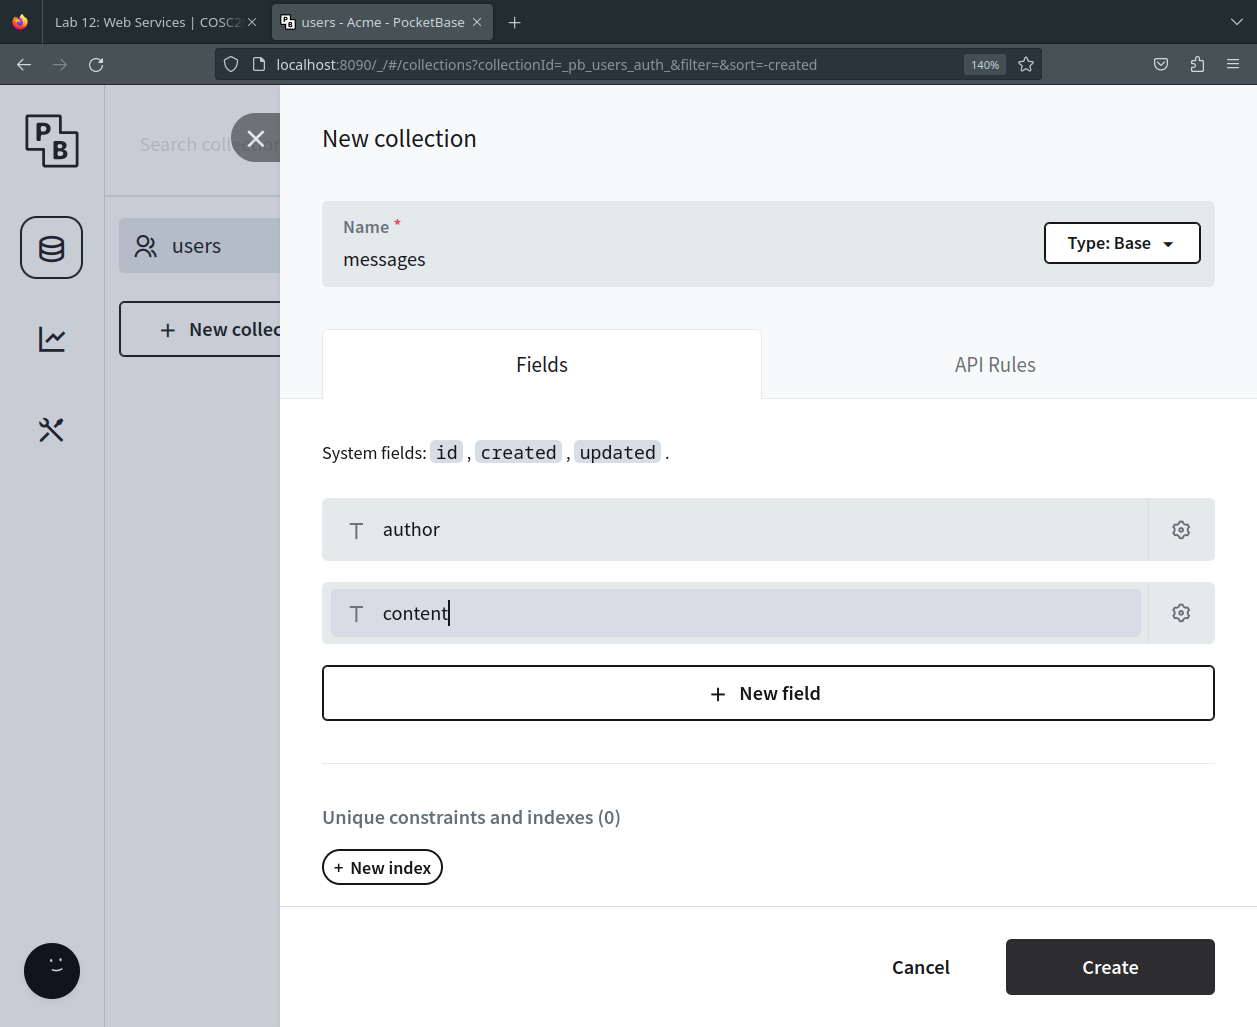
📝 Task 2: Create 'messages' collection
- Click: + New Collection
- Name:
messages- Fields:
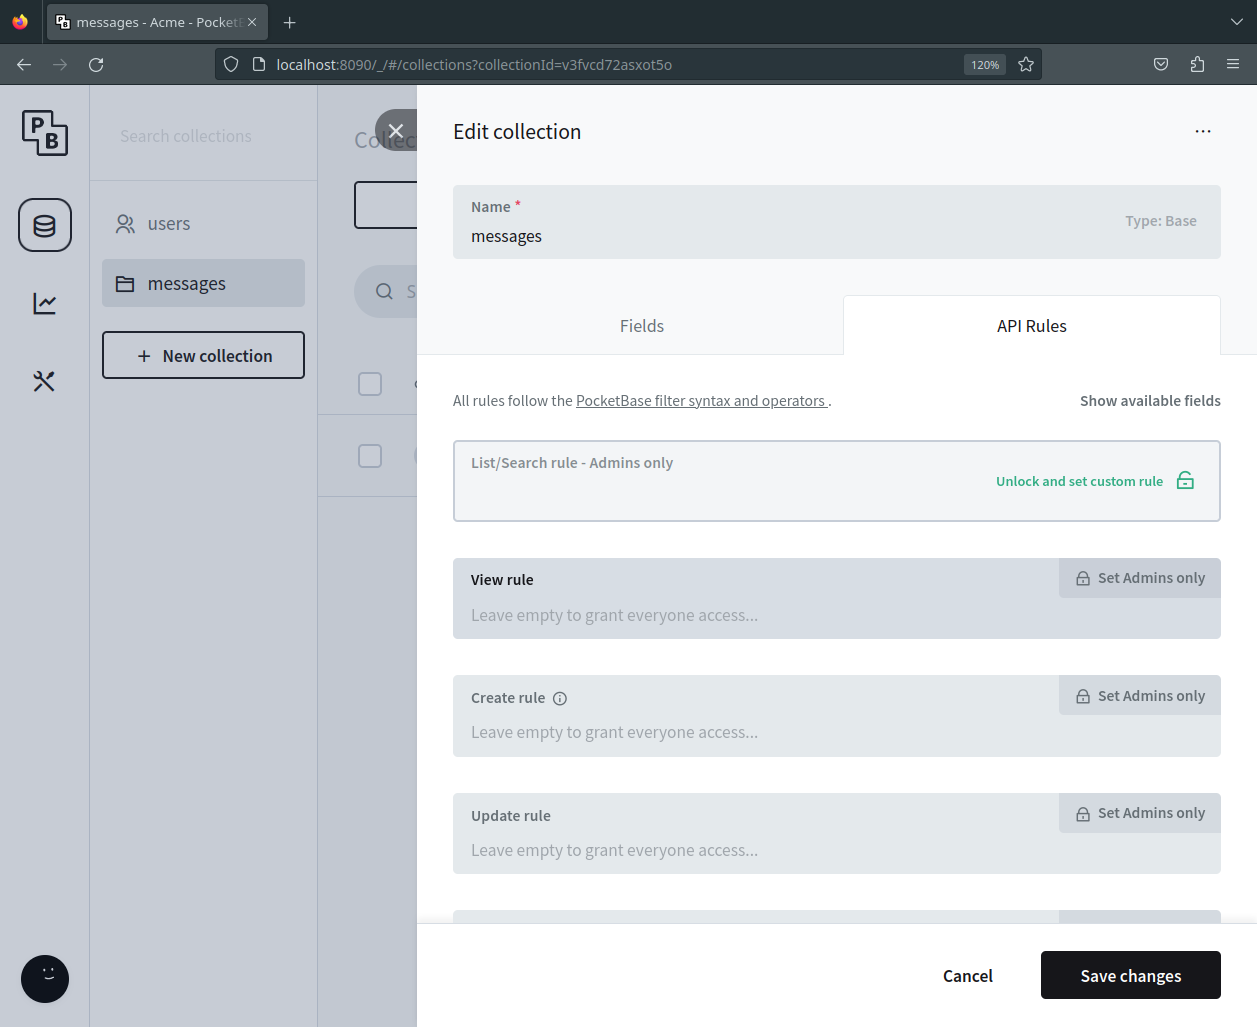
author(Plain Text)content(Plain Text)- Under API Rules
- Unlock all the rules
- All 5 should be unlocked (List, View, Create, Update, Delete)
- If we were serious about security we would also set up proper authentication, but not today.
📝 Task 3: Create records
- Create a few database records, just make up some data.
- Click + New Record
- Fill in the fields (you can leave the ID blank)
- Click Create
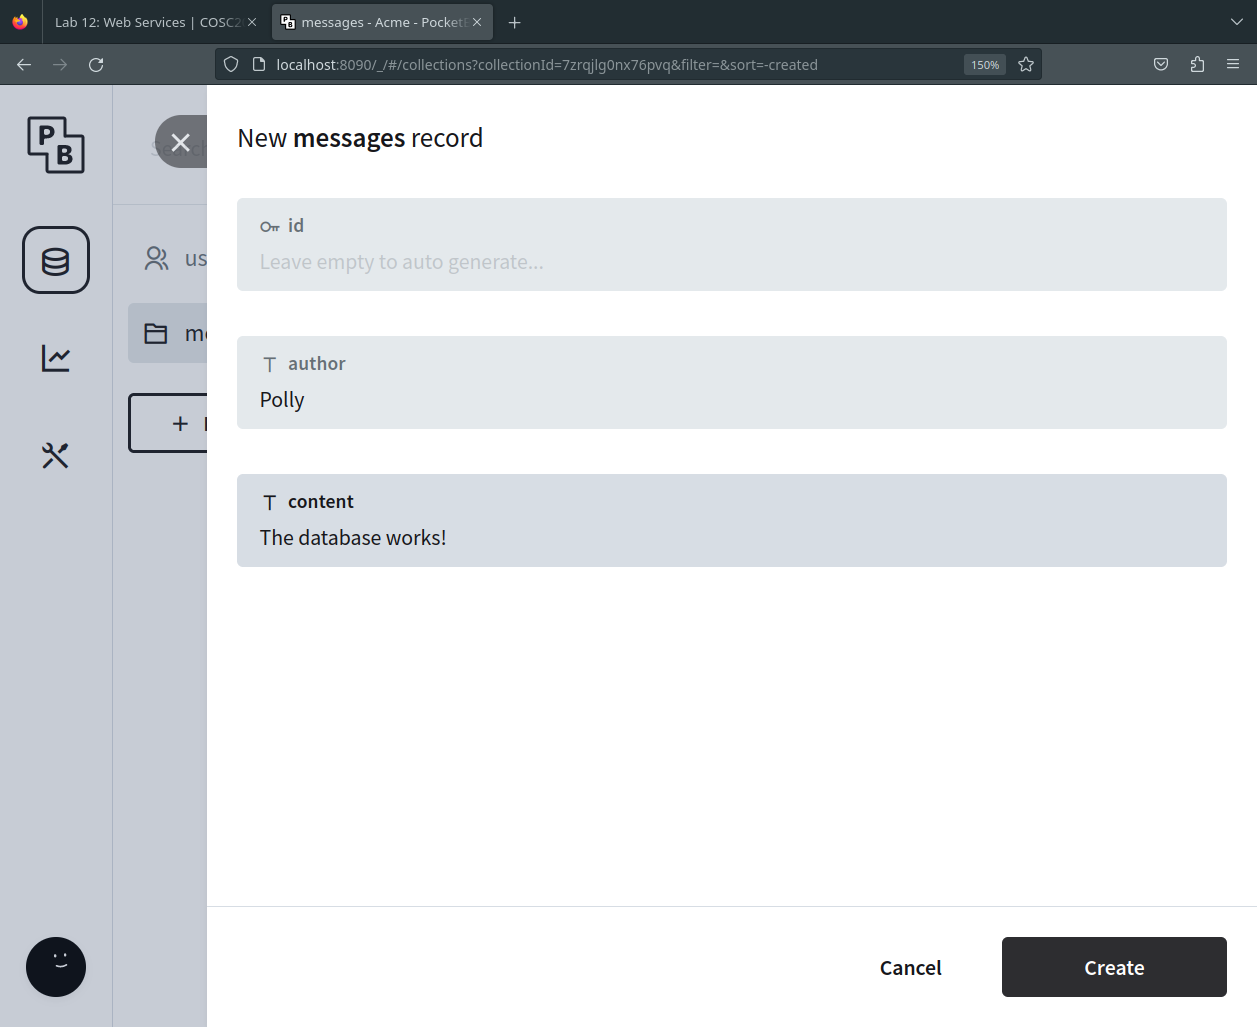
DONE!
Never has a database setup been so simple!
Next lets interact with this data using a RESTful API. We won’t even have to write any SQL! (yet…)
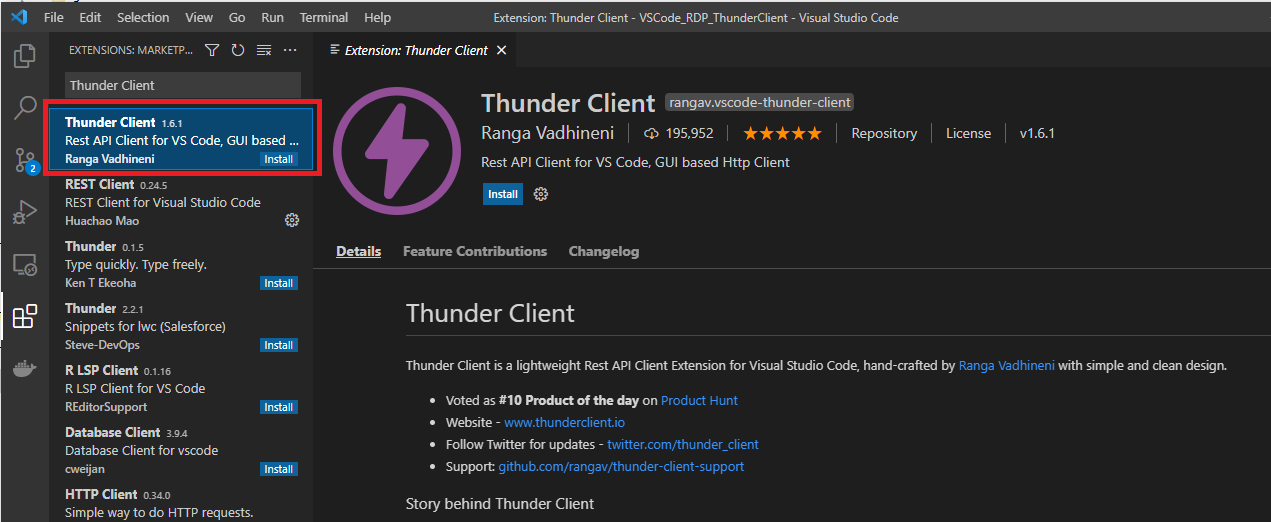
Thunder Client is a VS Code extension for testing APIs (Similar to Postman).
📝 Task 4: Testing the API
- Install Thunder Client
- Open Extension in VSCode to find/install
Thunder Client- Create a new request
- Click the thunderbolt icon ⚡
- Click New Request
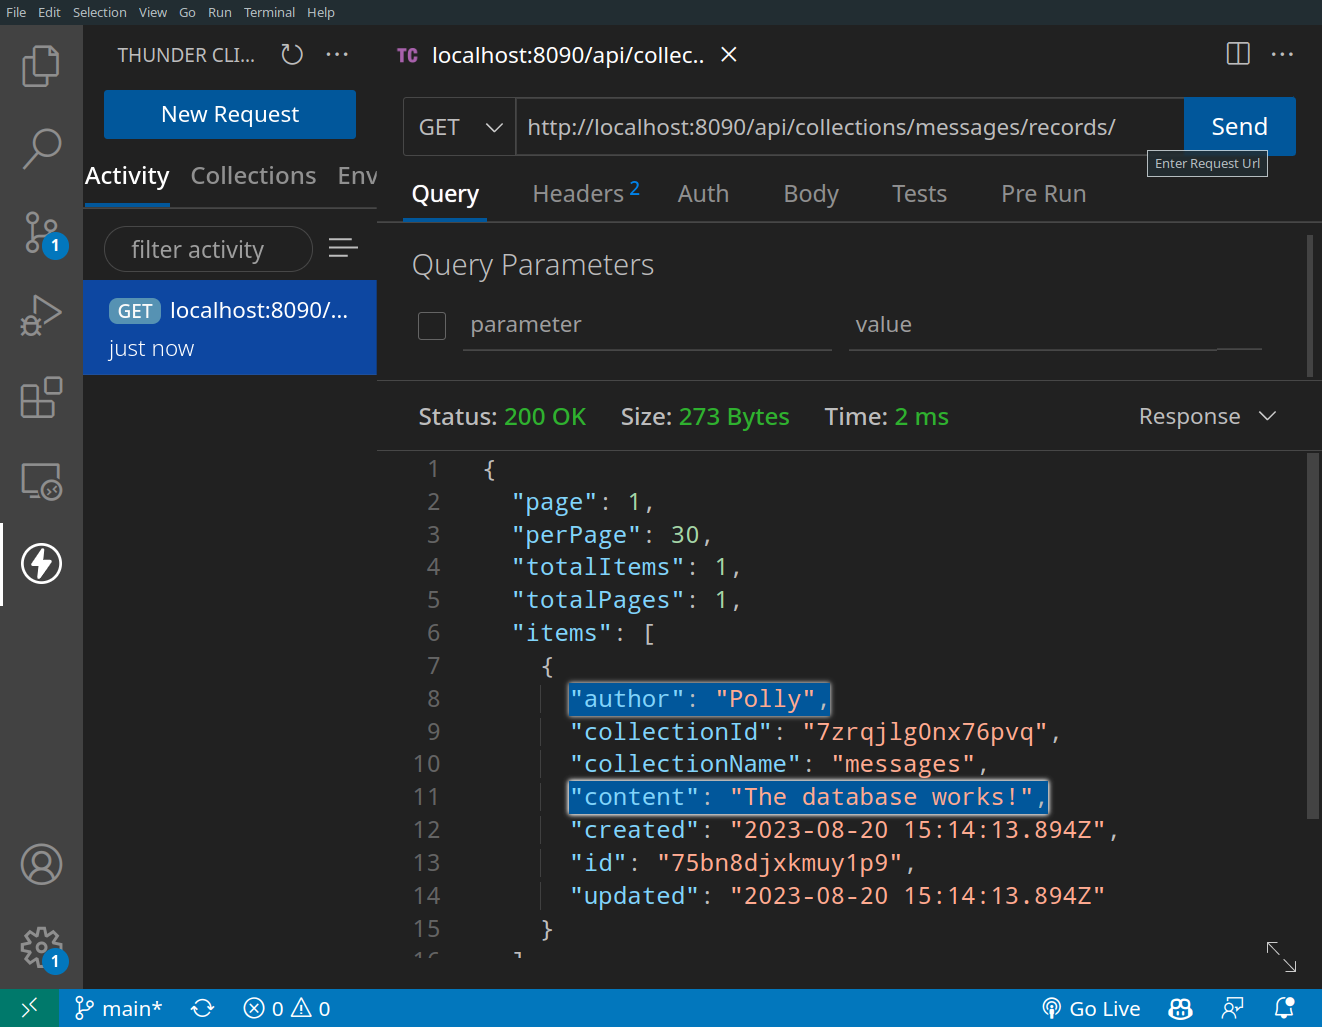
- Configure the request
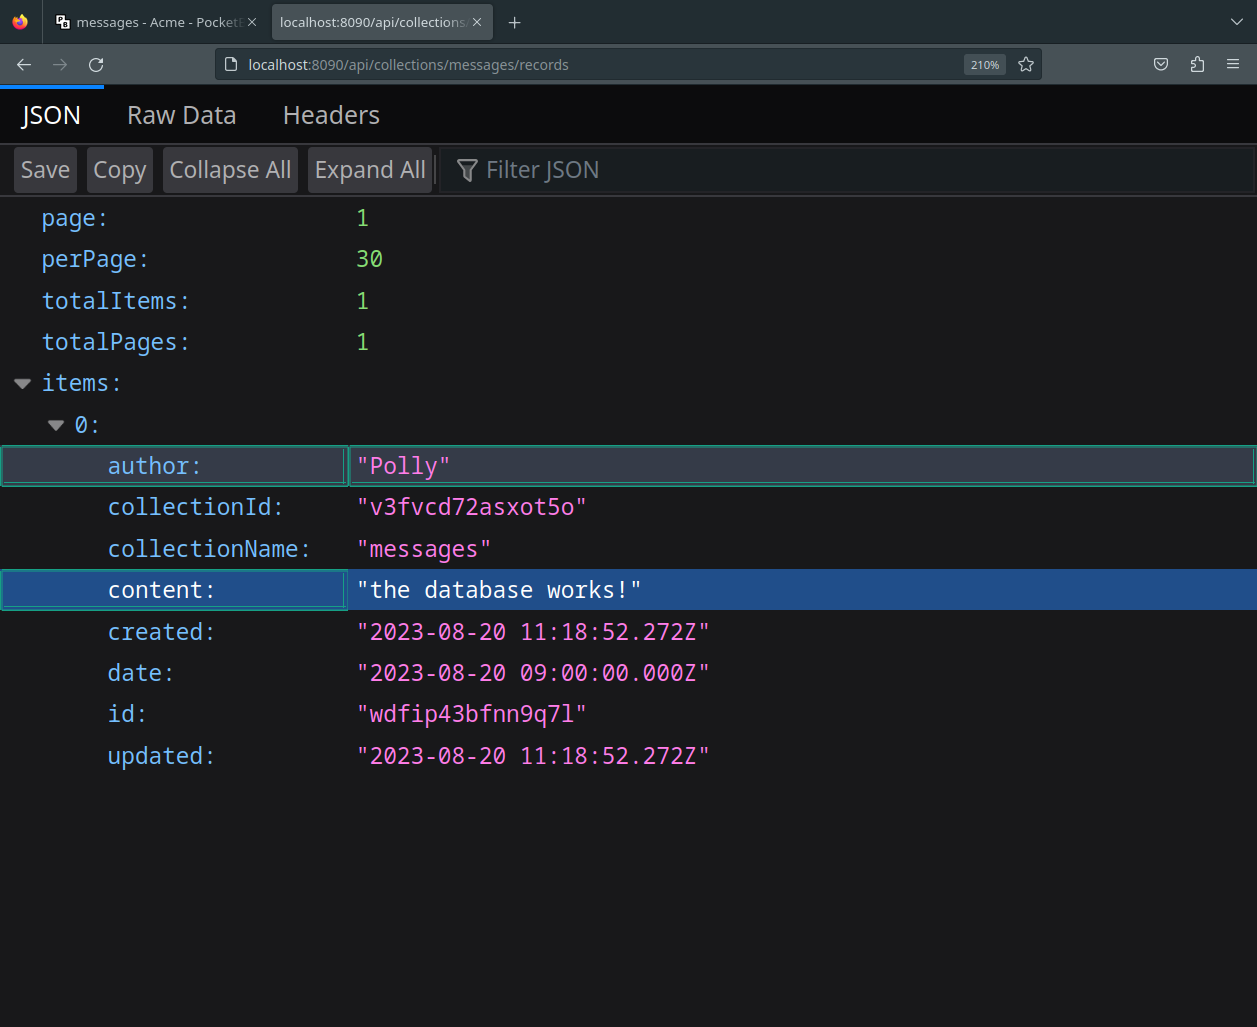
- URL:
http://localhost:8090/api/collections/messages/records/- Method:
GET- Click Send Request
- Voila
- Status Code: 200 OK
- Response Body:
{ "JSON": "data" }
- with your data you made earlier
📝 Task 5: Testing POST/PATCH/DELETE requests
- Create a new request
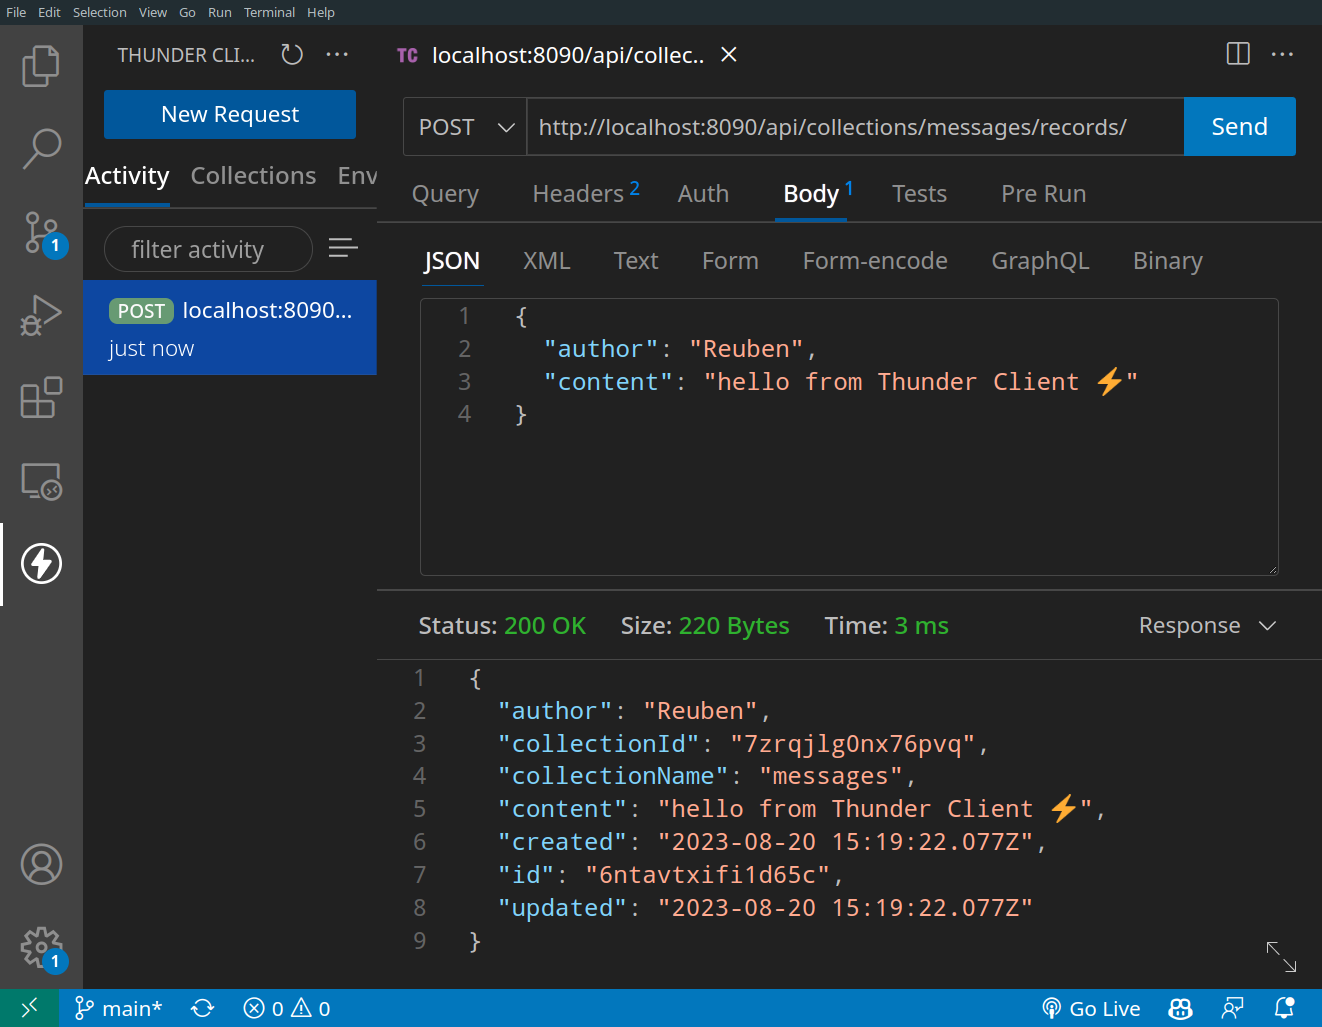
- Configure the request
- Method:
POST- URL:
http://localhost:8090/api/collections/messages/records/- Add the below data to the body (JSON tab)
{
    "author": "Polly",
    "content": "Hello World"
}
- Click Send Request
- If you got 200 OK
- Refresh the PocketBase admin portal to verify the new record was created
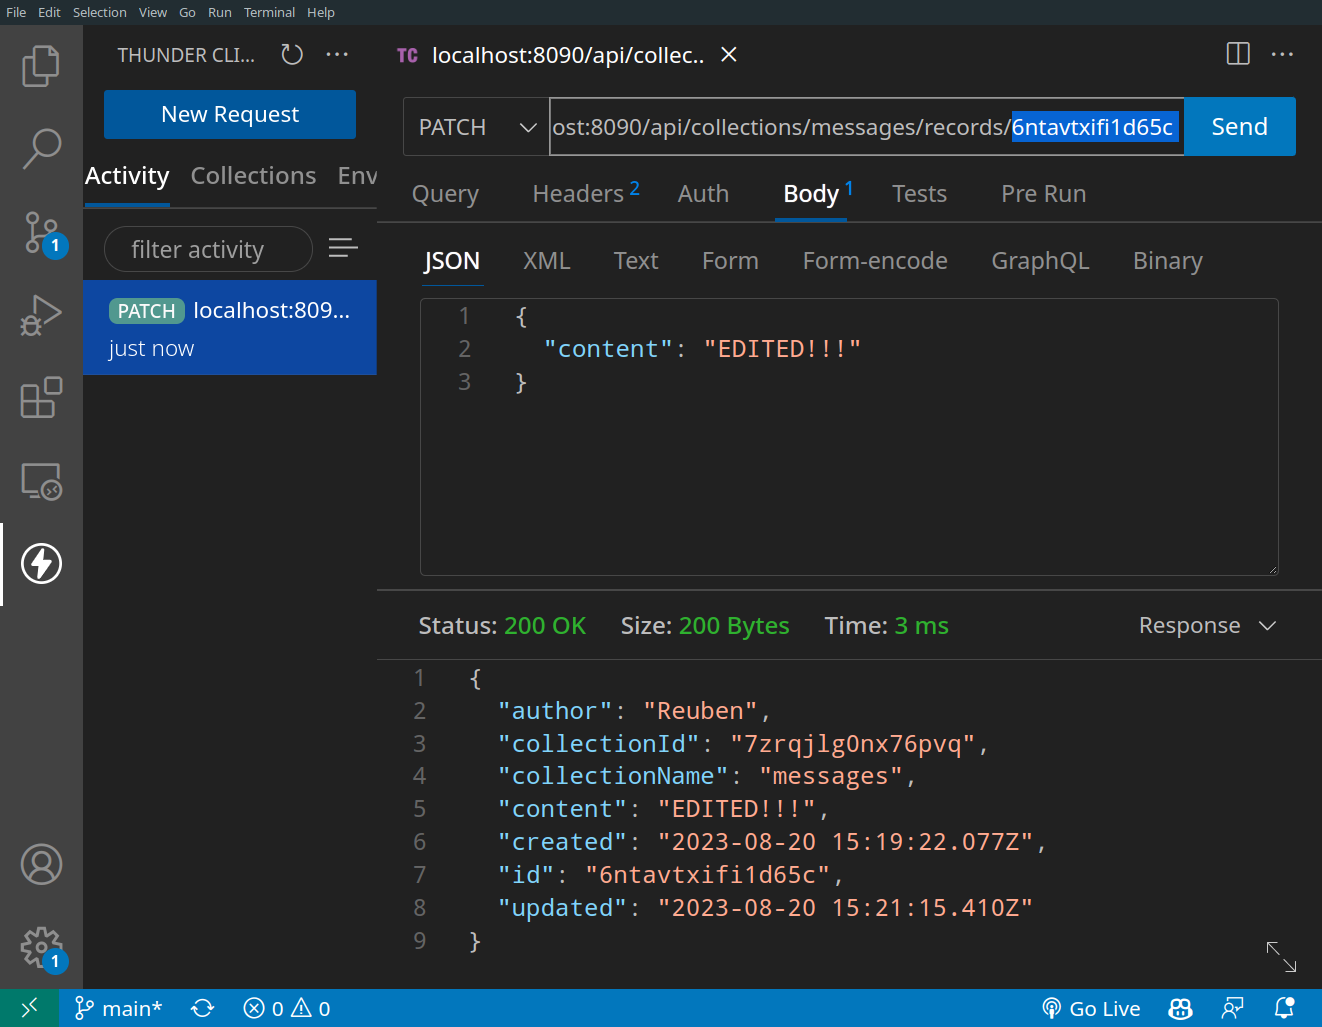
- Test the PATCH and DELETE requests too
- DELETE is for deleting a record
- PATCH is for updating a record
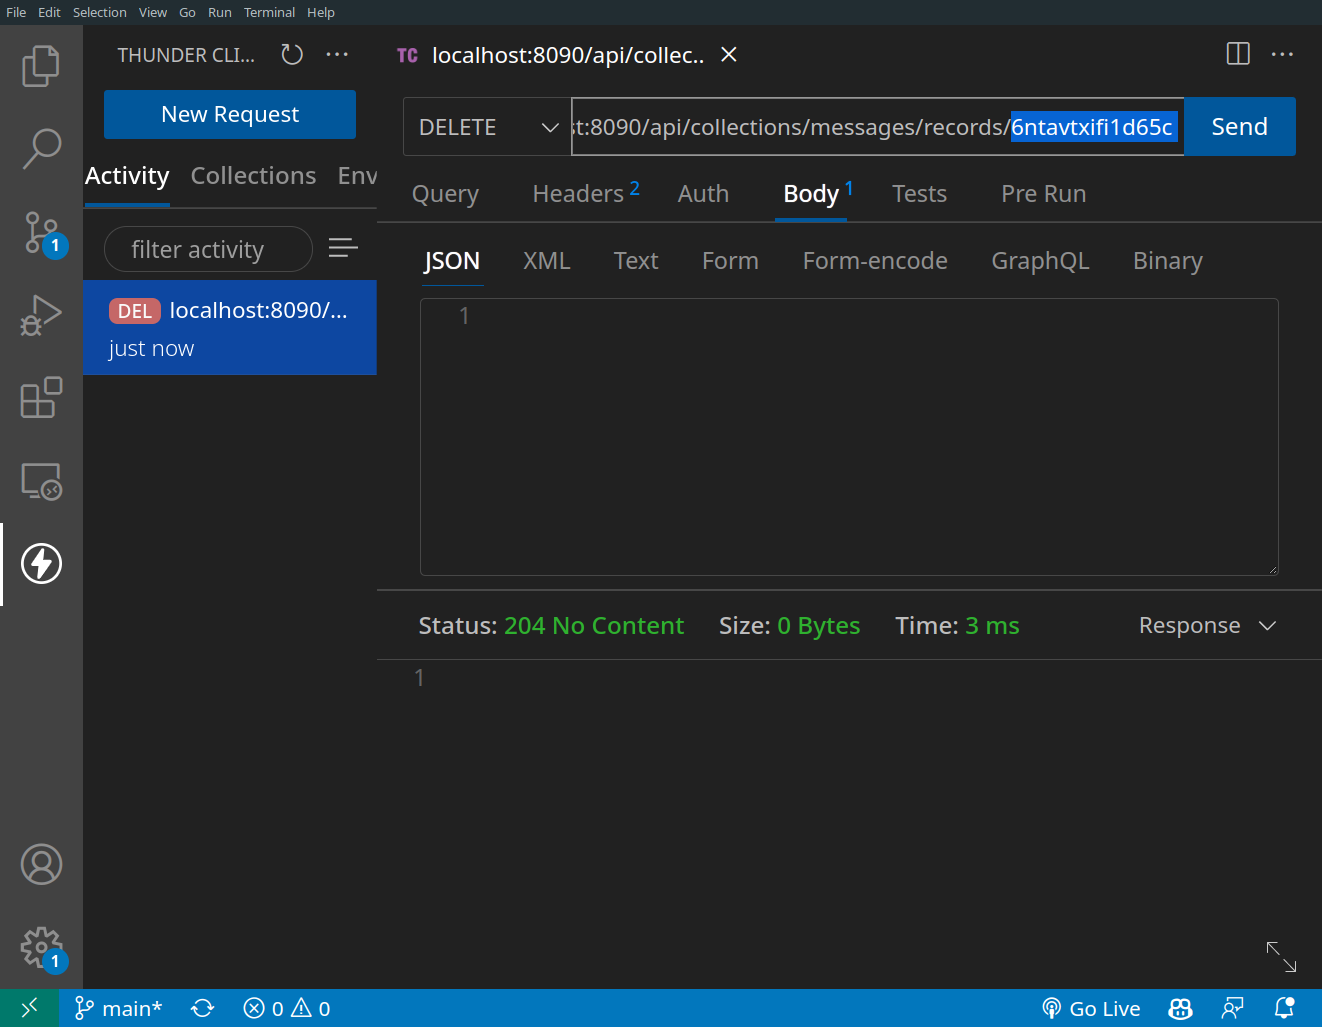
- Both require requires a valid message
idin the URL e.g.
- localhost:8090/api/collections/messages/records/6ntavtxifi1d65c
- DELETE doesn’t need a body
- PATCH needs a body with the data to update
{
    "content" : "this message has been edited"
}
- Verify you can Create, Update, and Delete records through API requests.
We have a fully functioning back-end! And simply by sending a few HTTP requests we can create, read, update, and delete data at will.
✅ TipThese are also known as CRUD opreations.
- Create a message
- Read all the messages
- Update a message
- Delete a message
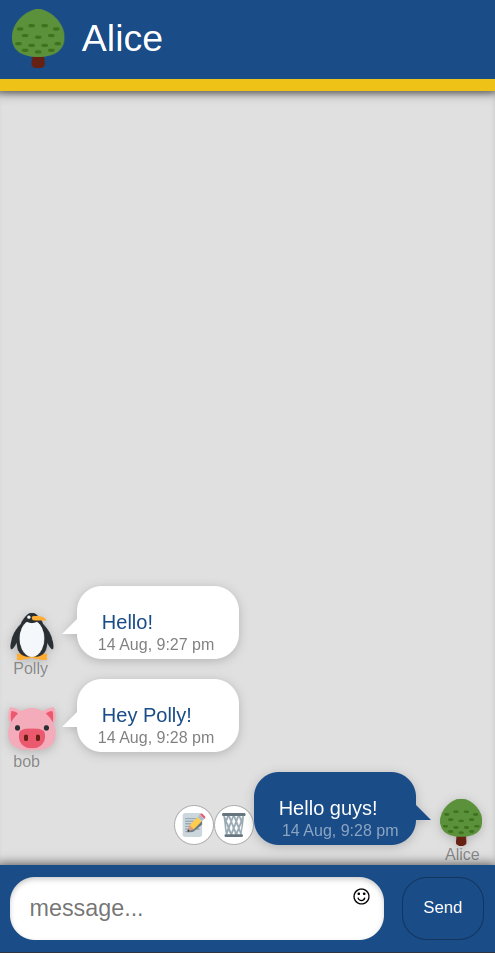
Since this lab is focused on backend development (server-side), we have provided a complete frontend (modified from lab 5). The main differences are the ‘edit’ 📝 and ‘delete’ 🗑️ buttons, as seen in the screenshot below.
Reminder about the server architecture we are building.
📝 Task 6: Setup the frontend
- Download from here. https://altitude.otago.ac.nz/cosc203/code/lab12-frontend
- To host the frontend as a website, either…
- Open an instance of VS Code and use the Live Server extension
- From a terminal run
python -m http.server- You should be able to load messages AND send messages
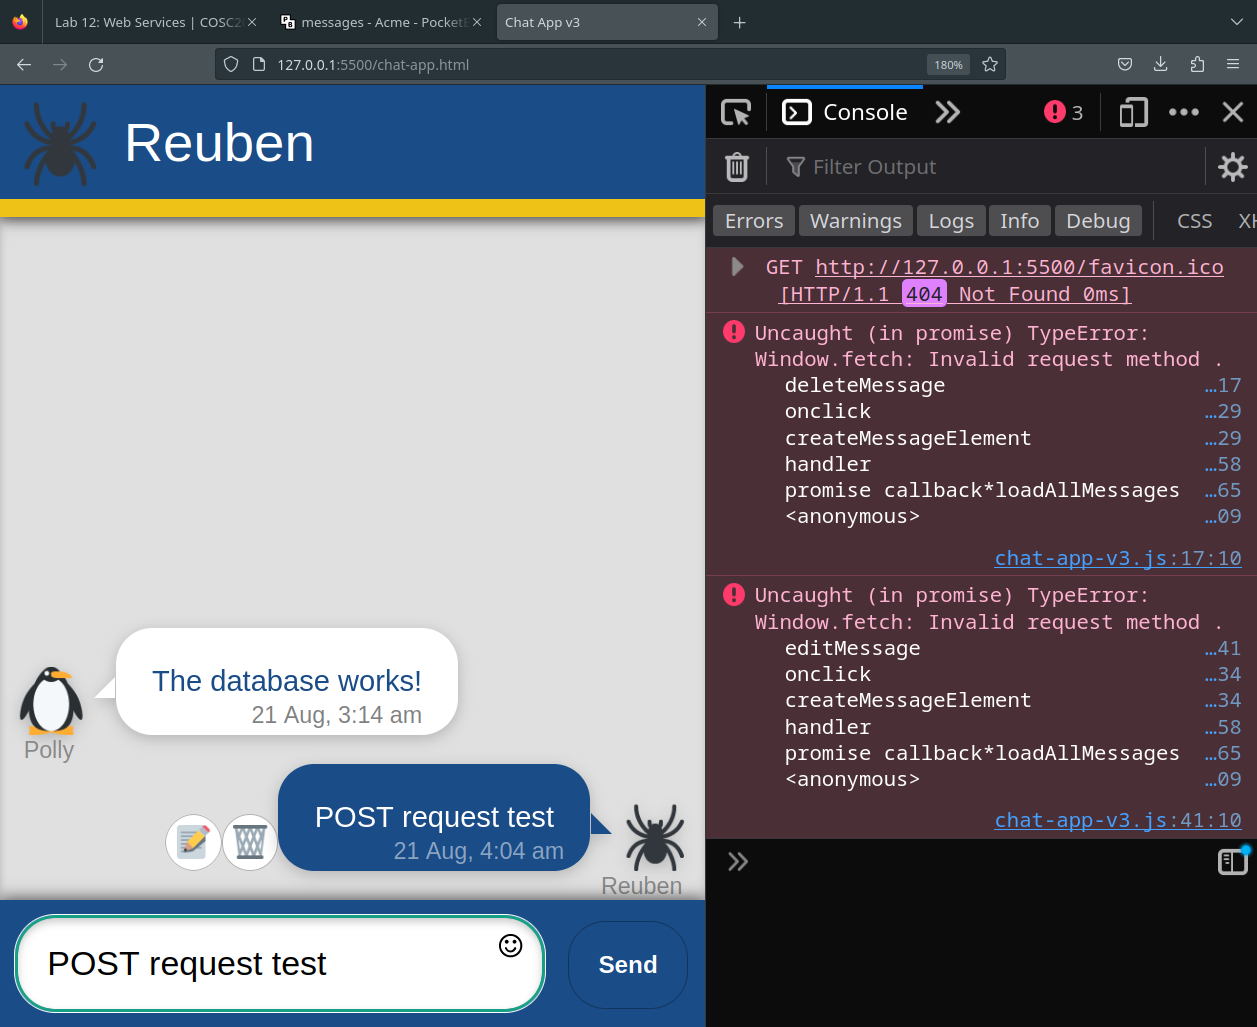
- Editing or deleting should give errors in the dev console
To Update/Delete messages from the frontend we need to send PATCH and DELETE requests to the server using the Fetch API. Most of the code already in chat-app-v3.js. You just need to finish it.
📝 Task 7: Editing and Deleting
- DELETE request
- In
chat-app-v3.jsfindasync function deleteMessage(...)
- change the value of
endpointtoAPI_URL + message_id- change the value of
options.methodto'DELETE'- in the response
handlerfunction:
- if
response.status == 204then- delete the message div via:
chatLogDiv.removeChild(messageElement);- PATCH request
- In
chat-app-v3.jsfindasync function editMessage(...)
- change the value of
endpointtoAPI_URL + message_id- change the value of
options.methodto'PATCH'- change the value of
options.bodytoJSON.stringify({ content: newContent })- in the response
handlerfunction:
- if
response.status == 200thenconsole.log("message edited");- Test the code
- send a message
- edit the message
- delete the message
- check PocketBase to ensure it definitely changed
In this final task we are going to throw away PocketBase and roll our own API server with MySQL as a database.
✅ TipTo close PocketBase, pressCtrl+Cin the terminal that it is runnning on.
📝 Task 8: Setup Backend
- Download this Git repo
- Open (another) instance VS Code
- If you’re using Live Server for the front end, it’s best to leave that running for now.
- Open the terminal within VS Code
- Ctrl + Shift + `
- Terminal > New Terminal
- run
npm install- run
npm run start
- The backend is now live!
- With a web browser visit http://localhost:1337/
The backend will serve
index.htmlif you visit http://localhost:1337/This page contains important documentation that should understand before moving on.
The main file we will be editing is api_server_.js, it is the server-side logic that will
- connect to the database
- repond to HTTP requests
- perform CRUD operations
Your new new backend could use the same URL/endpoints as PocketBase did.
/api/collections/messages/records/This will mean less work changing the frontend.
Take a moment to read through api_server_.js and see if you can figure out what everything does (or ask ChatGPT to explain it).
📝 Task 9: Update your frontendUpdate the frontend to use the new API URL.
- The new backend should be on port
1337, not8089const API_URL = 'http://localhost:1337/api/collections/messages/records/';
The below code is the CORS Policy. It informs web browsers which websites are allowed to access your backend web service. It’s largely a protection against random websites hotlinking your resources, and spamming your server, wasting valuable bandwidth and CPU time.
It’s not proper security, it won’t stop a bonafide hacker, but it is a requirement for compliant web browsers.
// CORS policy headers: allow all domains
app.options('*', (request, response) => {
	response.header('Access-Control-Allow-Origin', '*');
	response.header('Access-Control-Allow-Methods', 'GET, POST, PATCH, DELETE');
	response.header('Access-Control-Allow-Headers', 'Content-Type');
	response.send();
})
✅ TipTo restrict the backend API to only communicate with your frontend, simply replace the
*with your domain name. e.g.www.example.comresponse.header('Access-Control-Allow-Origin', 'www.example.com');
You have 3 options:
- Install MySQL on your own computer and skip to section 5.1
- Use the VirtualBox
cosc203VMfrom labs 7-10 - Docker (the easiest solution imho)
- Login to your database (if you remember the password)
mysql -u <username> -p
- Run the provided script
sql/db_setup.sql
source sql/db_setup.sql
If you install MySQL locally it’s HOST:PORT should be 127.0.0.1:3306
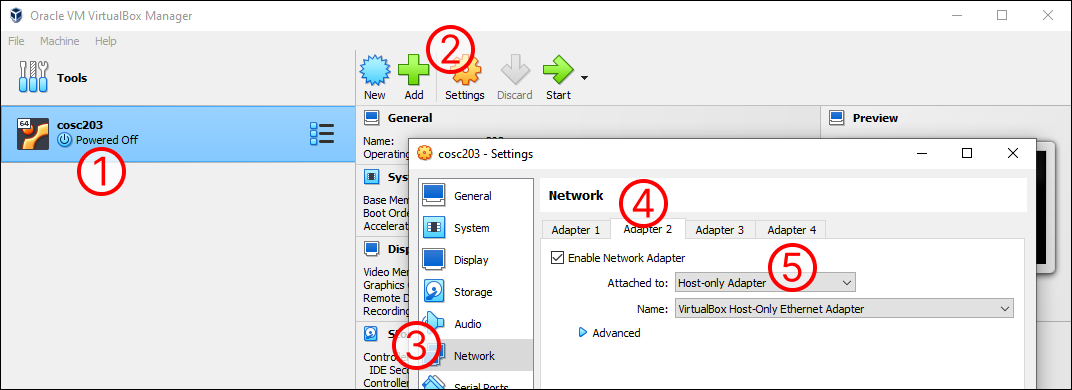
To use the VirtualBox cosc203VM, you need to change some settings.
- Power off the VM
- Settings
- Network
- Adapter 2
- Attached to: Host-only Adapter
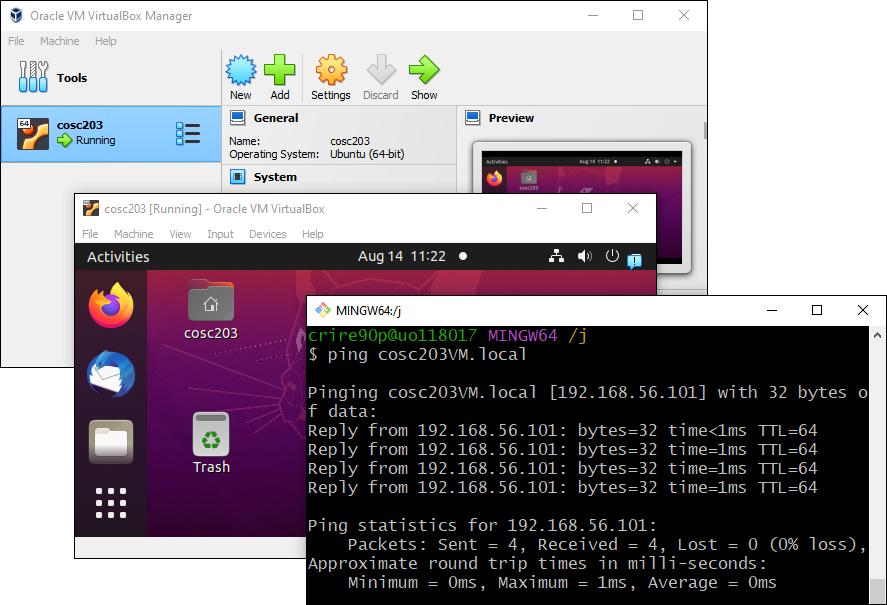
Test this by pinging the VM from your host machine.
ping cosc203VM.local
Run the provided script sql/db_setup.sql
mysql> source sql/db_setup.sql
Option #3 Docker: More simple than VirtualBox, and more clean than installing MySQL locally. Docker is a popular tool for lightweight virtual machines (but no GUI).
The provided backend code contains docker-compose.yml, which is setup for MySQL.
- Docker on lab computers
- Launch
Docker Desktop(it will give you an error) - From a shell run
wsl --install -d Ubuntuwsl --update- If/when windows requires admint privileges, click cancel
- Launch
Docker Desktopagain
- Launch
- Your own computer
- Install Docker Desktop, then run the following commands:
cd sql
docker compose up -d
docker exec -it cosc203_lab12_mysql mysql -u root -p
mysql> source sql/db_setup.sql
password is password haha
📝 Task 10: no taskName
- Use one of the three methods above to get a running instance of MySQL
- Run the provided script
sql/db_setup.sqlmysql> source sql/db_setup.sql
Lets connect our backend to the database. There is a node package called mysql2 which can connections and queries easily.
📝 Task 11: Install mysql2
- First, kill the server
Ctrl + C(even on macOS it’s CTRL + C)- run
npm install mysql2- Restart the server with
npm run start- Connect to MySQL
- copy the below code into
api_server_.js- paste it under the imports
- but before everything else
// Database
const mysql2 = require('mysql2');

const pool = mysql2.createPool({
    // host: 'cosc203VM.local', // Lab machine Virtual Box
    host: '127.0.0.1', // local MySQL or Docker
    // port: 3306,
    user: 'cosc203',
    password: 'password',
    database: 'CHATAPP',
    charset: 'utf8mb4',
    waitForConnections: false,
    connectionLimit: 10,
    queueLimit: 0,
    multipleStatements: true,
});
If using the
cosc203VM, you’ll need to change the DB connection’s hosthost: 'cosc203VM.local', // Lab machine Virtual Box
✅ TipWhen you saveapi_server_.jsthe server auto-restarts. This is because of the node packagenodemonwhich monitors file changes, and restarts the project.
Let’s start with the Read requests. api_server_.js already includes a GET endpoint for requesting messages: /api/collections/messages/records/. However, it only returns a single hard coded message.
Lets replace the boring hard coded response with a database query!
📝 Task 12: Retrieve data from the DB
- Replace the hard coded response with a database query
- modify the existing
app.get(...)with the code belowapp.get('/api/collections/messages/records/', async (request, response) => { // acquire a DB connection const db = pool.promise(); // query the database const [rows, fields] = await db.query("SELECT * FROM Messages;"); // set HTTP response headers response.header('Access-Control-Allow-Origin', '*'); response.header('Content-Type', 'application/json'); // send messages as JSON response.status(200); response.send(JSON.stringify({ items: rows })); })If done correctly, the chat app can now receive data from the database!
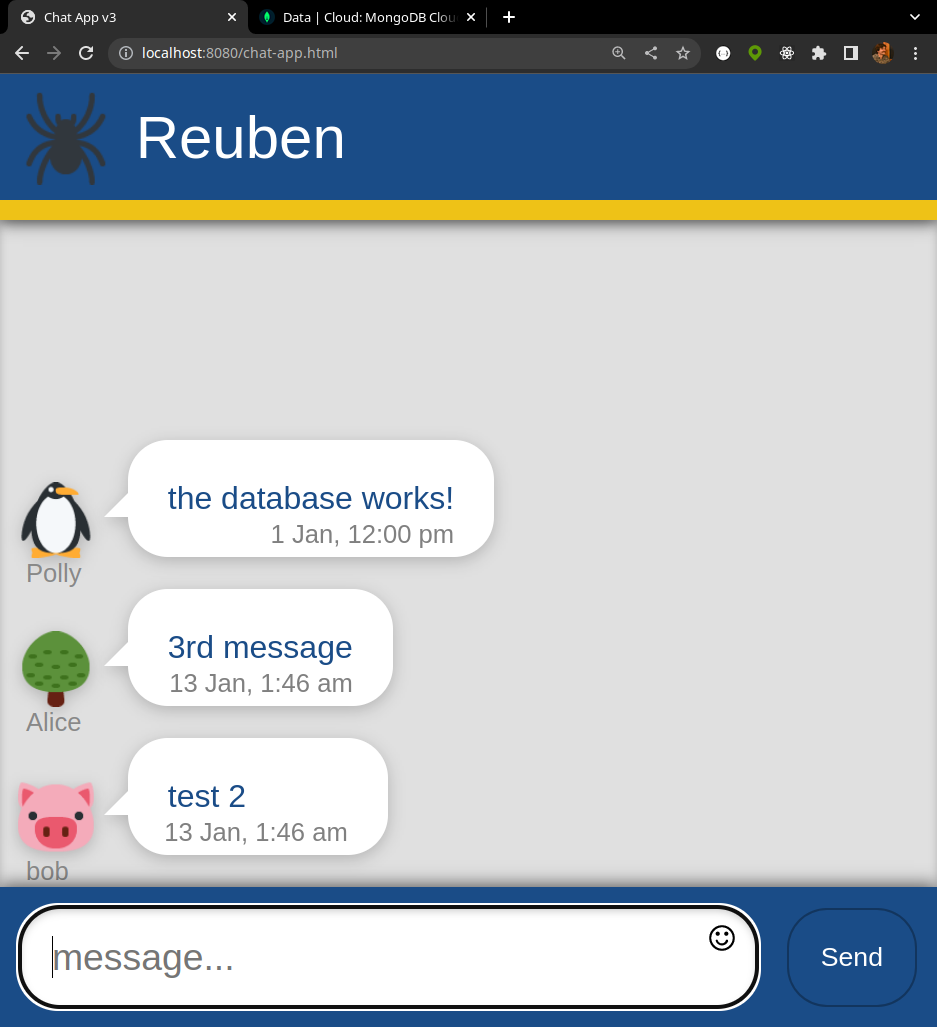
In lab 5 we created new messages by sending a POST request to the endpoint /send-message/. In this lab, we have renamed the endpoint /api/collections/messages/records/
Here’s the front-end code sets up the POSTS request.
const options = {
    method: 'POST',
    body: JSON.stringify({
        'author': userName,
        'content': msgInput.value,
    }),
    headers: { 'Content-Type': 'application/json' }
}
As you can see above (and may remember from lab 5) we put the message data in the body of the POST request. On the server side, we can access the contents of the body with request.body.
📝 Task 13: Create MessagesCreate new messages in the database
- In
api_server_.jsfindapp.post('/api/create-message', ... )
- remove:
response.status(500);
response.send();
- Replace it with the following code:
app.post('/api/collections/messages/records/', async (request, response) => {
	const { author, content } = request.body;
	const db = pool.promise();
    const stmt = "INSERT INTO Messages (author, content) VALUES (?, ?);"
	const [rows, fields] = await db.query(stmt, [author, content]);

	response.header('Access-Control-Allow-Origin', '*');
	response.header('Content-Type', 'application/json');

	response.status(200);
	response.send(JSON.stringify({ rows }));
})
- Test that you can send messages from the front-end to the DB
- send a message
- check MySQL to ensure it’s definitely there
Next we will add the ability to delete messages.
📝 Task 14: Delete Messages
- Add the following code to
api_server_.js// CRUD: delete message app.delete('/api/collections/messages/records/:id', async (request, response) => { const message_id = Number(request.params.id); const db = pool.promise(); const [rows, fields] = await db.query("DELETE FROM Messages WHERE id = ?;", [message_id]); response.header('Access-Control-Allow-Origin', '*'); response.status(204) response.send(); })
- Test the code
- send a message
- delete the message
- check MySQL to ensure it definitely changed
📝 Task 15: Edit Messages
- Add the following code to
api_server_.js// CRUD: update message app.patch('/api/collections/messages/records/:id', async (request, response) => { const message_id = Number(request.params.id); const content = request.body.content; const db = pool.promise(); const stmt = "UPDATE Messages SET content = ? WHERE id = ?;" const [rows, fields] = await db.query(stmt, [content, message_id]); response.header('Access-Control-Allow-Origin', '*'); response.header('Content-Type', 'application/json'); response.status(200); response.send(JSON.stringify({ rows })); })
- Test the code
- send a message
- edit the message
- check MySQL to ensure it definitely changed
✅ TipThis is an optional task. It’s not required for the lab, but it’s good practice.
It’s good practice to keep authentication data (like passwords) separate from your actual code. Keep them secret and protected. For example, storing passwords within a Git repo is a security breach. We could instead store passwords as environment variables.
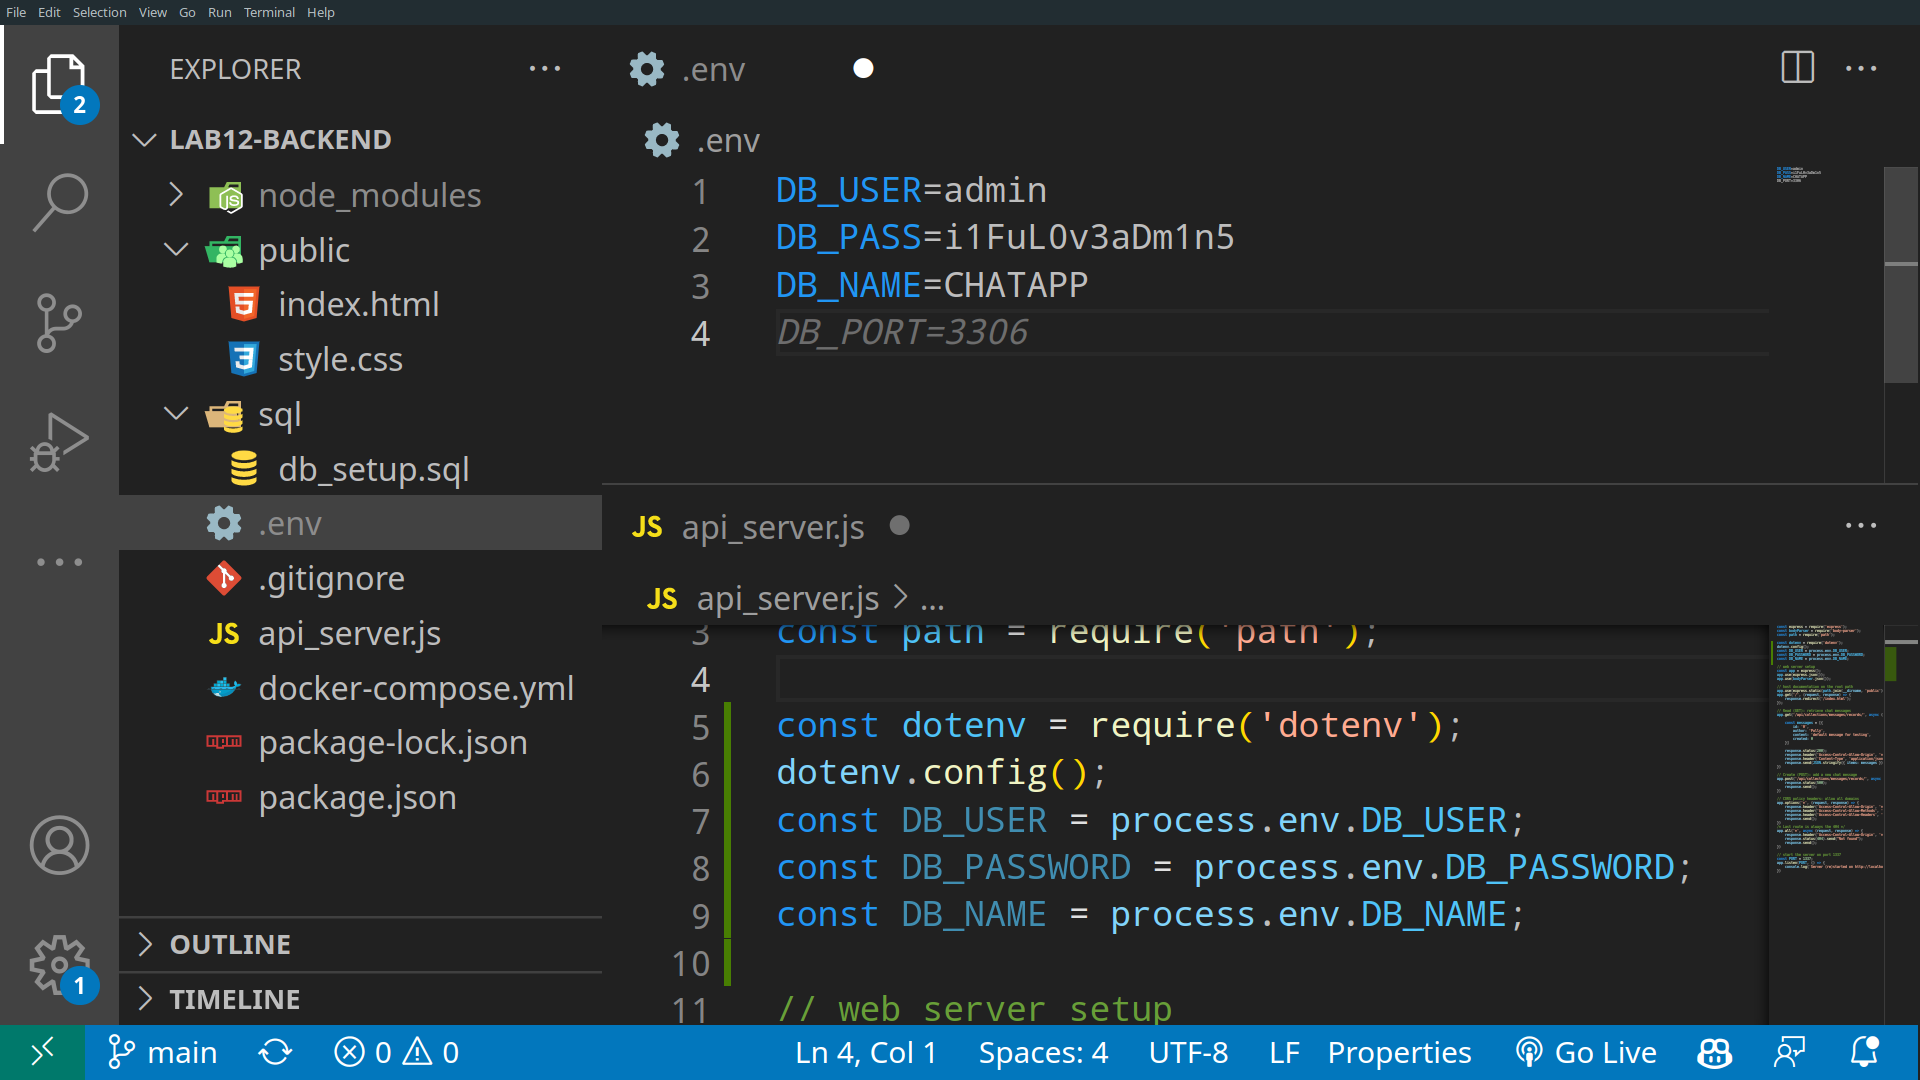
📝 Task 16: Environment Variables
- Create a file called
.envin the root directory of your backend.DB_USER=admin DB_PASS=MoreSecurePasswordHere
- install the
dot-envpackage:npm install dotenv- Add the following code to
api_server_.jsconst dotenv = require('dotenv'); dotenv.config();
- access the user/password
const db_user = process.env.DB_USER;
const db_pass = process.env.DB_PASS;
- Create a new database user with a secure password
CREATE USER 'dbuser' IDENTIFIED BY 'MoreSecurePasswordHere';
GRANT ALL ON *.* TO 'dbuser' WITH GRANT OPTION;
- Update the database connection code
- Update
.gitignoreto ignore your.envfile
This lab is worth marks. be sure to get signed off.