
Lab 11: Path Routing (with Express)
🎯 Lab ObjectiveBuild web servers with Express.
This lab teaches the following concepts:
- Synchronous page loading
- Path Routing with Express
- Query Parameters
- POST requests
Table of Contents
A web clients send HTTP requests, web servers respond with HTTP responses. In Lab 5 learned how fetch() can be used for HTTP requests and responses. Now, lets learn how web browsers use HTTP requests and responses during the initial page load.
Lets inspect what happens when loading a page using the Dev Tools Network Tab in Google Chromes.
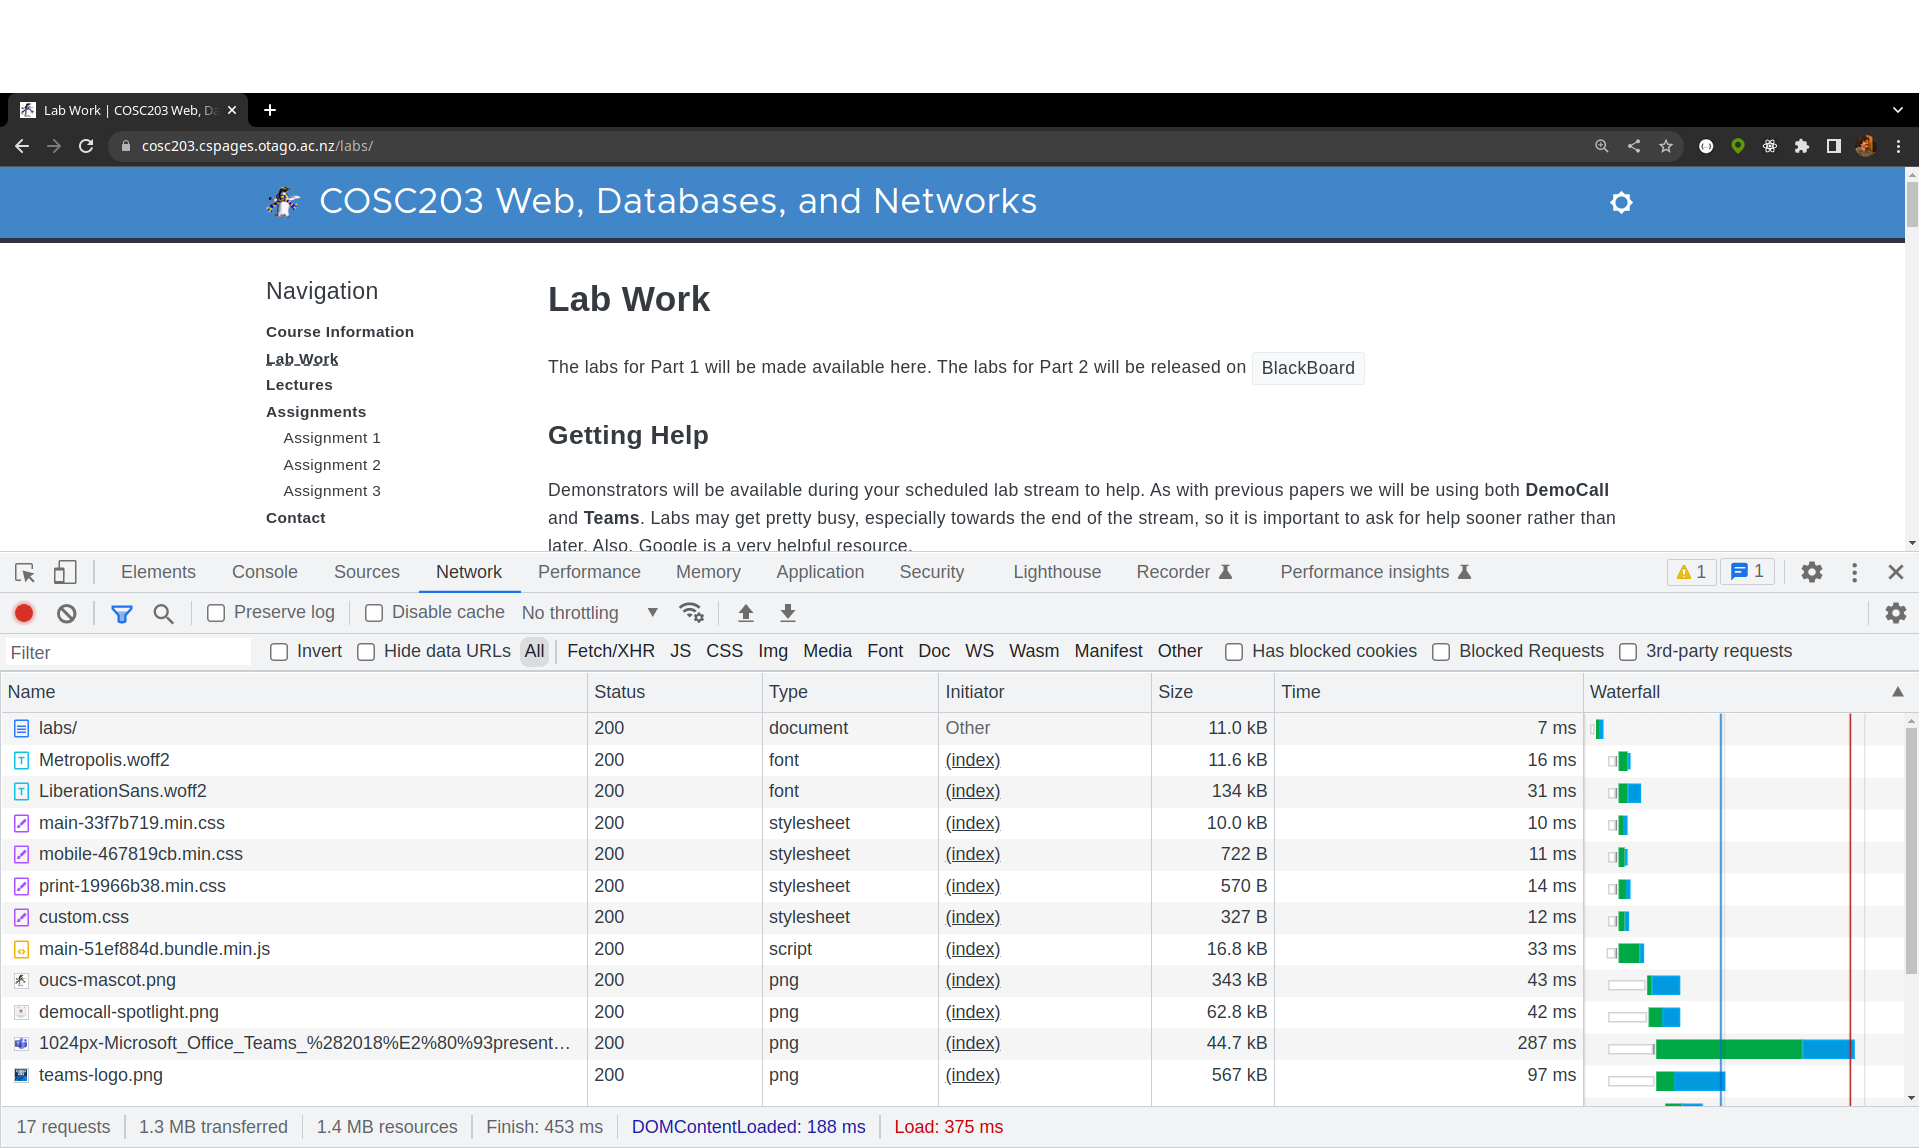

In a Web Browser, the top area is called the Navigation Bar. sThe displayed page is called the Viewport.
To load a page: the browser first puts a URL in the navigation bar. Where a URL is a string with specific parts
             host name    port
          ┌──────┴──────┐ ┌┴─┐
  https://www.example.com:1234/blog/august.html?tag=networking&order=newest#top
  └─┬─┘   └────────┬─────────┘└───────┬───────┘└────────────┬─────────────┘└─┬┘
 protocol     authority         resource path        query params         fragment
- protocol is usually
httporhttps - host name is usually a domain (or sometimes an IP address)
www.is a subdomain.comis a top-level domain
- port is optional, as it defaults to 80 for
httpor 443 forhttps - resource path identifies a specific resource, usually an HTML document like:
index.html - query and fragment are optional, more about them later…
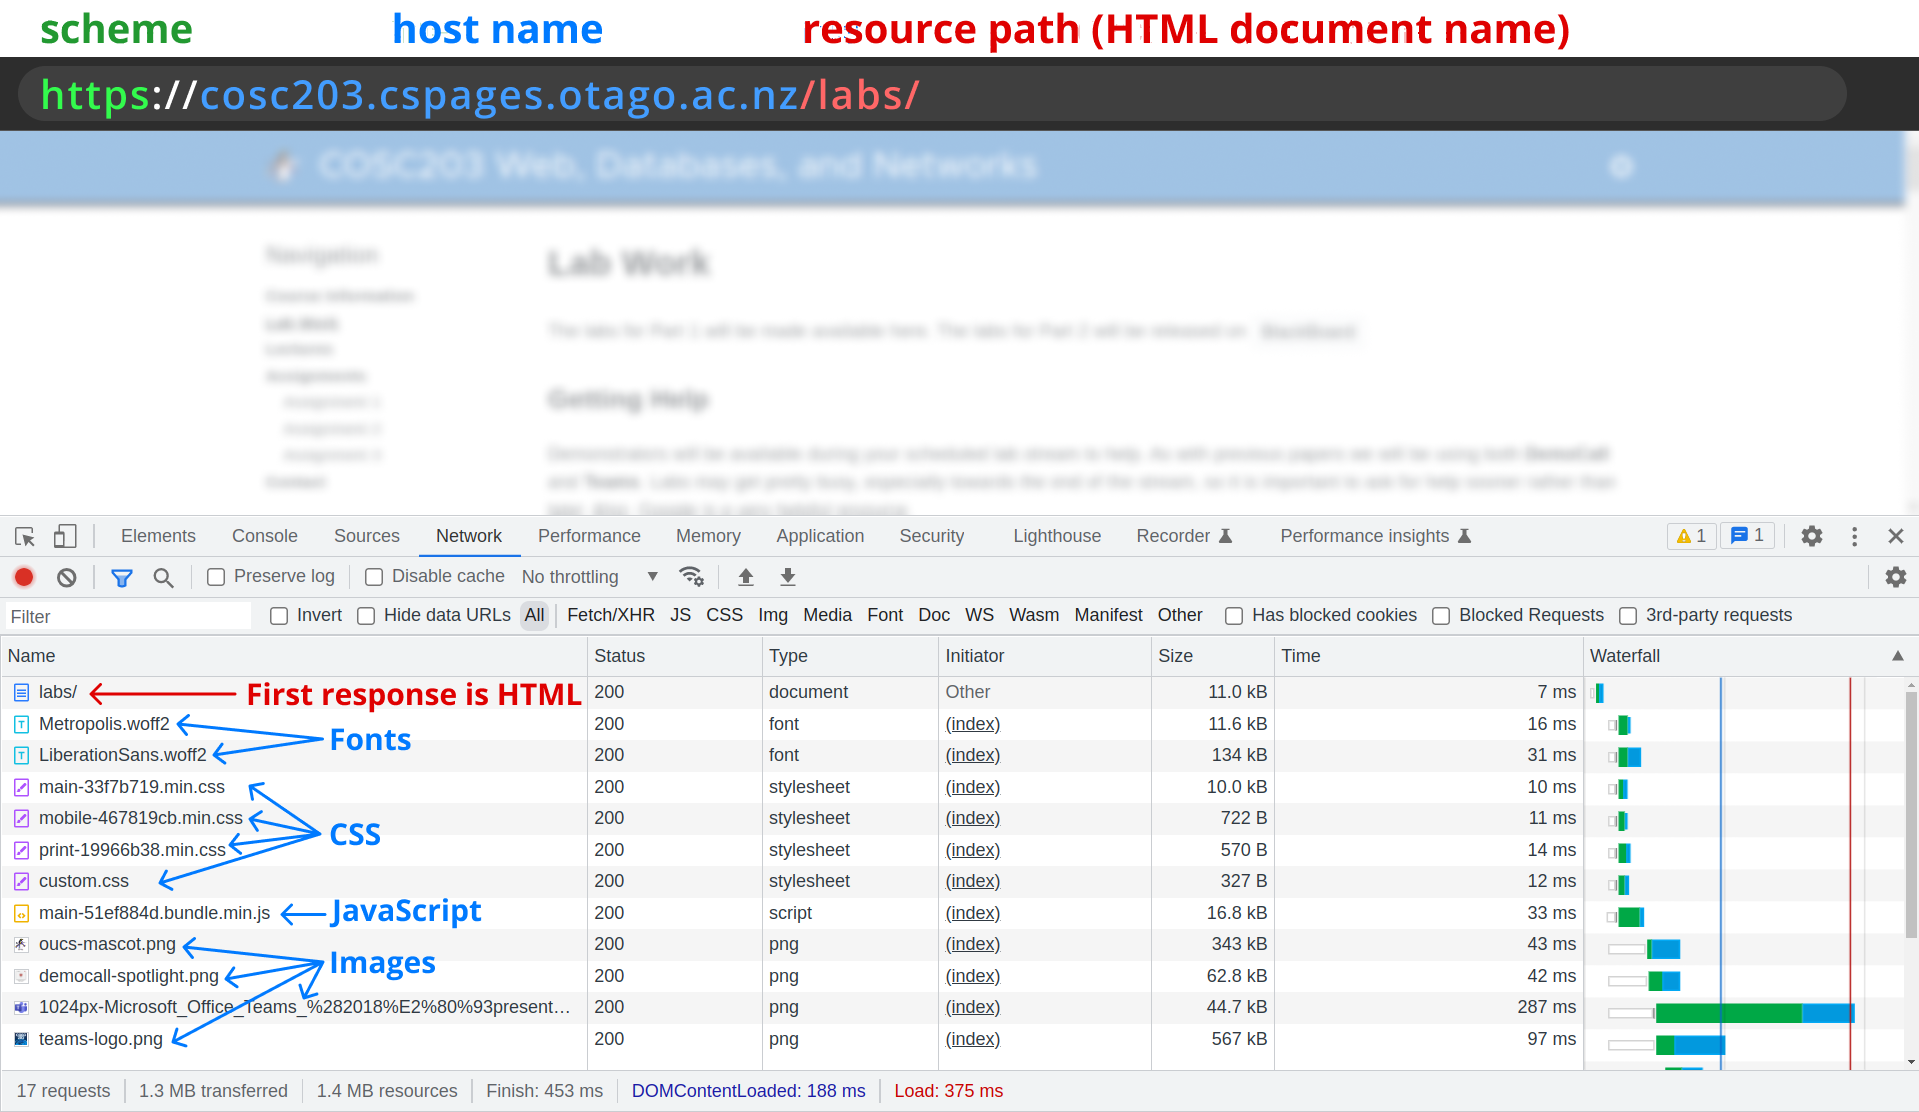
The Dev Tools Network Tab shows the timeline of loading files/resources. The browser first loads the HTML document, then loads the embedded resources (fonts, css, images, javascript, …)
📝 Task 1: Inspect a Page Load
- Open Google Chrome
- Load this page: https://cosc203.cspages.otago.ac.nz/labs/11_Routing
- Open the Network Tab in Dev Tools
- Right Click Page > Inspect > Network
- Trigger a page load
- First click Disable cache in the Dev Tools
- Then click refresh in the navigation bar
- Simulate a slow page load
- Click: No throttling > Slow 3G
- Refresh the page
- Disable throttling
✅ TipWhen the Dev Tools are open in Google Chrome you can Hard Reload the page by right clicking the refresh button.
These options are not avaiable when the Dev Tools are closed.
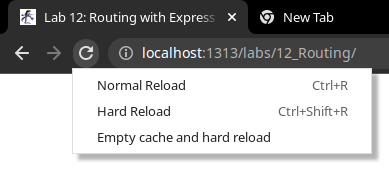
Even if the resource path does not end with.html, the server can still respond with HTML data. In the example below, the resource path is /labs/, and the page you are currently reading is /labs/12_Routing/ and yet… they both respond with HTML content.
You can verify this by clicking on the first entry in the Network Tab; it will show the response data… and lo! it contains <html> tags!
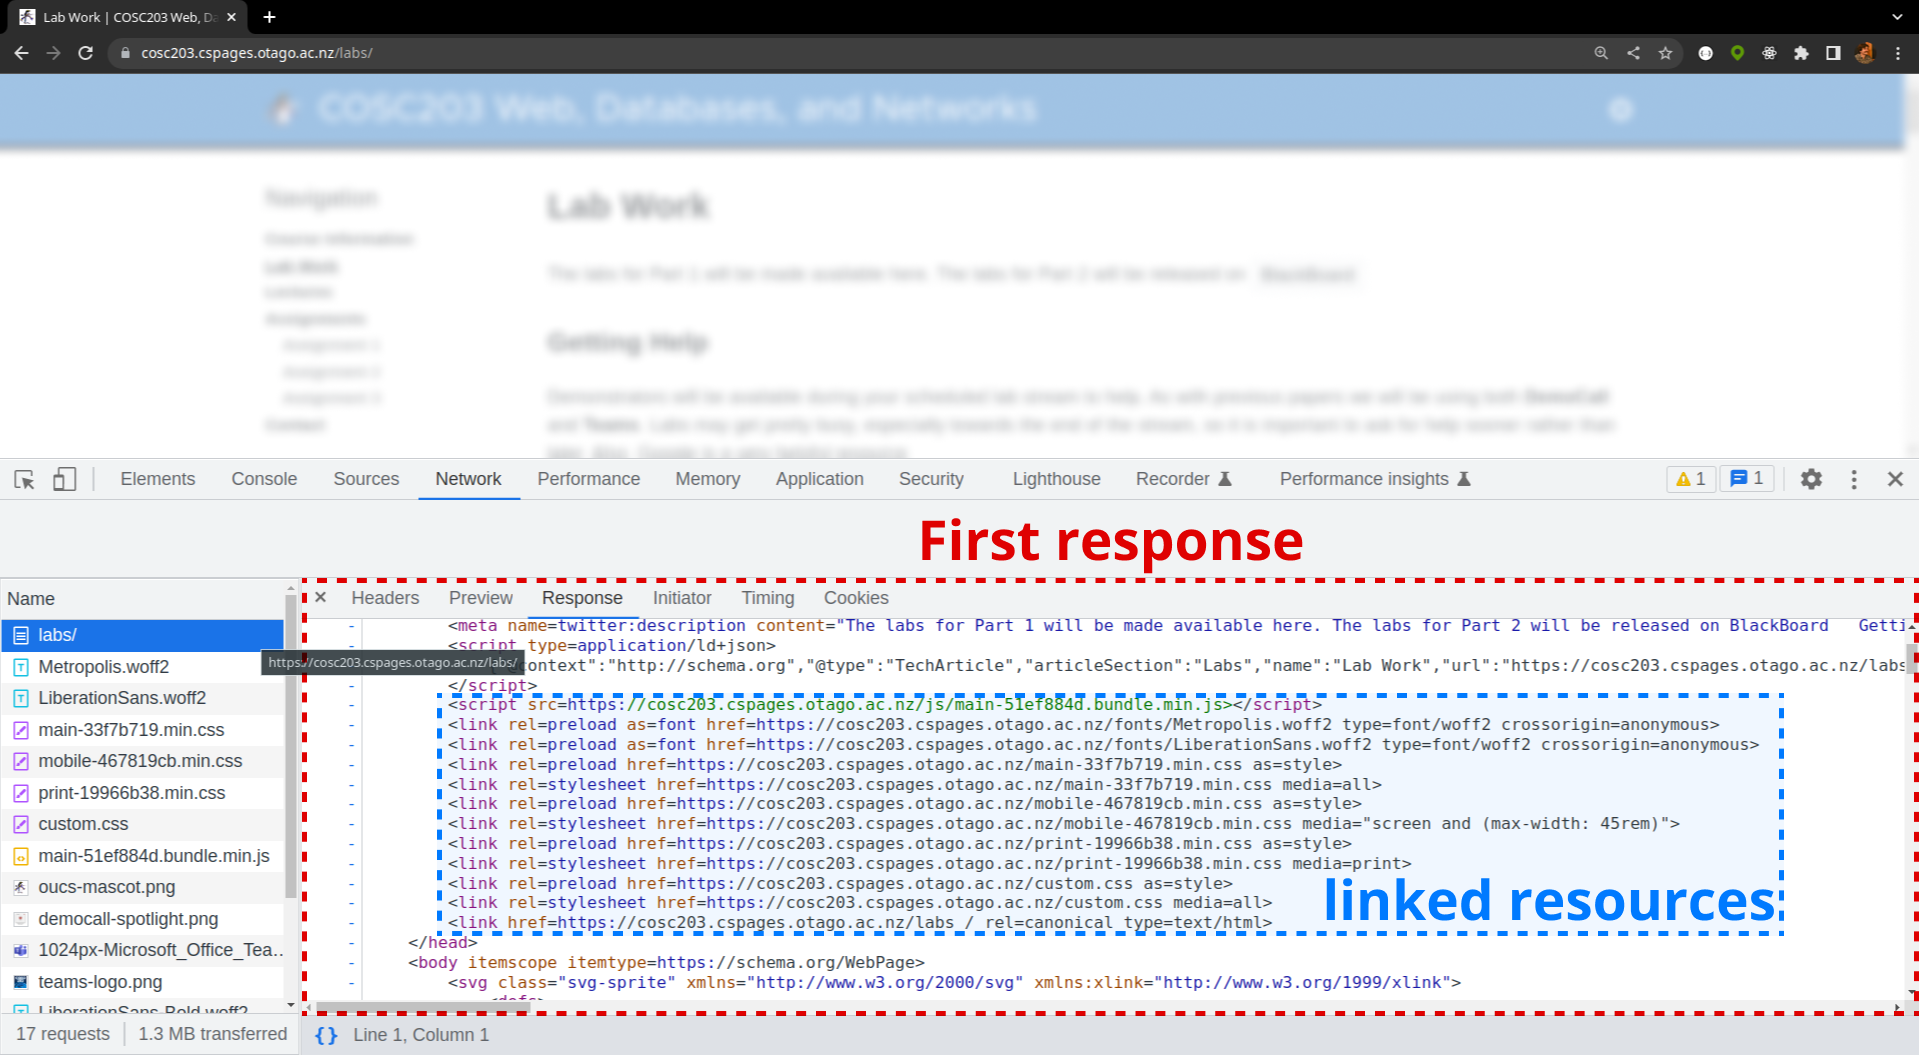
Within the HTML you should see see <link> tags, these are extra resources the page needs. This is how the browser knows which files it needs to request next (and the order to request them in).
The browser reads the first response (the HTML) and for every <link>, the browser will send the server another HTTP GET request.
The following diagram shows an example page load, and the requests/responses over time.
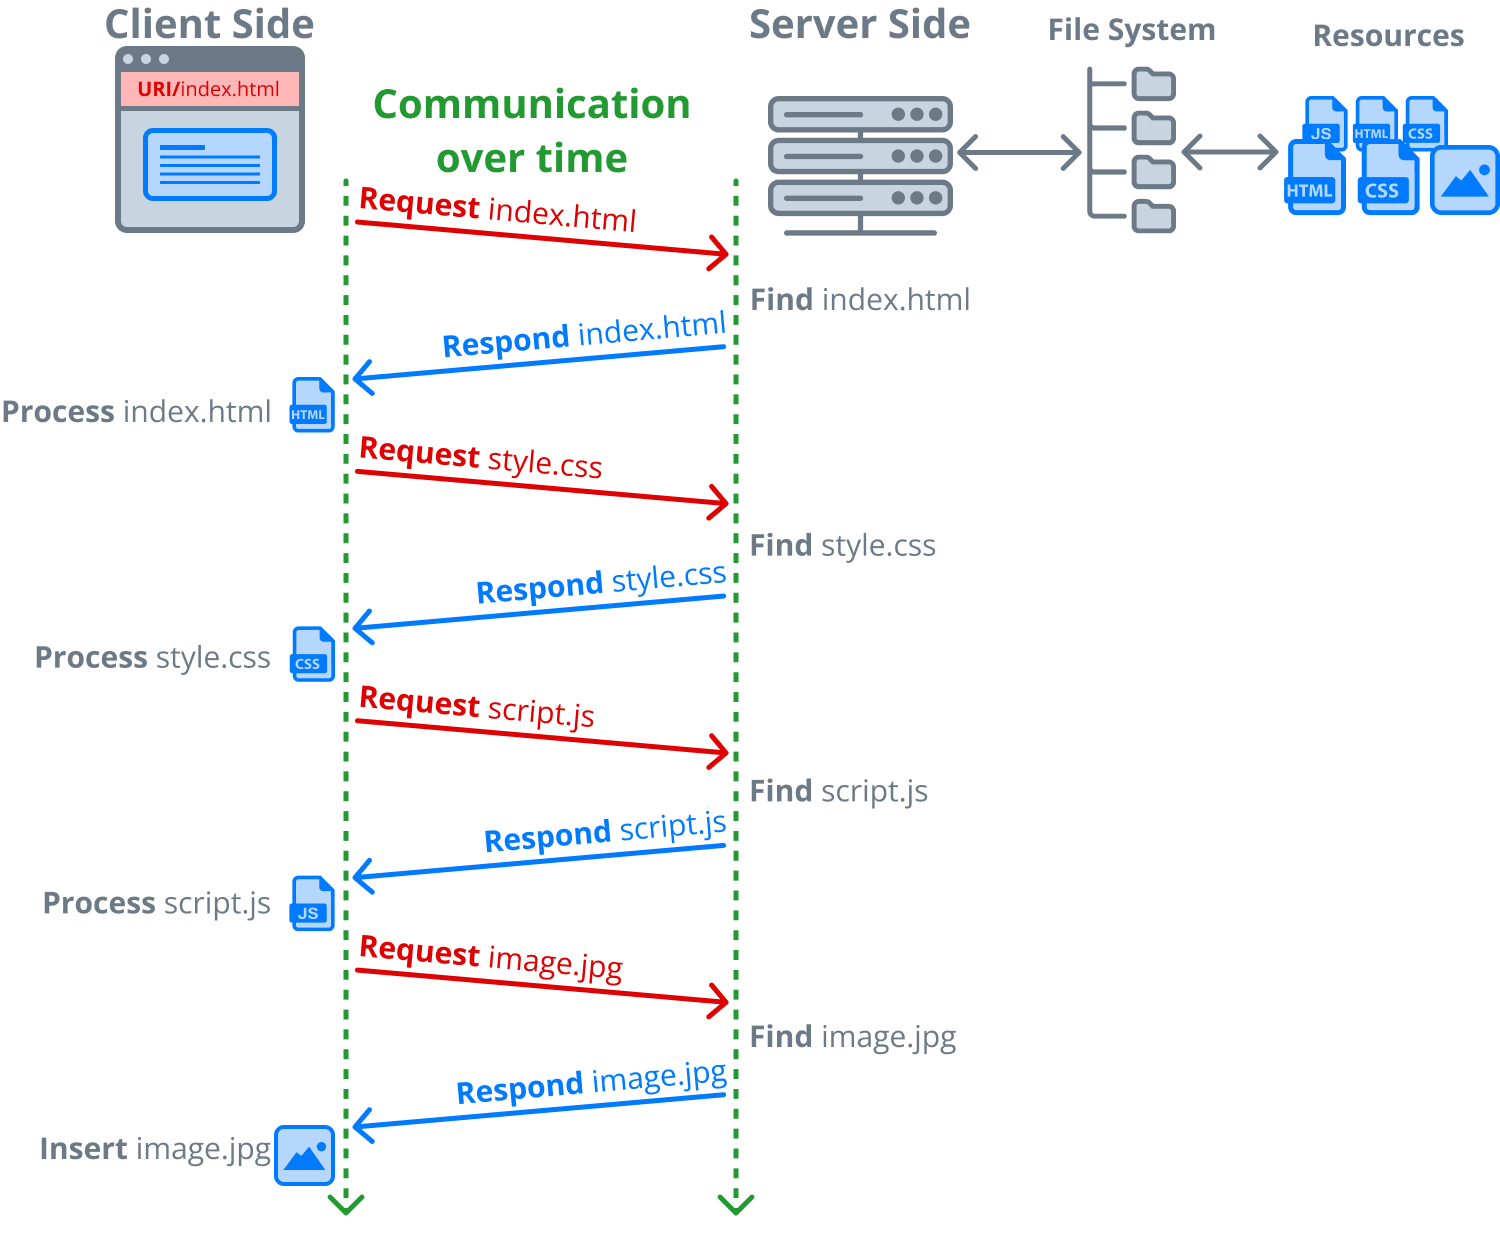
The “Waterfall” column in Chrome’s Dev Tools visualizes this order of resource loading.
✅ TipYou can change how a browser loads linked resources using the
relattribute of the<link>tag.<!-- CSS --> <link rel="prefetch" href="style.css" as="style" /> <link rel="preload" href="style.css" as="style" /> <!-- javascript --> <link rel="modulepreload" href="script.js" /> <!-- when page load requires cross origin requests --> <link rel="preconnect" href="https://example.com" /> <link rel="dns-prefetch" href="https://example.com" /> <!-- caches page load, anticipating the user will navigate there! --> <link rel="prerender" href="https://example.com/about.html" />Apparently,
relis an abbreviation for relationship… I don’t get it either?More info here
All of the requests during a page load are HTTP GET Requests. In this section we will build a web server that Responds to these HTTP GET requests.
📝 Task 2: New Node ProjectSetup a Node Project
- Create a new directory… name it whatever, my suggestion is
lab11/- Inside this directory create a new Node Project
- From a terminal, run:
npm init- Accept all the default options when prompted
- Install the node packages: express, nodemon, path, and body-parser
npm install express nodemon path body-parserDone!
Too easy.
📝 Task 3: Node Start ScriptLet’s create a start script for our Node Project
- Create a file called
server.js
- leave it empty for now.
- Edit the file:
package.json
- This is your project config file
- You should see
express,nodemonandpathunder dependencies- change
"main": "index.js",to"main": "server.js",- add a start script:
"start": "nodemon server.js"Your
package.jsonshould now look like:{ "name": "lab11", "version": "1.0.0", "description": "", "main": "server.js", "scripts": { "test": "echo \"Error: no test specified\" && exit 1", "start": "nodemon server.js" }, "author": "", "license": "ISC", "dependencies": { "body-parser": "^1.20.2", "express": "^4.18.2", "nodemon": "^3.0.1", "path": "^0.12.7" } }
- You can run your Node project from a terminal:
npm run start
- Though, it doesn’t yet do anything
- Stop your Node project by pressing
Ctrl+C
Let’s write some code…
📝 Task 4: Start ExpressCreating a web server with Express requires 3 lines of code!
Inside
server.jswrite these 3 linesconst express = require('express'); // import express module const app = express(); // create an express server instance app.listen(8080); // start the server on port 8080
Our web server doesn’t yet respond to requests… so let’s create our first Route Handler to respond to a GET request.
✅ TipURL Routing is how web servers determine which resource to respond with.
Sometimes the resource isn’t event a physical file! more on that later…
In Express, route handlers look like: app.METHOD(PATH, HANDLER);
METHODis usuallygetfor GET requests.PATHis the resource pathHANDLERis a callback function that takes 2 parameters:requestcontains the data from the clientresponseused to respond to the client
function handler(request, response) {
    response.send('hello world');
}
📝 Task 5: First Request HandlerCreate a route handler with
app.get(...)
- Give you
server.jsa route handler as below
- The resource path is
/- The response is some badly-formed HTML data… haha!
const express = require('express');
const app = express();

app.get('/', (request, response) => {
    response.send("<h1>Hello World! 😃</h1>");
});

app.listen(8080);
- Visit http://localhost:8080/ in a web browser
- if it worked, you will see: Hello World! 😃
- (you may have so stop, and restart the server)
Ctrl+Cnpm run start- Open the Network Tab, and reload the page
- ensure the response from the server is what you expect
✅ TipThe provided code uses an anonymous arrow function as the second parameter.
- Anonymous as it has no name
- Arrow because of the
=>
The server is now responding to a GET request, but it’s not giving us any feedback.
📝 Task 6: Make the server print it's statusWe start the web server with:
app.listen(port, [callback])
app.listen()also accepts a callback function, which executes after the server has started
- Modify your
app.listen(8080)to something like belowconst PORT = 8080; app.listen(PORT, () => { console.log(`Server is live! http://localhost:${PORT}`) });Yet another anonynmous arrow function:
() => { ... }
Let’s add another GET request handler. This time we will create a route for /style.css even though the no such file exists!
📝 Task 7: Route for a stylesheet
- Create a route handler for the resource path
/style.css. Something like below:app.get('/style.css', (request, response) => { // set output to CSS content (HTML is deafult) response.setHeader('content-type', 'text/css'); const data = "* { background: blue; font-size: 100px; }"; response.send(data); })
- let’s also update the
'/'handler
- we want the browser to send a GET request for
/style.cssapp.get('/', (request, response) => { const data = ` <!DOCTYPE html> <html> <head> <link rel="stylesheet" href="style.css" /> </head> <body> <h1>Hello World! 😃</h1> </body> </html>`; response.send(data); })
- To see the changes you will have to restart the server
- Stop the server with
Ctrl+C- Start the server with
npm run start- Ensure the browser is requesting
style.css
So, we have learned how to create routes which respond with data… even though the data doesn’t come from a file, this is perfectly normal stuff. However sometimes we want to route files too.
If you had this file structure on your computer:
home/
└── polly/
    └── cosc203/
        └── lab11/
            └── public/
                ├── index.html
                ├── style.css
                └── images/
                    ├── icon.png
                    ├── logo.png
                    └── photo.jpg
You might want to route the resource path to the corresponding file path
- e.g.
/index.html->home/polly/cosc203/lab11/public/index.html
📝 Task 8: Routing Files
- In your Node project, create a directory called
public/- inside
public/crseate two files:
index.htmlstyle.css- inside
index.htmlput:<html> <head> <link rel="stylesheet" href="/style.css" /> </head> <body> <h1>Hello World! 😃</h1> </body> </html>
- inside
style.cssput:* { background: blue; font-size: 100px; }
- Install the Node module:
path(if you haven’t already)
npm install path- In
server.jsimport path as path
const path = require('path');- (please put your imports at the top of the file)
- Modify your route handlers to use
path.resolve()
path.resolve()is an easy way to get file path namessendFile()is how we send files instead of stringsapp.get('/', (request, response) => { const filePath = path.resolve(__dirname, 'public/index.html') response.sendFile(filePath); }); app.get('style.css', (request, response) => { const filePath = path.resolve(__dirname, 'public/style.css') response.sendFile(filePath); });
- Create 2 more route handlers:
- path:
/home->public/index.html- path:
/index.html->public/index.htmlYou should now be able to visit
And they should all load the same resource:
index.html
It should now be clear that resource paths and file paths are different things.
Resource paths have more restrictions. For example, they cannot contain spaces !?
URLs must be formatted with Percent Encoding. Where special symbols are converted into a % followed by a number. For example spaces become %20 (because in ASCII 0x20 is the space character)
e.g. the file path:
My Cool Site.html
would be URL encoded as:
My%20Cool%20Site.html
The purpose for URL encoding is to be readable on any computer. And unfortunately different Operating Systems use different file systems. E.g. in macOS the / as a path separator, whereas Windows uses \. Windows file names are case insensitive, whereas macOS file names are not. etc…
URI encoding is a Universal format for the entire internet (including the www). All client requests must be done with URLs, and we use URL routing to map them onto the file system.
If a browser tries to request a resource which does not match any of our route handlers, we need to respond with the HTML status code 404. We will also send a some HTML data which explains the error to the user.
📝 Task 9: Create a 404 Page
- Create
public/404.html- Use Emmet
!to create the boiler plaet- Insert some html:
<h1>404: Page Not Found</h1>
<p>Did you take a wrong turn❓</p>
- Create a route handler for the resource path:
'*'
'*'is a wild card and will match with any path- set the status code to 404
response.status(404);- send the file:
/public/404.htmlThe
'*'route handler should always be the last route handler inserver.jsOtherwise, it will greedily respond to a requests when another handler would be more approprite.
app.get('*', (request, response) => {
    response.status(404)
    response.sendFile(path.resolve(__dirname, 'public/404.html'));
});
Routing each file individually is alot of work, especially if we had have dozens, or hundreds of files. Thankfully, Express has the ability to route an entire directory.
📝 Task 10: Route a directory
- Use the below code to route the entire
public/directoryapp.use('/', express.static(path.resolve(__dirname, 'public')));Note: we are using
app.use()notapp.get(), becauseexpress.static()is a middleware function that calls.get()for us. More on middleware later…
- Remove the router handler for
/styles.cssas it’s no longer needed
Now your server.js might look like this:
const express = require('express');
const path = require('path');

const app = express();

// host the public directory
app.use('/', express.static(path.resolve(__dirname, 'public')));

app.get('/home', (request, response) => {
    const filePath = path.resolve(__dirname, 'public/index.html')
    response.sendFile(filePath);
});
app.get('/default.html', (request, response) => {
    const filePath = path.resolve(__dirname, 'public/index.html')
    response.sendFile(filePath);
});

app.get('*', (request, response) => {
    response.status(404)
    response.sendFile(path.resolve(__dirname, 'public/404.html'));
});

const PORT = 8080;
app.listen(PORT, () => {
    console.log(`Server is live! on port http://localhost/${PORT}`)
});
And that’s everything you need to build a static web server 🥳
Serving static HTML is limiting; the server always responds with the same data. A dynamic web server will respond differently depending on when / where / who the requests are sent from.
📝 Task 11: Some Dynamic Content
- Create a
.get()handler for the path:'/time'- Respond with the current time
Something like this…
app.get('/time', (request, response) => {
    const datetime = new Date().toISOString();

    const dynamic_html = `<h1>The server time is ${datetime}</h1>`

    response.send(dynamic_html);
});
- Visit http:localhost:8080/time
- Everytime you load the page, the server responds with different data!
- it’s automatic!
- it’s systematic!
- it’s
hydromaticdynamic!
✅ TipGenerating HTML dynamically on the server is called Server Side Rendering. More on that in lab 13.
Dynamic content is much, much more than just the current time.
Let’s actually process some real data in a useful way.
📝 Task 12: A Random BirdCreate a route which responds with random bird data.
- Download the JSON from assignment 1
- nzbird.json (Right Click, Save link as…)
- save the file in the root of your node project (next to
server.js)- In
server.jsimport the JSON
const birds = require('./nzbird.json');- Add a route handler for the resource
/birds/random:
- Something like the below code:
- Currently it responds with the first bird in the JSON array
app.get('/birds/random', (request, response) => {
    const randomIndex = 0; /* some math here...? */

    const data = birds[randomIndex];

    response.send(data);
});
- Modify the route handler to respond with a random bird (from the JSON array)
- Remember these?
Math.random()Math.floor()Math.ceil()birds.length- Test it out: http://localhost:8080/birds/random
- random bird?
- shmandom shmird!
✅ TipHere is a Chrome extension which makes the JSON easier to read
chrome.google.com/webstore/detail/json-formatter

For large web sites the routing can get quite complicated…. Below is an example site map showing several paths a user might want to navigate around.
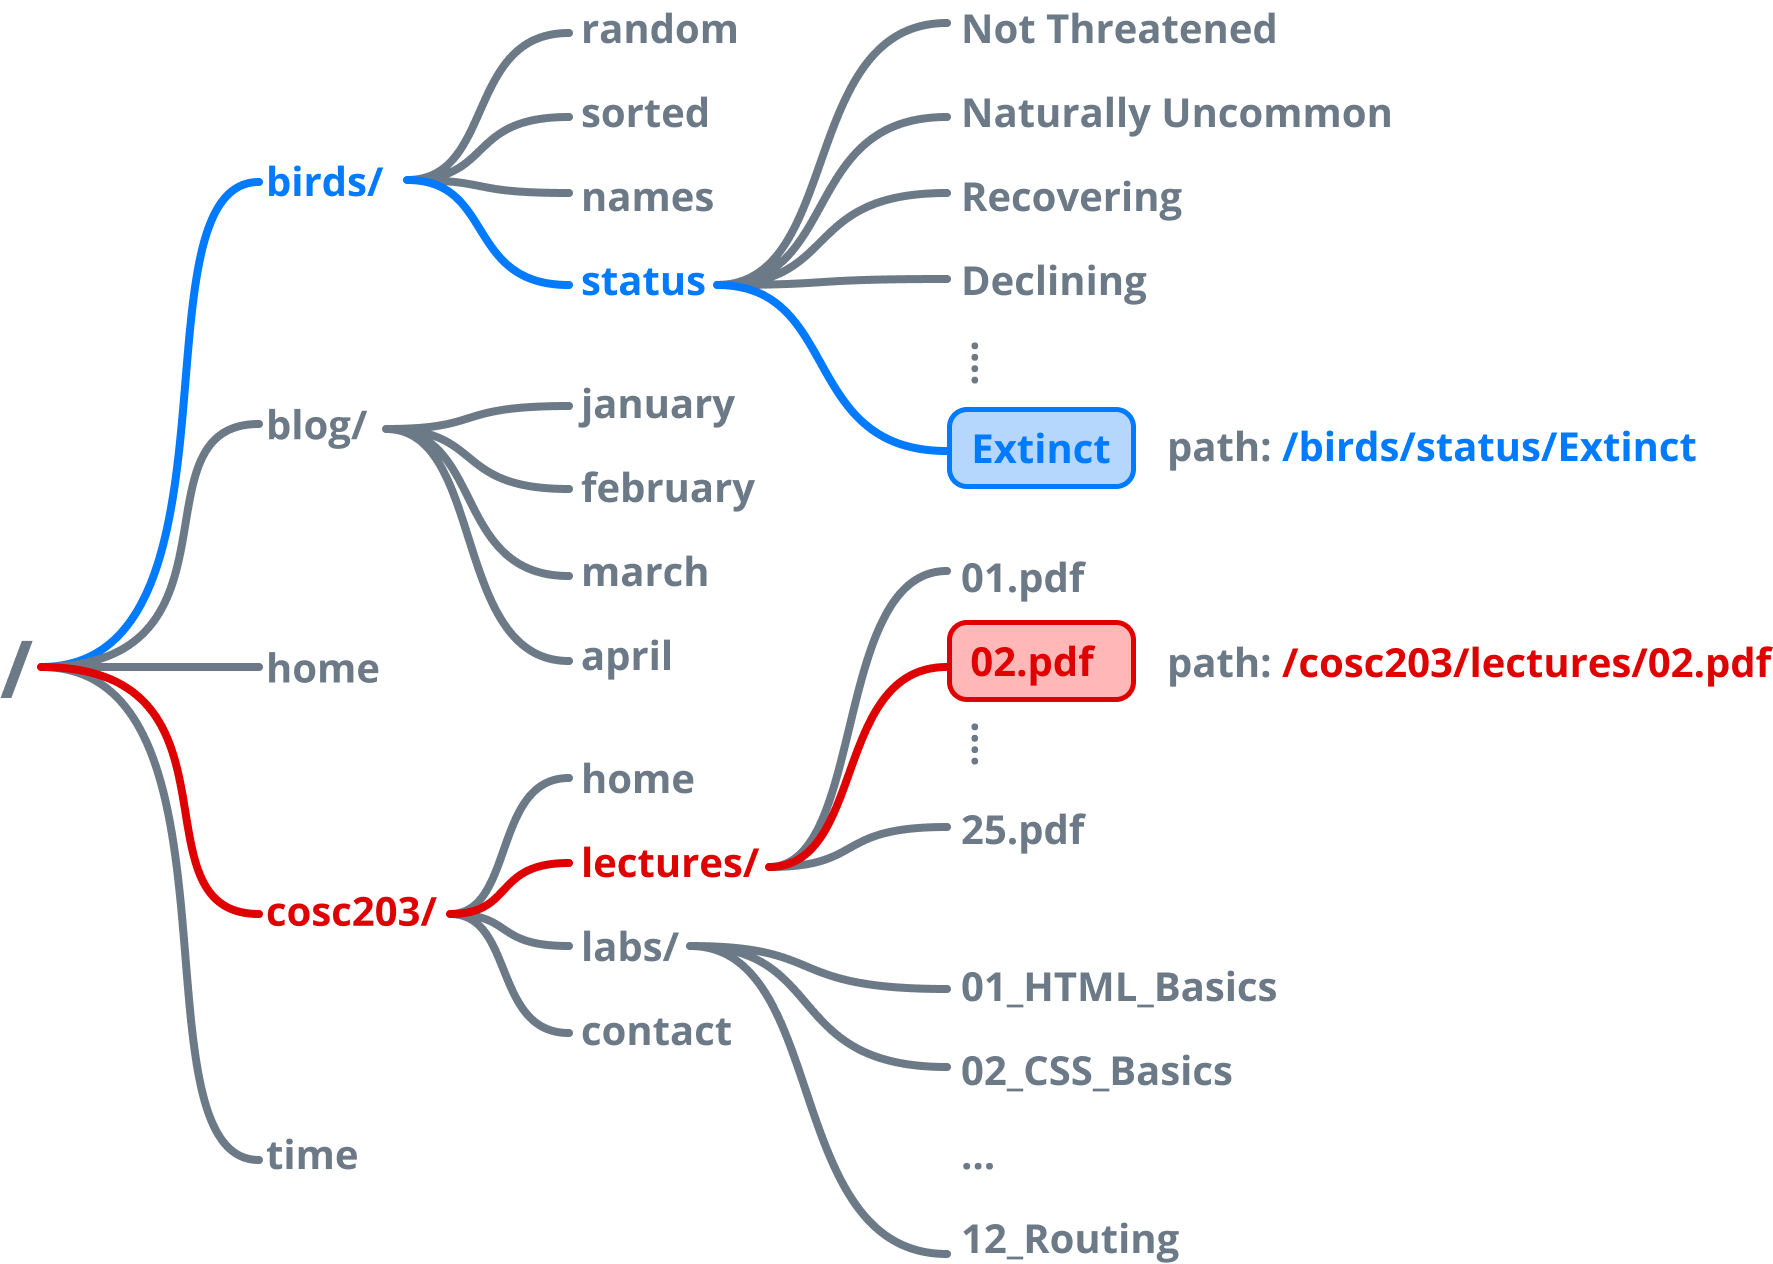
Placing all of these routes in one file gets messy… So, let’s do it cleaner
We’re going to create all of the birds/... paths shown above. All contained within their own file.
📝 Task 13: Create a Separate Router for birds/
- create a file in the root of your project called
birds_router.js
- in
birds_router.js, write the following codeconst express = require('express'); // import express const router = express.Router(); // create a router /* we will code each individual route handler here */ // router.get(PATH, HANDLER); // router.get(PATH, HANDLER); // export the router last module.exports = router;
- Inside
server.js
- import the birds_router
const birds_router = require('./birds_router');- register the bird router with the path
/birds/
app.use('/birds/', birds_router);- Move the JSON from
server.jsintobirds_router.js
const birds = require('./nzbird.json');- Also, move the
/birds/randomroute handler intobirds_router.js
- change
app.get()torouter.get()- change the path from
/birds/randomto just/random/const express = require('express'); const birds = require('./nzbird.json'); const router = express.Router(); /* we will code each individual route handler here */ router.get('/random', (request, response) => { const randomIndex = 0; /* some math here...? */ const data = birds[randomIndex]; response.send(data); }); // export the router last module.exports = router;const express = require('express'); const path = require('path'); const birds_router = require('./birds_router'); const app = express(); // birds router app.use('/birds/', birds_router); // host the public directory app.use('/', express.static(path.resolve(__dirname, 'public'))); // 404 page if file not found app.get('*', (request, response) => { response.status(404) response.sendFile(path.resolve(__dirname, 'public/404.html')); }); const PORT = 8080; app.listen(PORT, () => { console.log(`Server is live! on port http://localhost/${PORT}`) });
Below are some example routes for the birds data. Each uses a different JavaScript array function
Because I’m secretly teaching functional programming
array.sort(...)returns a sorted copy ofarrayarray.filter(...)returns a copy ofarraywith some elements removedarray.map(...)returns a copy ofarraywhere each elements has been modified
router.get('/', (request, response) => {
    response.send(birds);
})
router.get('/sorted', (request, response) => {
    const data = birds.sort(
      (a, b) => a.size.length.value - b.size.length.value
    );

    response.send(data);
})
router.get('/penguins', (request, response) => {
    const data = birds.filter(
      (b) => b.english_name.toLowerCase().includes('penguin')
    );

    response.send(data);
})
router.get('/names', (request, response) => {
    const data = birds.map(
      (b) => b.primary_name
    );

    response.send(data);
})
📝 Task 14: More Bird Routes
- Copy the 4 route handlers above into
birds_router.js- Code more route handlers
- filters the birds where:
.status === "Declining"- filters the birds where:
.family == "Apterygidae"- sorts the birds alphabetically by english_name
There are limitless routes we could create… but I don’t have the immortality to write limitless code.
So, Let’s simplify our routing with parameters. There are two kinds we will look at:
- Query Parameters
- Path Parameters
Query parameters are key=value pairs which can be included in the URL.
To send parameters to the server, place them last, after a ? symbol.
http://www.example.com/?key=value
Multiple parameters are separated by the & character.
http://www.example.com/?first=a&second=b&third=c
To read query parameters (on the server) use request.query. That easy!
This URL includes the parameter animal=frog, http://localhost:8080/test?animal=frog
Read animal in a route handler: request.query.animal
app.get('/test', (request, response) => {
    const id = request.query.animal
    response.send('Your patronus is a: ' + animal);
});
Here is a better way to filter the birds by Conservation Status:
router.get('/filter', (request, response) => {
    let results = birds;

    const status = request.query.status;

    if (status !== undefined) {
        results = results.filter(
          (b) => b.status === status
        );
    }

    response.send(results);
})
This single route will work for any Conservation Status!
- http://localhost:8080/birds/filter?status=Declining
- http://localhost:8080/birds/filter?status=Not%20Threatened
- http://localhost:8080/birds/filter?status=Nationally%20Endangered
Note: URL is case sensitive and spaces are encoded as %20.
📝 Task 15: Query Parameters
- Add the above code:
router.get('/filter', ...)intobirds_router.js
- test it with the links above
- Modify it to be case insensitive
- such that
relictmatchesRelict- e.g. http://localhost:8080/birds/filter?status=relict
- Create a route handler for the path
/family
- use the query parameter
?family=...to filter() the birds by family- e.g. http://localhost:8080/birds/family?family=Apterygidae
- Change the
/sortedroute handler so that it 2 query parameters
Almost the same as query parameters, except the parameter is inside the path.
Path parameters are denoted with the : symbol.
router.get('/path/:param', (request, response) {
    const param = req.params.param;

    response.send(param);
})
What’s the difference?
- Query parameters are supported by every web framework.
- Path parameters are only supported by some (like Express)
Path parameters are best used to identify different resources in structured data
- different files
- different database collections
Query parameters should be used to modify those resources, i.e. to sort/filter etc.
Say we wanted to navigate the birds data using the taxonomic data. We could create a single route using path paramters:
app.get('/:class/:order/:family/:genus/:species', (req, res) => { ... });
Then a web browser could navigate the structured data by plugging in all (or some) of the parameters
http://animals.com/birds/Apterygiformes/Apterygidae/Apteryx/australis

http://animals.com/birds/Psittaciformes/Strigopidae/?sort=length&reverse=true
The other common type of HTTP request is the POST request.
A POST request is for sending data to the server.
The data is sent in the body of the HTTP Request
You could send data using a GET request and query parameters, but the URL is limited to 259 ASCII characters. It’s also insecure to send data as query parameters as they’re presented in plaintext in the URL.
The POST request body is theoretically limitless, but server admins usually cap it at 1MB to 2GB. It’s also far more secure, especally when the using the https scheme.
So POST requests are for sensitive data, or large files.
In Express we need the middleware: body-parser to process HTTP request body.
📝 Task 16: Processing POST requests
- Install the body-parser middleware
- Import
body-parseras bodyParser- Register the bodyParser as middleware
npm install body-parserconst bodyParser = require('body-parser');app.use(bodyParser.urlencoded({ extended: false }))
Usually we POST data using an HTML form
📝 Task 17: Sending PasswordsHere is a route handler for checking a username and password in the request body.
Using
.redirect()triggers a different route handler to respond.app.post('/submit_login', (request, response) => { const user = request.body.user; const pass = request.body.pass; // in practice, we would check a database for the username/password if (user === "admin" && pass === "password123") { // if login matches, load success.html response.redirect('success.html'); } else { // if login fails, load login.html response.redirect('login.html'); } })Here is public/login.html
<!DOCTYPE html>
<html>
<head>
    <title>Login</title>
</head>
<body>
    <form action="/submit_login" method="POST">
        <label for="user">User</label>
        <input name="user" type="text">
        <label for="pass">Pass</label>
        <input name="pass" type="password">
        <button type="submit">Submit</button>
    </form>
</body>
</html>
Here is public/success.html
<!DOCTYPE html>
<html>
<head>
    <title>Welcome</title>
</head>
<body>
    <h1>Successfully logged in!</h1>
</body>
</html>
If you have time, give it a go!
✅ TipIn a previous lab we used a<form> ... </form>, much like here. Except, in the sumbit button’s click handler we used.preventDefault()to prevent the browser from submitting the form. Because at the time, we didn’t have a web server waiting to receive the form data. Instead we used the form data with JavaScript.
This lab is worth marks. be sure to get signed off.