
Lab 6: React
🎯 Lab ObjectiveIn this lab, you will learn React
This lab teaches the following concepts:
- Template Strings
- The
<template>element- React Components and JSX
- React State
Table of Contents
String concatentation in JavaScript is simple, but the syntax can get messy…
let name = "Polly";
let country = "Antarctica";

let msg = "Welcome, " + name + ", to " + country + "!";
Introducing a cleaner syntax: Template Strings!
let msg = `Welcome, ${name}, to ${country}!`;
✅ Tip
Template strings contain placeholders ${ } which are substituted with values. Placeholders may contain any JavaScript expression:
console.log(`π is about ${22 / 7}`);
✅ TipPython 3.6 has a similar syntax called f-Strings
msg = f'Welcome, {name}, to {country}!!'
Template strings respect line breaks, so we can template HTML!
const html = `
 <div className="card">
    <h2>Welcome, ${name}, to ${country}!</h2>
    <img src="${img}" className="profile" />
 </div>
`;

document.querySelector('main').innerHTML = html;
📝 Task 1: Template StringsA simple To-Do List application
- Copy the code below into a
.htmlfile- Replace
const time = ...with a Template String- Replace
item.innerHTML =with a Template String- Test the functionality
<!DOCTYPE html>
<html lang="en">

    <head>
        <meta charset="UTF-8">
    <title>Lab 08 Templating</title>
    <style>
        body {
            display: flex;
            flex-direction: column;
            align-items: center;
        }
        main.listClass {
            width: 90%;
            padding: 10px;
        }
        main > div.itemClass {
            display: flex;
            justify-content: space-between;
            padding: 10px;
        }
        main, main > div.itemClass {
            border: 2px solid gray;
            border-radius: 10px;
            margin: 10px;
        }
        .timeClass {
            color: gray;
            font-size: 0.8em;
        }
    </style>
    <script>
        function submit() {
            // get input
            const input = document.querySelector('input')
            const text = input.value

            // format timestamp string
            const d = new Date();
            const time = d.getHours() + ":" + d.getMinutes() + ":" + d.getSeconds() + "." + d.getMilliseconds()

            // create new element
            const item = document.createElement('div')
            item.setAttribute('class', 'itemClass');
            item.innerHTML = '<input type="checkbox" /><span class="textClass">' + text + '</span><span class="timeClass">' + time + '</span>';

            // append new element
            document.querySelector('main.listClass').append(item)
        }
    </script>

</head>

<body>
    <h1>Todo List</h1>

    <div>
        <input type="text">
        <button onclick="submit()">Add Item</button>
    </div>

    <main class="listClass">
        <p>Items:</p>
    </main>

</body>

</html>
The <template> element can also be used to create DOM. First we define a <template> element which contains the HTML we wish to create.
<template>
    <div>
        <h2></h2>
        <img src="" />
    </div>
</template>
Then we clone the template
// reference to the template
let temp = document.querySelector("template");
// clone the template
let clone = temp.content.cloneNode(true);
Insert our data into the cloned template
clone.querySelector('h2').innerText = 'Hello';
Then add it to the page
document.body.appendChild(clone);
📝 Task 2: Template Element
- Copy the following
<template>into the.htmlfile you made earlier
- you may place it anywhere (inside the
<head>or the<body>)<template id="itemTemplate"> <div class="itemClass"> <input type="checkbox" /> <span class="textClass"></span> <span class="timeClass"></span> </div> </template>
- In the JavaScript, replace the
const item = ...code with:// get a reference to the template const template = document.querySelector("#itemTemplate"); // clone the template const item = template.content.cloneNode(true); // insert some values item.querySelector('.textClass').textContent = text; item.querySelector('.timeClass').textContent = time; // append new element as usual
- Test the functionality
The two previous tasks (we created HTML with templates) are both examples of 1-Way Data Binding. We bind data to a template to create a view (DOM). This approach is limited, because, if/when data changes our view does not update. We have to manually re-bind the data, and regenerate the view… which is tedious…
React is a Client Side Framework which provides 2-Way Data Binding. This means that React can synchronize the data and view to eachother. No more manual DOM manipulation!
Learning syntax of React might be hard, but it’s worth it.
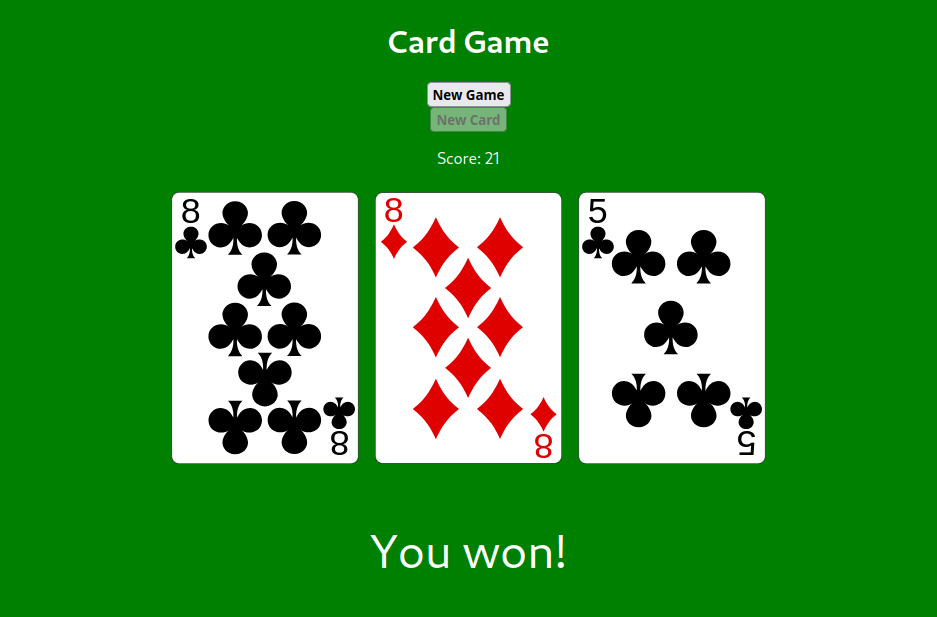
With React, we will build a simple card game ‘based’ on Black Jack. In our game each card has a value. If the cards in our hand sum to 21 we win, if we exceed 21 we lose.
📝 Task 3: Create React AppReact expects a certain structure for the project. To create the project we will use the built tool
vite.
- In a terminal, create a new project via:
npm create vite@latest
- (y) to install create-vite
- Project name: >
card-game- Select a framework >
react- Select a variant >
JavaScriptcd card-gamenpm install- Start the dev server:
npm run dev- Visit the hosted site http://localhost:5173/
- Open the project directory with VS Code
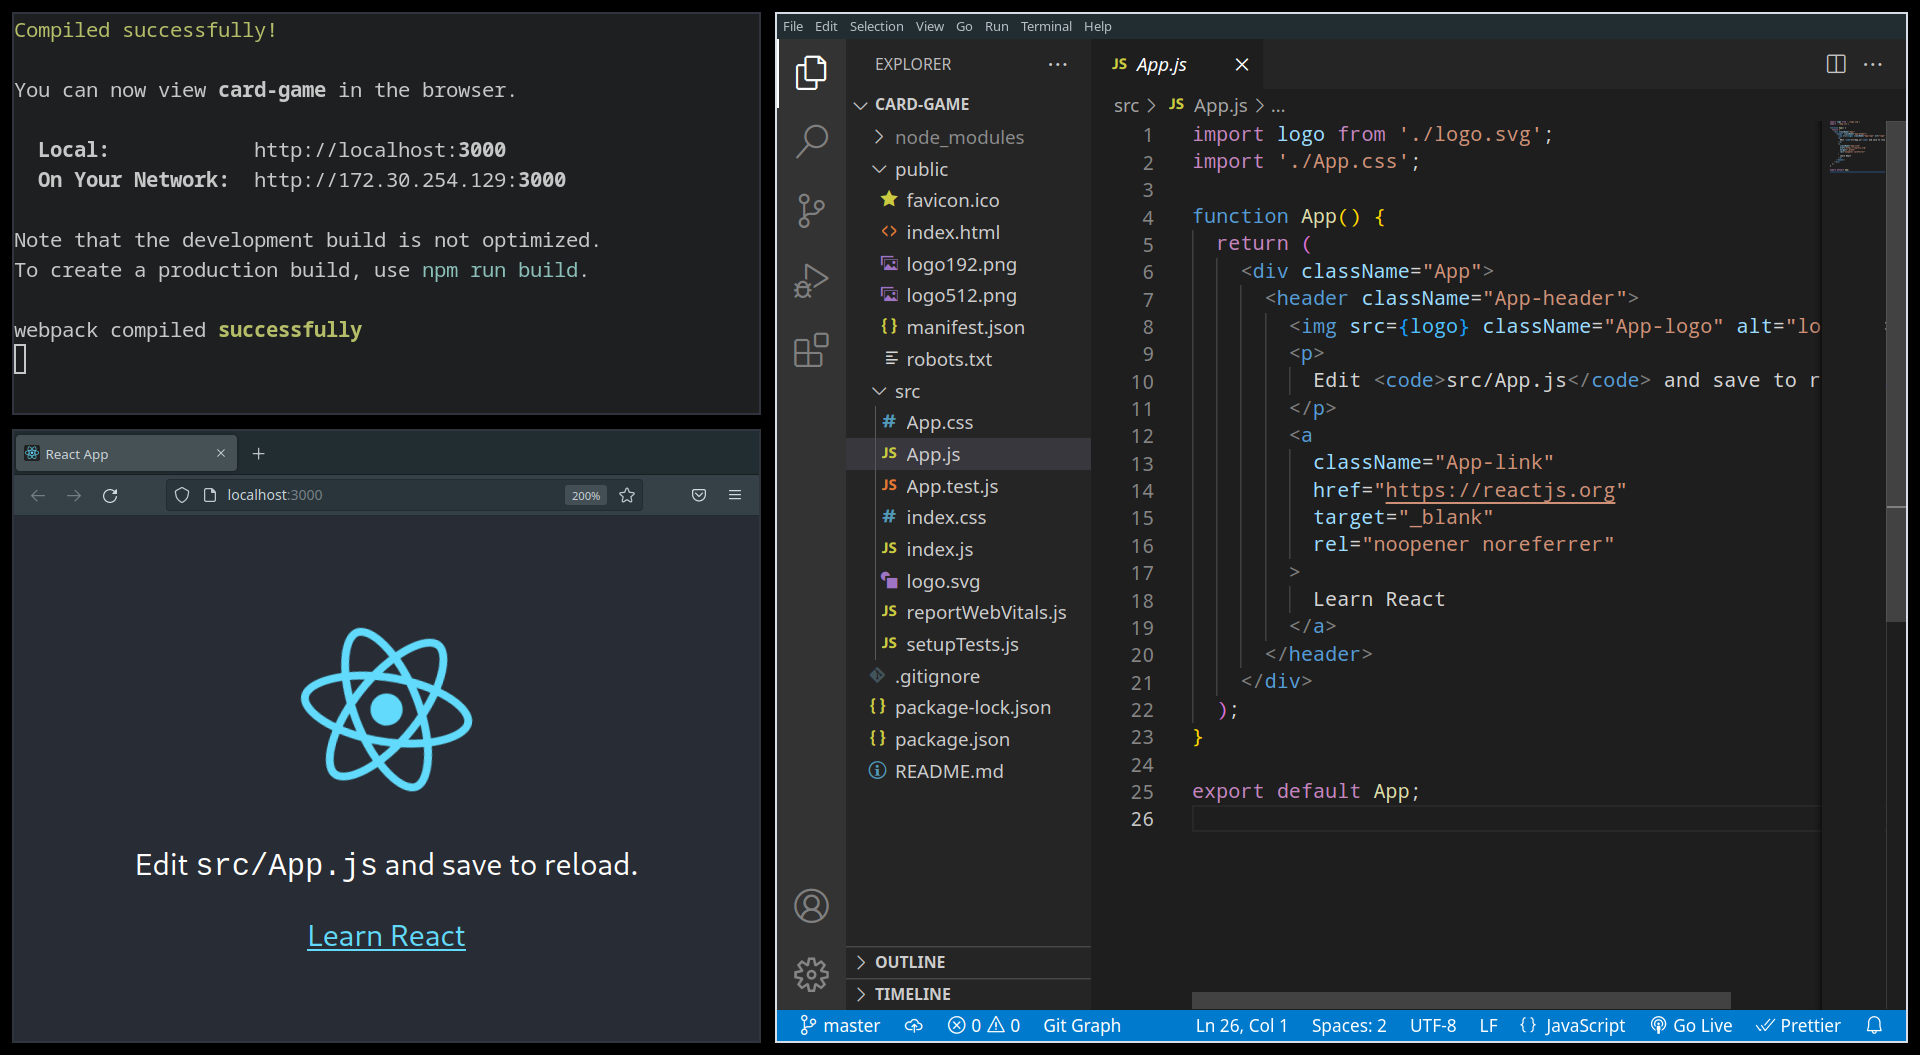
The two files we will be editing are src/App.jsx and src/App.css, they contain a React component we will be modifying for the card game. If you want to understand the purpose of the other files, read the list below (or refer back to it at your leisure)
package.json- metadata on which node packages are installed
package-lock.json- metadata on the exact version of each package
node_modules/- contains the actual files for each package
.gitignore- metadata for git to ignore certain files
index.htmlthe file React inserts components intopublic/root folder that is served as a websitevite.svg
src/the source code for the projectApp.jsxa provided example componentApp.cssstyle for the above component (App.jsx)index.cssglobal styles for the entire projectmain.jsxthe initial script which inserts components intoindex.htmlassets/react.svgasset which can be deleted
React components are JavaScript functions which return JSX. JSX is a syntax extension to JavaScript which provides a better way to template HTML.
In JSX, <tags> which start with a lower case are HTML elements, and <Tags> that begin with an uppercase are React Components.
Here is a React Component; as you can see it returns JSX (which looks like HTML).
// App.jsx
import React from 'react';
import './App.css';

function App() {

  const score = 0;

  return (
    <div className="App">
      <h1>Card Game</h1>
      <p>Score: {score}</p>
    </div>
  );
}

export default App; // exported so index.js can load it
The function App() is a React Component, it returns JSX. The returned JSX contains three elements. The <p> element includes {score} which will be substituted with the variable score.
📝 Task 4: Edit App.jsx
- Replace the contents of
App.jsxwith the one provided above
- you may also delete
logo.svg)- Set score to different number
- save, reload, and check it updates
- this isn’t 2-way data binding yet…
To properly bind data to a component we have to use State. When a component’s state updates it will trigger the component to reload it’s view.
We can declare a state variable with React.useState(). Which returns a pair of values, the current state, and the function that updates it. We also pass in the initial value.
📝 Task 5: State Hook
- Replace
const score = 0;with:const [score, setScore] = React.useState(0);
- Lets add a function that increases the score by 1
- put the function inside
function App()
- (a function declaration inside a function!!!)
function increaseScore() {
    setScore(score + 1);
}
- Add a button to call our
increaseScore()function
- insert the button below the
<p>element<button onClick={increaseScore}>Add Score</button>
- Test it
- everytime you click the button the view updates!!!
- Yeah! 2-Way Data Binding
Sometimes, we need to render different components based on some condition. We could use a regular JavaScript if-statement to decide which JSX component to render:
if (!isLoggedIn) {
    return <LoginButton />;
} else {
    return <LogoutButton />;
}
We could also achieve the same effect inline with the Logical && Operator
return (
    {!isLoggedIn && <LoginButton />}
    {isLoggedIn && <LogoutButton />}
);
It works because JavaScript does Short-circuit evaluation: For Logical And, both left and right need to be true, so if the left expression is false it won’t evaluate the right expression. So the <Component /> will only render if the left expression is true.
📝 Task 6: Conditional Rendering
- Show Win/Lose statements
- add the following code into your component
{score === 21 && <h1>You won!</h1>}
{score > 21 && <h1>You lost</h1>}
- Your
App.jsxshould look like this:function App() { const [score, setScore] = React.useState(0); function increaseScore() { setScore(score + 1); } return ( <div className="App"> <h1>Card Game</h1> <p>Score: {score}</p> <button onClick={increaseScore}>Add Score</button> {score === 21 && <h1>You won!</h1>} {score > 21 && <h1>You lost</h1>} </div> ); }
- Test the game out
- get to the winning state
- get to a losing state
We have provided some assets to make the game look nicer
📝 Task 7: Game Assets
- Replace the content of
App.csswith:.App { color: white; background: green; display: flex; flex-direction: column; align-items: center; min-height: 100vh; } .hand { display: flex; justify-content: center; width: 100vw; } .card { margin: 8px; max-width: 30%; min-width: 5%; }
- Download the card images here: cards.zip
- unzip the images into the
public/folder- e.g.
public/cards/ace_of_spades.svg'- Copy the below JSON array into
App.jsx
- (after the imports; before the
function App()component)const cardData = [ { value: 1, img: './cards/ace_of_spades.svg'}, { value: 2, img: './cards/2_of_spades.svg'}, { value: 3, img: './cards/3_of_spades.svg'}, { value: 4, img: './cards/4_of_spades.svg'}, { value: 5, img: './cards/5_of_spades.svg'}, { value: 6, img: './cards/6_of_spades.svg'}, { value: 7, img: './cards/7_of_spades.svg'}, { value: 8, img: './cards/8_of_spades.svg'}, { value: 9, img: './cards/9_of_spades.svg'}, { value: 10, img: './cards/10_of_spades.svg'}, { value: 10, img: './cards/jack_of_spades2.svg'}, { value: 10, img: './cards/queen_of_spades2.svg'}, { value: 10, img: './cards/king_of_spades2.svg'}, { value: 1, img: './cards/ace_of_clubs.svg'}, { value: 2, img: './cards/2_of_clubs.svg'}, { value: 3, img: './cards/3_of_clubs.svg'}, { value: 4, img: './cards/4_of_clubs.svg'}, { value: 5, img: './cards/5_of_clubs.svg'}, { value: 6, img: './cards/6_of_clubs.svg'}, { value: 7, img: './cards/7_of_clubs.svg'}, { value: 8, img: './cards/8_of_clubs.svg'}, { value: 9, img: './cards/9_of_clubs.svg'}, { value: 10, img: './cards/10_of_clubs.svg'}, { value: 10, img: './cards/jack_of_clubs2.svg'}, { value: 10, img: './cards/queen_of_clubs2.svg'}, { value: 10, img: './cards/king_of_clubs2.svg'}, { value: 1, img: './cards/ace_of_hearts.svg'}, { value: 2, img: './cards/2_of_hearts.svg'}, { value: 3, img: './cards/3_of_hearts.svg'}, { value: 4, img: './cards/4_of_hearts.svg'}, { value: 5, img: './cards/5_of_hearts.svg'}, { value: 6, img: './cards/6_of_hearts.svg'}, { value: 7, img: './cards/7_of_hearts.svg'}, { value: 8, img: './cards/8_of_hearts.svg'}, { value: 9, img: './cards/9_of_hearts.svg'}, { value: 10, img: './cards/10_of_hearts.svg'}, { value: 10, img: './cards/jack_of_hearts2.svg'}, { value: 10, img: './cards/queen_of_hearts2.svg'}, { value: 10, img: './cards/king_of_hearts2.svg'}, { value: 1, img: './cards/ace_of_diamonds.svg'}, { value: 2, img: './cards/2_of_diamonds.svg'}, { value: 3, img: './cards/3_of_diamonds.svg'}, { value: 4, img: './cards/4_of_diamonds.svg'}, { value: 5, img: './cards/5_of_diamonds.svg'}, { value: 6, img: './cards/6_of_diamonds.svg'}, { value: 7, img: './cards/7_of_diamonds.svg'}, { value: 8, img: './cards/8_of_diamonds.svg'}, { value: 9, img: './cards/9_of_diamonds.svg'}, { value: 10, img: './cards/10_of_diamonds.svg'}, { value: 10, img: './cards/jack_of_diamonds2.svg'}, { value: 10, img: './cards/queen_of_diamonds2.svg'}, { value: 10, img: './cards/king_of_diamonds2.svg'}, ];
Let’s use the game assets
📝 Task 8: The Card Component
- Create a new file in
src/called:Card.jsx
- (the capital ‘C’ matters)
- Insert the following code into
Card.jsx// props is how we pass data to components function Card(props) { // this component just returns an <img /> return ( <img className='card' src={props.card.img} alt='' /> ); } export default Card
- Import Card into App.jsx
import Card from './Card';
- Test the Card Component in
App.jsx
- add a
<div className="hand">...</div>- inside the
<div>create a Card component with<Card />- pass data to the component with
<Card card={...} />Like this:
return (
    <div className="App">
        <h1>Card Game</h1>
        <p>Score: {score}</p>

        <button onClick={increaseScore} >Add Score</button>

        <div className="hand">
            <Card card={cardData[0] }/>
            <Card card={cardData[13] }/>
            <Card card={cardData[26] }/>
            <Card card={cardData[39] }/>
        </div>

        {score === 21 && <h1>You won!</h1>}
        {score > 21 && <h1>You lost</h1>}
    </div>
);
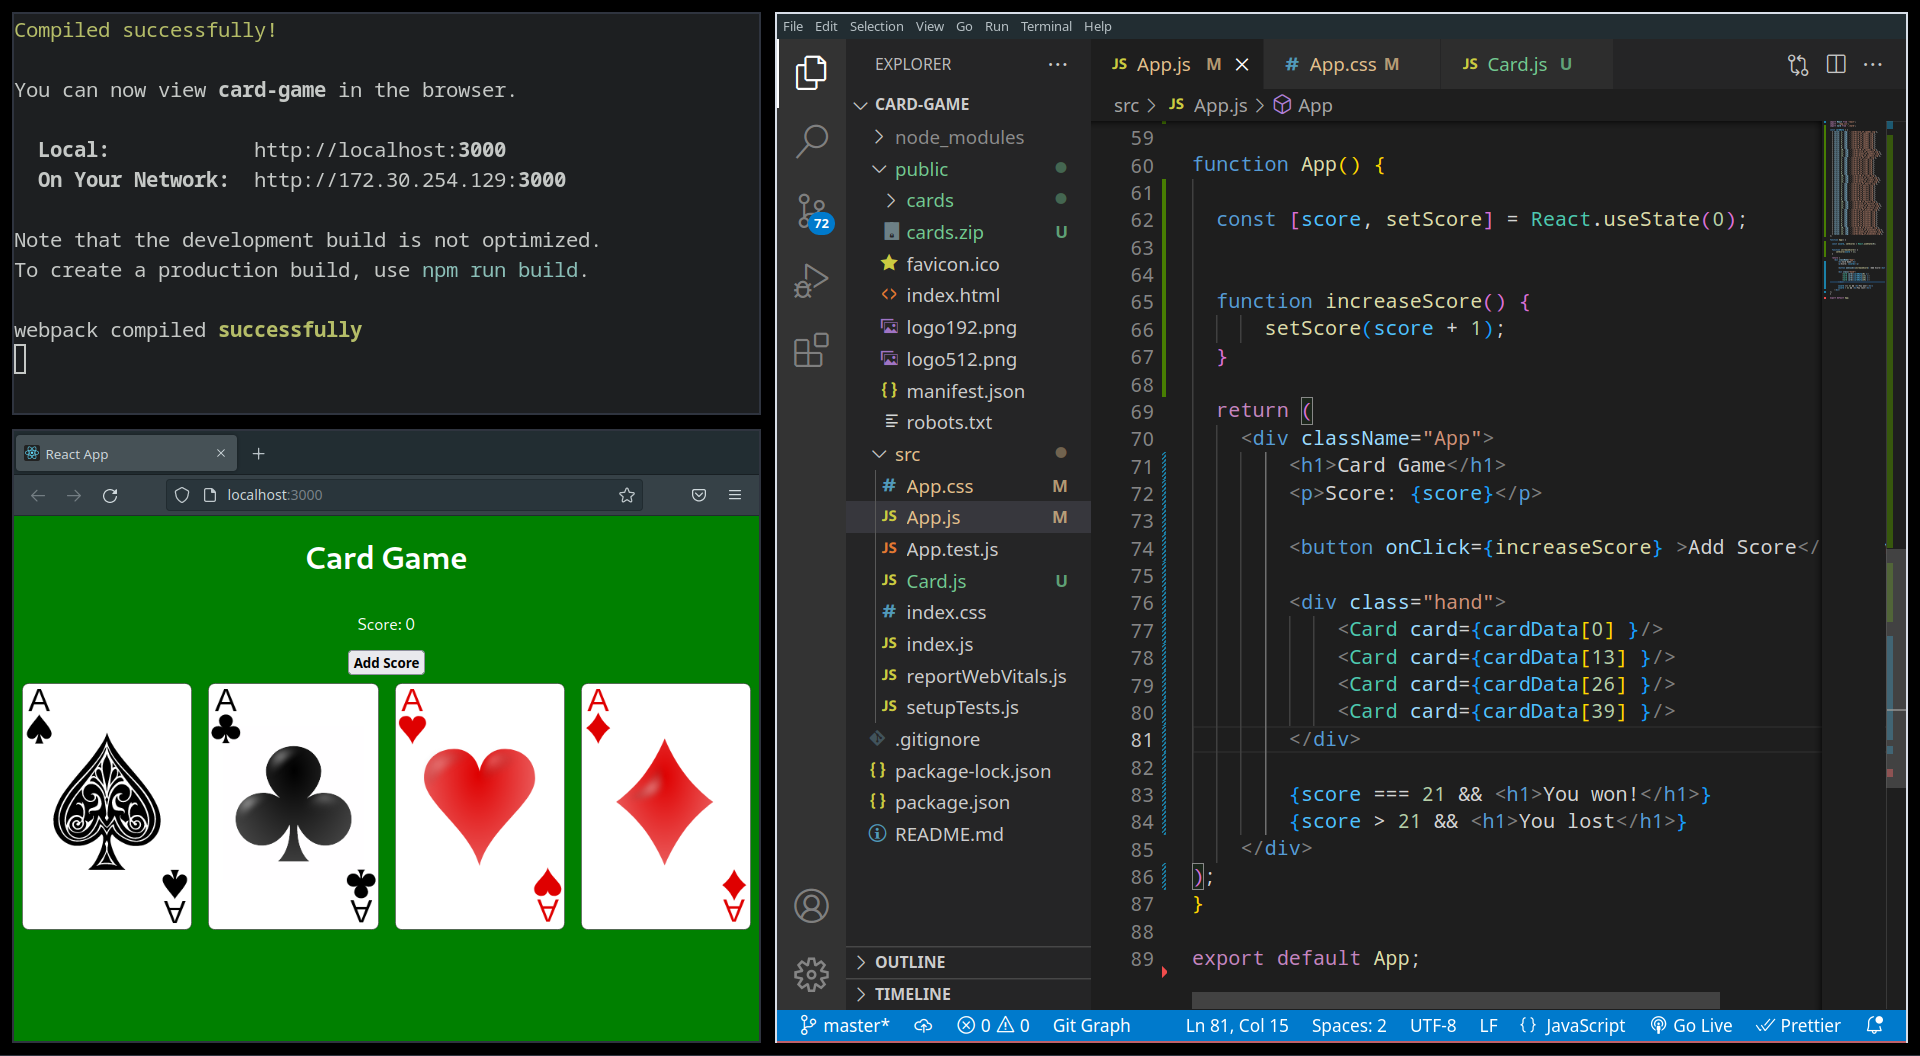
Add a state variable for the player’s cards. An array of numbers, where each number corresponds to an index in cardData.
const [hand, setHand] = React.useState([0, 13, 26, 39]);
JavaScript’s Array.map() is a function which transforms one array into another array. In JSX, it is commonplace to use Array.map() to create arrays of components. Below, we are transforming our array of numbers into an array of <Card /> components.
Add the code below into your App.jsx
<div className="hand">
    {hand.map((c) => <Card card={cardData[c]}/>)}
</div>
Lets add a function to add a random card to the player’s hand, and increase their score
Since our hand array is a state variable we can’t edit it directly. So, we first copy the array using the spread operator; modify the copy; then set the state variable to the modified copy.
function addNewCard() {
    // random card
    const newCard = Math.floor(Math.random() * cardData.length);

    // update player's hand
    const handCopy = [...hand]; // spread operator: deep copy array
    handCopy.push(newCard);
    setHand(handCopy);

    // update score
    setScore(score + cardData[newCard].value);
}
Add a button to call our addNewCard() function. The button auto-disables when the player wins/loses.
<button onClick={addNewCard} disabled={score >= 21} >New Card</button>
Add a function to reset the game
function clearHand() {
    setHand([]);
    setScore(0);
}
Add a button to reset the game
<button onClick={clearHand} >New Game</button>
That’s it.
The game is ready to play, and hopefully you learned some React syntax along the way!
If you’re familar with Black Jack you know we simplified the game.
If you have time you could easily implement the rest of Black Jack.
- Deal two random cards at the start of the game
- Track the cards which have been dealt (don’t deal duplicate cards)
- If player is dealt an Ace, they should choose
1or11- you could use conditional rendering to display buttons for the choice
- Play against the dealer
- the dealer will need their own hand
- the player’s choices should be:
- ‘Hit’ for a new card
- ‘Stand’ to keep their hand
- After the player Stands
- the dealer adds new cards until they win, or bust
- Implement a betting system?
This lab is worth marks. be sure to get signed off.