Lab 5: JavaScript, Fetching JSON
🎯 Lab ObjectiveIn this lab, you will learn how to fetch JSON from a web server
This lab teaches the following:
- fetch()
- JSON data
- GET and POST
Table of Contents
We are going to use the asynchronous data fetching function fetch(), to get JSON data from a web server.
Fetching is not instant, servers take time to respond. This is why processing is handled with callback functions.
function response_callback( response ) { ... }
function data_callback( data ) { ... }

fetch("www.example.com").then( response_callback ).then( data_callback );
✅ TipWhen passing a callback to a function only use the function’s name (i.e. without the parentheses)
foo( callback ); // correct ✅
foo( callback() ); // incorrect ❌
The data we are going to fetch is a JSON array of emoji.
https://cosc203.cspages.otago.ac.nz/labs/files/emoji.json
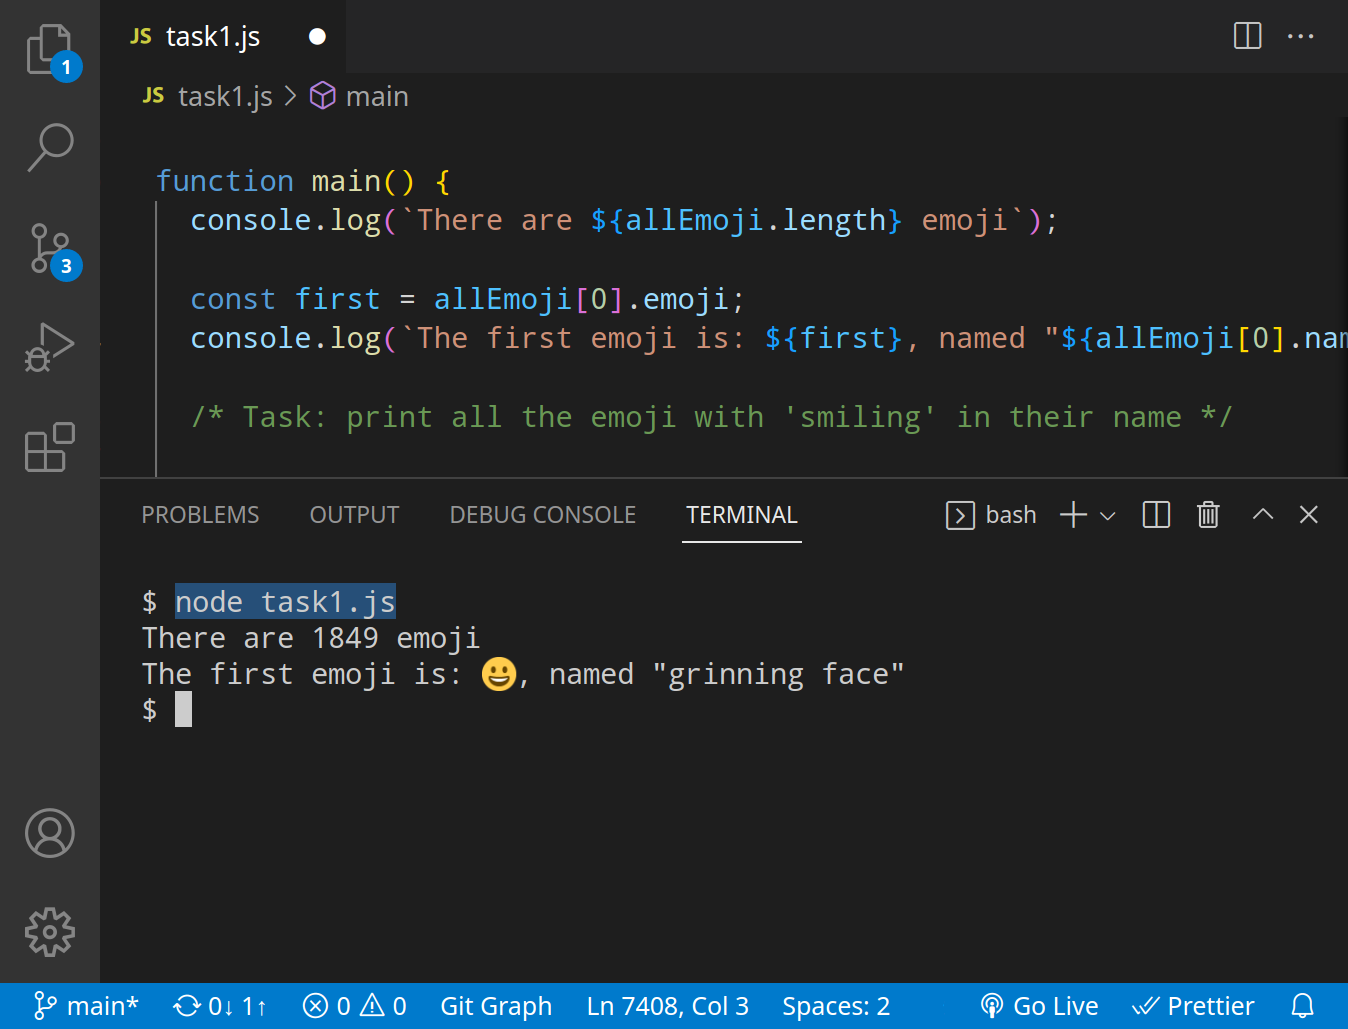
📝 Task 1: Fetching JSON
- Test the above link with a web browser
- Create a new
.jsfile- In a terminal, run:
node --version
- If you’re on version 17 (or higher) skip to (4)
- If you’re on version 16.x or below you need to install
fetch
- in a terminal, from the same folder as your
.jsfile:
npm install -s node-fetch@2- add the following to your
.jsfileconst fetch = require('node-fetch')- declare the URL as a variable
let URL = "https://cosc203.cspages.otago.ac.nz/labs/files/emoji.json";- Write some code to fetch the data
fetch(URL).then( response_callback ).then( data_callback );- Before the fetch() define two functions
response_callbackanddata_callback.function response_callback( response ) { ... } function data_callback( data ) { ... }- The
response_callbackprocesses the server response
- if
response.status != 200thenreturn;- if the status code is 200
return response.text()- The
data_callbackprocesses the actual data
- you should first parse the
textdata into JSONlet emoji_array = JSON.parse(data);- Loop over the
emoji_arrayand print all the emoji- Run the code in a terminal with:
node yourFileName.js
✅ Arrays in JavaScriptlet array = [1, 2, 3, 4, 5];Use square brackets
[ ]to access an elementconsole.log(array[0]); // prints 1The
.lengthpropertyconsole.log(array.length); // prints 5For loops
for (let i = 0; i < array.length; i++) {
    console.log(array[i]);
}
For each loops
for (let num of array) {
    console.log(num);
}
✅ Visual Studio CodeUse Visual Studio Code’s built-in terminal
Often, we convert JSON between a string format and object format. Strings are useful as they can be stored as files (serialized) and sent across the internet, but objects are easier to work with in code.
To convert a JavaScript object into a string, use JSON.stringify()
const obj = {
    "name": "grinning face",
    "emoji": "😀"
};
const string = JSON.stringify(obj);
To perform the inverse: convert a string into a JavaScript object, use JSON.parse()
const string = '{ "name": "grinning face", "emoji": "😀" },';
const obj = JSON.parse();
The data we fetched is an array, so we can treat it as such.
Each element of the array is a javascript object with 2 name/value pairs.
{
    "name": "smiling face with sunglasses",
    "emoji": "😎"
}
We can access each name/value pair with dot . notation.
let element = all_emoji[70];

console.log( element.name );

console.log( element.emoji );
📝 Task 2: JSON processingModify your emoji fetching program to only print the emoji with"smiling"in their name.
✅ TipYou may find the string method
.includes()usefulif ( my_string.includes("smiling") ) { ... }
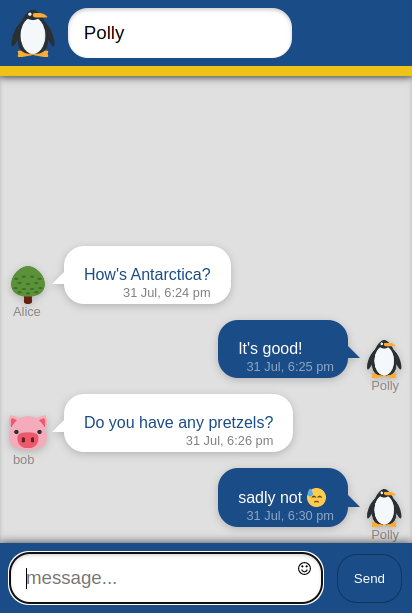
We are going to improve the chat application from the previous lab by using fetch() to communicate with an Web Service API.
- If you are working in the labs, use this server URL:
- If you are working from home, you must host the Web Service API
- download this Git repo
- follow the instructions in
README.md- your API server URL will be:
📝 Task 3: A Better Chat ApplicationThe provided files are modified from the previous lab.
We will modify
lab05.jsto fetch messages from a server (via a Web Service API).
- Download the lab files
- Test the client app first!
- in
Visual Studio CodestartLive Serverextension.- Open
lab05.html- Type a user name
- Type a message, and hit Send
- Read the code!
- It is important that you understand these functions:
lab05.js>submitNewMessage()
new ChatMessage(userName, message, time, "message-self")lab05-utils.js>_create()lab05-utils.js>_newelement()- They are refactored from the previous lab.
- Test the server first!
- Open the API server with a browser http://oucs1555.staff.uod.otago.ac.nz:8080
- read about how to interact with the server
- Test the
/messages.jsonendpoint.
- http://oucs1555.staff.uod.otago.ac.nz:8080/messages.json
- If working from home http://localhost:8080/messages.json
- you should see a JSON array of messages
- this is the endpoint where we will fetch data from
- fetch
/messages.jsoninlab05.js>loadAllMessages()
- Use the pattern
fetch(url).then(response_callback).then(data_callback);
- Response callback should
return response.txt();- Data callback should:
- Parse the JSON array
JSON.parse(data)- For each message in the JSON array
- call
new ChatMessage(sender, message, time, type)
- sender, message, and time, are all in the JSON object
- type is a CSS class and should be:
"message-self"ifuserName == message.name"message-other"otherwise.- Messages you send will dissapear as they aren’t actually sent to the server (yet)
- Prevent duplicate messages
- If you did everything right the chat log will grow infinitely 😢
- This is because
loadAllMessages()is called every 3 seconds (usingsetTimeout())- Modify your data handler callback to wipe all messages before loading new ones
- remove all existing messages in the chat log container
- get element
<main id="chat-log-container">
- or:
let e = document.getElementById('#id-goes-here');- set
e.innerHTML = '';- Your application should now refresh the chat log every 3 seconds
- This isn’t the best way to do this.
- Can you think of a better way?
By default fetch() sends GET requests. In the next task we will send POST requests to post data to the API server.
To send a POST request with fetch() you need to set the right options (the second parameter of fetch).
const fetchOptions = {
    method: "POST",
    body: '{ "name": "data" }', /* stringified JSON */
    headers: { "Content-Type": "application/json" }
}

fetch(URL, fetchOptions).then( post_response_callback ).then( post_data_callback );
Option paramters:
methodis the HTTP request type (GETis default).bodyis the payload, the data we are sending to the serverheadersare connection info and metadata.
📝 Task 4: Create POST requestsLet’s send messages to the server.
Write you code in
lab05.js>submitNewMessage()
- Prepare the data for transmission
- Format the message data a JSON object
- it must have 3 name/value pairs (
"name","message", and"time")
- for time use
new Date().getTime();const json_object = { "name": userName, "message": message, "time": time };- Use fetch to send the
POSTrequest
- The server’s endpoint for receiving POST requests is:
/send-message- fetch options:
const options = { method: 'POST', body: json_string, // stringify json_object before sending! headers: { 'Content-Type': 'application/json' } }- Write 2 callbacks to handle the response and data
fetch(url, options).then(response_callback).then(data_callback);- In reponse callback
console.log(response.status);:
201Successfully created400Bad Requestreturn response.text();- In data callback
console.log(data);for debugging- Congratulations
- you can now chat with everyone in the lab!
Improve our chat client so it doesn’t wipe the chat log every 3 seconds.
📝 Task 5: Final Challenge
- Modify
loadAllMessages()to be more efficient.
This lab is worth marks. be sure to get signed off.