Lab 4: JavaScript, DOM API
🎯 Lab ObjectiveIn this lab, you will learn how to use JavaScript in a Web Browser.
This lab teaches the following concepts:
- Event Driven Programming
- DOM API (modifying the web page with JS)
- Date API
- Timing Events
- localStorage API (optional)
Table of Contents
JavaScript is a scripting language designed to run inside web browsers.
📝 Task 1: Run JavaScript in a Web BrowserHow to run JavaScript directly in a Web Browser
- From any web browser (possiblt this one)
- Right click this page and click “Inspect”
- On Safari you must first enable dev tools
- Safari > Preferences > Advanced > Enable dev tools
- You should have opened the “dev tools” window
- Find the “Console” tab
- In the console type
console.log('hello');- In the console type
alert('hello');- Now try
setTimeout(function f() { console.log("hi") }, 1000);
So, console.log(); is our print function, alert(); displays a pop up.
setTimeout() is a timer. It takes two parameters: a callback function and a delay (milliseconds). It will execute the callback function after the delay has passed.
Congratulations! You are now a JavaScript developer!
✅ TipWhen passing a callback to a function only use the function’s name (i.e. without the parentheses)
foo( callback ); // correct ✅
foo( callback() ); // incorrect ❌
Some core stuff that you will find both familar and useful.
// single line comment

/* multi-line comment */
let myVariable;
myVariable = 'Polly';

let x = 4;
let y = true;
let z = 'string'
let myArray = ['one', 'two', 'three'];

// variables declared with const cannot be changed.
const PI = 3.14159;
if (y === true) {

} else if (x !== 4) {

} else {

}
for (let i = 0; i < myArray.length; i++) {

}

for (let i of myArray) {

}

while (x <= 0) {
    x++;
}
function multiply(a, b) {
    return a * b;
}
let x = multiply(4, 3);
console.log(x);
We are going to build a Web Application for Polly, so she can message her friends back home.

You can include JavaScript anywhere in HTML simply by using the <script> tag.
<main>
    <p>check the Dev Tools for a secret message!</p>
    <script>
        console.log('the WiFi password is: "OneTwoThreeAllCaps"');
    </script>
</main>
Though its better practice to use the <script> tag in the <head> with a src attribute to a separate file.
<head>
    <title>Lab 06</title>
    <script defer src="myScript.js"></script>
</head>
✅ TipThe defer keyword is optional (but recomended). It tells the Web Browser to run our script after the web page has fully loaded.
📝 Task 2: Link some JavaScript
- Download the lab files (right click, save as/Save Link As..)
- Link a JavaScript file
- create a JavaScript file (file extension
.js)- in the
.jsfile, insert:console.log('JavaScript works!');- use a
<script defer src=""></script>element to link the.jsfile- Load your web page
- check the dev tools to make sure the JavaScript worked
Next we will create a text box (and send button) so users can write messages.
HTML Forms are declared with the <form> tag. They are used to collect input from the user, like emails, passwords, etc… Usually a form would send the data to a server, but for our application we will use the data locally.
📝 Task 3: Create a FormUse the Blueprint below to create a
<form>
- Open
chat-app.htmlin a text editor
- VS Code maybe?
- Inside
<form>add two child elements
<input><button>- Inside
<button>insert “Send”- Add all the attributes from the Blueprint
<form id="message-form">- etc…
- If done correctly, your form will use our provided CSS.
- You won’t need to write any CSS for this lab
flowchart TD
    subgraph form
        id3(["id=“message-form”"])
        direction LR
        subgraph input
            direction LR
            id2(["id=“message-text”"])
            type(["type=“text”"])
            a(["autocomplete=“off”"])
            placeholder(["placeholder=“message...”"])
        end
        subgraph button
            id(["id=“message-button”"])
            type2(["type=“submit”"])
            text["Send"]
        end
    end
    style a fill:#f79,stroke:#333,stroke-width:2px
    style id3 fill:#f79,stroke:#333,stroke-width:2px
    style id fill:#f79,stroke:#333,stroke-width:2px
    style id2 fill:#f79,stroke:#333,stroke-width:2px
    style type fill:#f79,stroke:#333,stroke-width:2px
    style type2 fill:#f79,stroke:#333,stroke-width:2px
    style placeholder fill:#f79,stroke:#333,stroke-width:2px
    style form fill:#4186c988,stroke-width:2px,stroke:#333
    style input fill:#4186c988,stroke-width:2px,stroke:#333
    style button fill:#4186c988,stroke-width:2px,stroke:#333
    style text stroke:#333,stroke-width:1px
Events are asynchronous actions, which may be confusing… Essentially, events can occur at any time: a specific but indeterminate point in time. Events allow for interactive websites. Most events are triggered by user input.
To interact with the event system we must create an “Event Handler”, which is just a callback function to be executed when the event happens. Then, we provide this callback to an HTMLElement using addEventListener(). In this way the element will “listen” for the event and then execute our callback (event handler).
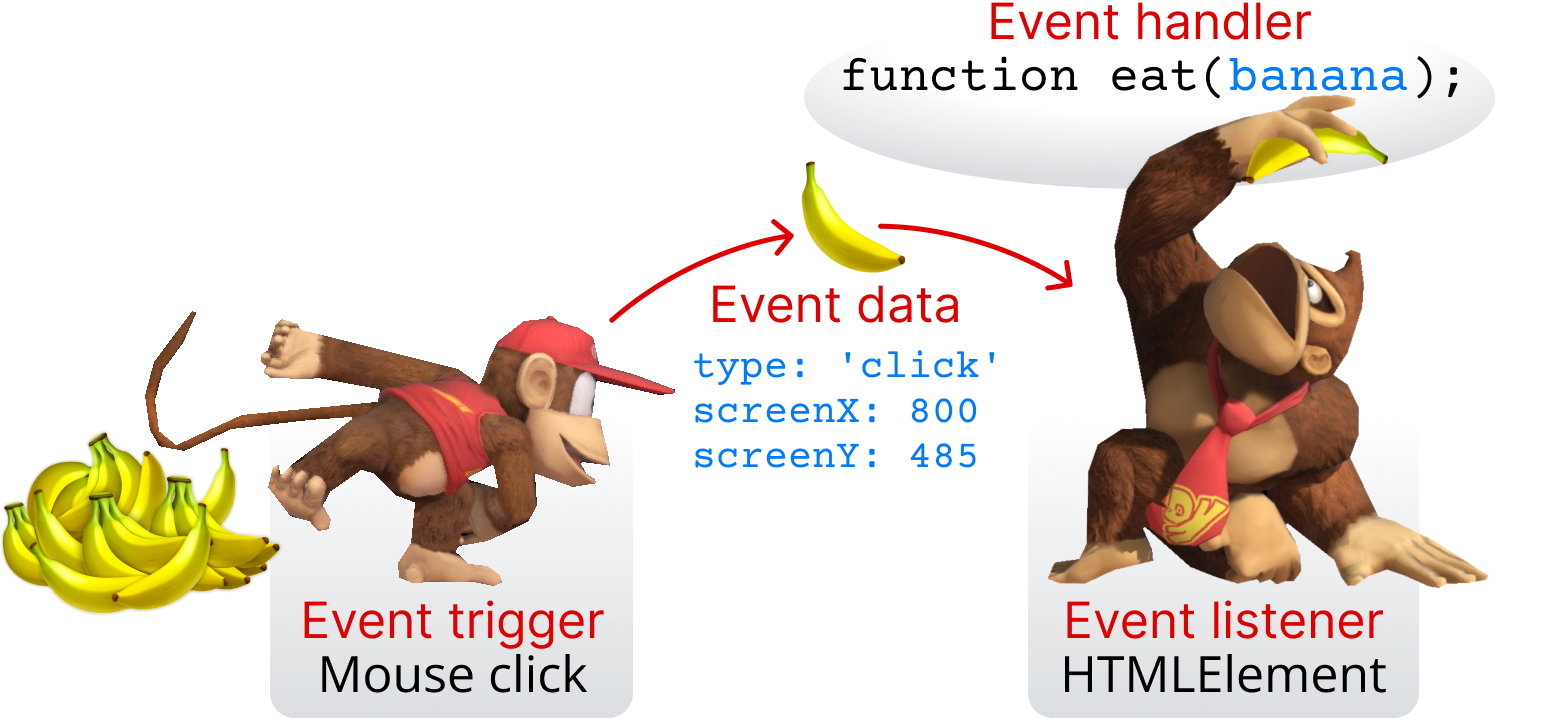
This is the essence of Event Driven Programming.
An HTMLELement is a JavaScript object, which represents an element on the page (e.g. <div>, <p>, … ). We can access any HTMLElement through the global variable document. Specifically, the document.querySelector(selector) will return a reference to the first element which matches the provided selector. And ``document.querySelector(selector)` will return a list of all elements which match the provided selector.
let element = document.querySelector("#css-selector");
Okay, let’s now give an event handler to an HTMLElement (then trigger an event).
📝 Task 4: Basic Event Driven Programming
- In your
.jsfile create an event handler callback functionfunction myEventHandler(eventData) { // Keep this! Otherwise the <form> will reload the page eventData.preventDefault(); console.log('event happened!'); console.log(eventData); }
- Get a reference to the
<button>element
- Use
document.querySelector(selector)with an appropriate “selector”- assign the return value to a variable (using
letorconst)- Register your event handler on the button reference
- on the button reference call
addEventListener()- set the first parameter to
'click'(the event type)- the second paramter to the name of your event handler function
- Check it works
- Clicking the button should print stuff in the Dev Tools console.
Your
.jsfile should look like this:function myEventHandler(eventData) { // Keep this! Otherwise the <form> will reload the page eventData.preventDefault(); console.log('event happened!'); console.log(eventData); } let btnRef = document.querySelector("#the-button-id"); btnRef.addEventListener('click', myEventHandler);
Lets do something more useful in our event handler. When we click on the button we want to retrieve the string in the text box (what the user typed), and put it on the page. Something like this:
To achieve this we will get a reference to the <input> element, and use the .value data field.
📝 Task 5: Get the Input ValueThe following task should be done inside the Event Handler function!
- Inside the Event Handler: get a reference to the
<input>element
let inputRef = document.querySelector(some css selector)- Assign the user’s string to a variable
- use
inputRef.valueto get the user’s input string- assign this string to a variable (maybe
message)?- We can test if it worked by using
console.log()to print the the variable- Clear the
<input>text box
- assign the empty string
''to.valueinputRef.value = '';- Test it out
- does the string print in the console?
- does the form clear itself?
Remember, you may remove the
console.log()calls if you don’t need them, they’re only for debugging/testing.
Before we use JavaScript to create Elements, let’s first test the provided .css.
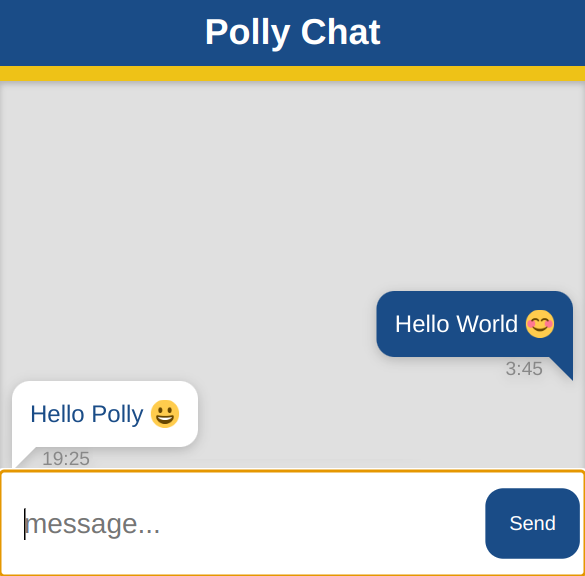
Add the following HTML into the <main> element and check to make sure it looks as expected.
<div class="message-self">
    <p>Hello World 😊</p>
</div>

<div class="message-other">
    <p>Hello Polly 😀</p>
</div>
flowchart TD
    subgraph div
        classd(["class=“message-self”"])
        direction LR
        subgraph p
            direction LR
            textm["Hello World 😊"]
        end
    end
    style classd fill:#f79,stroke:#333,stroke-width:2px
    style div fill:#4186c988,stroke-width:2px,stroke:#333
    style p fill:#4186c988,stroke-width:2px,stroke:#333
    style textm stroke:#333,stroke-width:1px
As you can see, each message is contained within it’s own <div> with a class: message-self or message-other. Inside the <div> is a <p> element with the message content. Creating these elements is straight forward after we learn how:
Returns a reference to a page element (type HTMLElement)
let e = document.querySelector(selector)`
Creates a new element and returns a reference to that element (type HTMLElement)
let p = document.createElement('p');
let div = document.createElement('div');
Setting an attribute on an element reference is as simple as:
const x = e.getAttribute(attribute);
const id = e.getAttribute('id');

e.setAttribute(attribute, value);
e.setAttribute('class', 'myClassName');
The HTMLElement interface has a data field .textContent which can be used to get or set the elements content.
let str = e.textContent; // get text content

e.textContent = "something new"; // set text content
To insert an element onto the page: first get a reference to the parent (already on the page), then use appendChild() or append() on the parent.
let parent = document.querySelector("#id");
let child = document.createElement('p');

parent.append(child);
✅ TipYou may also
p.append(c)to move an existing element to elsewhere on the page.There is also
p.prepend(c)to insert the element as the first child.There is also
p.insertBefore(c, p.children[1]);to insert the element as the second child (or any arbitrary position).
📝 Task 6: Creating ElementsWe will now insert the user’s input onto the page.
Again: all the code can be done inside the Event Handler
- create a
<p>element for the message content
- use
createElement()- (and assign it to some variable)
- set the
.textContentof this new element to the user’s string
- (the string fron retrieved the form/text field)
- Create a
<div>for the message box- Set the
<div>class attribute tomessage-self
- use
setAttribute()- append the
<p>to the<div>- get a reference to the message container
- this one:
<main id="chat-log-container">- append the
<div>to<main>
- using
parent.append(child);- Test it out
- type a message, and hit send
- does the message appear correctly?
Web browser’s also provide an interface for date and time via Date objects.
The defult constructor will return the current datetime:
const d = new Date(); // returns the datetime "now"
If you want to get a specific datetime:
const d = new Date("December 25, 2022 06:30:00");
// more date formats here https://www.w3schools.com/js/js_date_formats.asp

const year = 2022;
const month = 11; // January = 0, december = 11
const day = 25;
const date = new Date(year, month, day);

const hours = 6;
const minutes = 30;
const seconds = 0;
const milliseconds = 0;
const datetime = new Date(year, month, day, hours, minutes, seconds, milliseconds);
To convert a date object into a string there are many options.
📝 Task 7: Test the Date APIWe will soon add timestamps to our messages, like this:
Copy the below code into the Dev Tool console (or Node) and figure out which one you want to use for the message timestamps.
const d = new Date();

console.log(d.toString());
console.log(d.toDateString());
console.log(d.getTime());
console.log(d.getHours() + ":" + d.getMinutes());
✅ TipFor more methods on converting aDateto strings check here https://www.w3schools.com/js/js_date_methods.asp
📝 Task 8: Add timestamps to the messagesWe will now write some JavaScript to adds timestamps to the messages.
In the Event Handler function:
- Use JavaScript to Create another
<p>element- Give it the class attribute
timestamp- Set the
.textContentto the current time
- use the
Datestuff explained earlier- Append it to the
<div>- Test to make sure the timestamps appear correct
- hopefully, the provided
.csswill style it nicelyThe messages should now be created with this HTML structure:
<div class="message-self">
    <p>Hello World 😊</p>
    <p class="timestamp">1:23</p>
</div>

<div class="message-other">
    <p>Hello Polly 😀</p>
    <p class="timestamp">3:45</p>
</div>
flowchart TD subgraph div classd(["class=“message-self”"]) direction LR subgraph p direction LR textm["Hello World 😊"] end subgraph pm["p"] classt(["class=“timestamp”"]) textt["1:23"] end end style classd fill:#f79,stroke:#333,stroke-width:2px style classt fill:#f79,stroke:#333,stroke-width:2px style div fill:#4186c988,stroke-width:2px,stroke:#333 style p fill:#4186c988,stroke-width:2px,stroke:#333 style pm fill:#4186c988,stroke-width:2px,stroke:#333 style textt stroke:#333,stroke-width:1px style textm stroke:#333,stroke-width:1px
We said earlier we were building a messaging app. In truth, we are building a simple chat bot.
If we create an array of strings, we can randomly choose from one, and simulate the app receiving a message. Here is how arrays in JavaScript work.
let bot_messages = [];
bot_messages[0] = "How's Antarctica?";
bot_messages[1] = "Wanna get some sushi later? 🍣😋";
bot_messages[2] = "I 🐳 always be here for you.";
bot_messages[3] = "Noot noot 🐧";
bot_messages[4] = "There's plenty of 🐟 in the 🌊 but I like you best ❤️";
📝 Task 9: Progam a bot to send messagesWe will now program the “bot” to generate random messages.
Messages from the bot have the same HTMl structure as our other messages, except the
<div>class will bemessage-other(instead ofmessage-self)
- Copy the event-handler-function so we can modify it for the bot
- name the new function something like
function receiveMessage() { ... }- you can remove
eventDatawe wont be using it- (usually, copying code is bad practice, but we can refactor it later.)
- In this new function, set the class attribute of the
<div>tomessage-other- In this new function, set the
textContentof the<p>to a random message
- You may use the array provided above.
- You may find
Math.random()useful
- it returns a random float >= 0.0 and < 1.0
- You may find
Math.floor()useful
- it rounds numbers down
- You may find
myArray.lengthuseful
- it returns the number of strings in the array
- (you can remove the code relating to the
<input>)- Call your
receiveMessage()function at the bottom of your.jsfile about 5 times
- Refreshing the page will re-execute your code
Your code should have roughly this structure:
function eventHandler(event) {
    ...
}

function receiveMessage() {
    let bot_messages = [];
    bot_messages[0] = "How's Antarctica?";
    ...

    // choose a random message from the string array
    // create <p> element for message
    // create <p> element for the timestamp
    // create <div> element for the message box

    // append it all together, into <main>
}

receiveMessage();
receiveMessage();
receiveMessage();
receiveMessage();
receiveMessage();
*Feel free to write you own chat bot messages.
Sometimes, in event driven programming (asynchronous programming) it makes sense to control our application with timers. Events which are triggered by timers are quite easy.
To delay code by a specific amount of time, use: setTimetout(func, delay);
The first parameter (func) is the name of the handler function, to be called after the delay.
// execute after 1,000 milliseconds (1 second) has passed
setTimeout(myHandler, 1000);
The first parameter could also be an anonymous function: a function without a name, like below:
setTimeout(function() {
    console.log("I will print after 1 second. " + new Date());
}, 1000);
To repeatedly execute code at a fixed rate, use: setInterval(func, delay);
The first parameter (func) could be the name of the handler function, or an anonymous function.
setInterval(myHandler, 1000);

setInterval(function() {
    console.log("I will print every second. " + new Date());
}, 1000);
📝 Task 10: Automate the chat botAutomate the chat bot
- Remove the 5 calls to
receiveMessage();- Use
setInterval()to make the chat bot send a message every 5 seconds.- Use
setTimeout()to make the chat bot reply after 1 second.
- i.e. everytime the user “sends” a message, the bot will reply after a 1 second delay.
You could also use
Math.random()to add some variation between times
This Section is an optional extension.
Everytime we refresh the page our chat history is wiped :(
In the following task we will save the chat history locally (in the browser), so we can load it when the page loads.
We will use localStorage to achieve this. If you remember from earlier, the web browser does not allow JavaScript to directly access the File System on the computer, however, it does provide localStorage which will allow us to store data (as strings). We could use cookies, but localStorage is much easier and more flexible for our purposes.
📝 Task 11: localStorage extensionFirst let’s create an array to store our messages
- At the top of your
.jsfile create an empty array for our messageslet chatHistory = [];
- Every time you creat a message on the page, add it to the array too
to append data to an array, use
array.push().const type = "message-self"; // the class const message = ""; // the message content /* the following is an Object of Key-Value pairs lust like python's dictionary (dict) */ const messageObject = { "type": type, "message": message }; // add the messageObject to the array chatHistory.push(messageObject);
- Every time you push to the
chatHistoryarray, also save it tolocalStorageThe following code first encodes the array as
JSONwhich is the most popular way to serialize data in Web Applicationsconst encodedData = encodeURIComponent(JSON.stringify(chatHistory)) localStorage.setItem("chatHistory", encodedData);
- When the page first loads, create the messages from
localStorage// if chat history exists in local storage if(localStorage.getItem("chatHistory") !== null) { // retrieve the data const encodedData = localStorage.getItem("chatHistory"); // decode the data into an array const savedMessages = JSON.parse(decodeURIComponent(encodedData)); // this is a for each loop (in the functional paradigm) savedMessages.forEach(message => { if (message.type === "message-self") { // create messages where message.message is the content } else if (message.type == "message-other") { // create messages where message.message is the content } }); }
- To clear the chat history, you could use the following code:
function clearChatHistory() {
    chatHistory = [];
    localStorage.removeItem("chatHistory");
    document.querySelector('#chat-log-container').innerHTML = "";
}
Maybe clear the chat history with another button?
This lab is worth marks. be sure to get signed off.