
Lab 2: Git and Web Servers
🎯 Lab ObjectiveIn this lab you will learn Git and web servers.
- Git usage
- SSH Authentication
- Local Web Servers
- Public Web Servers
Table of Contents
If you are using the lab machines, do the following first (even if you have done it before).
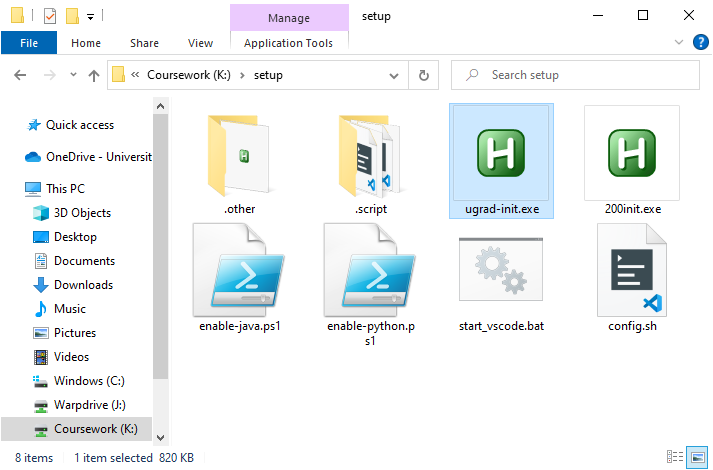
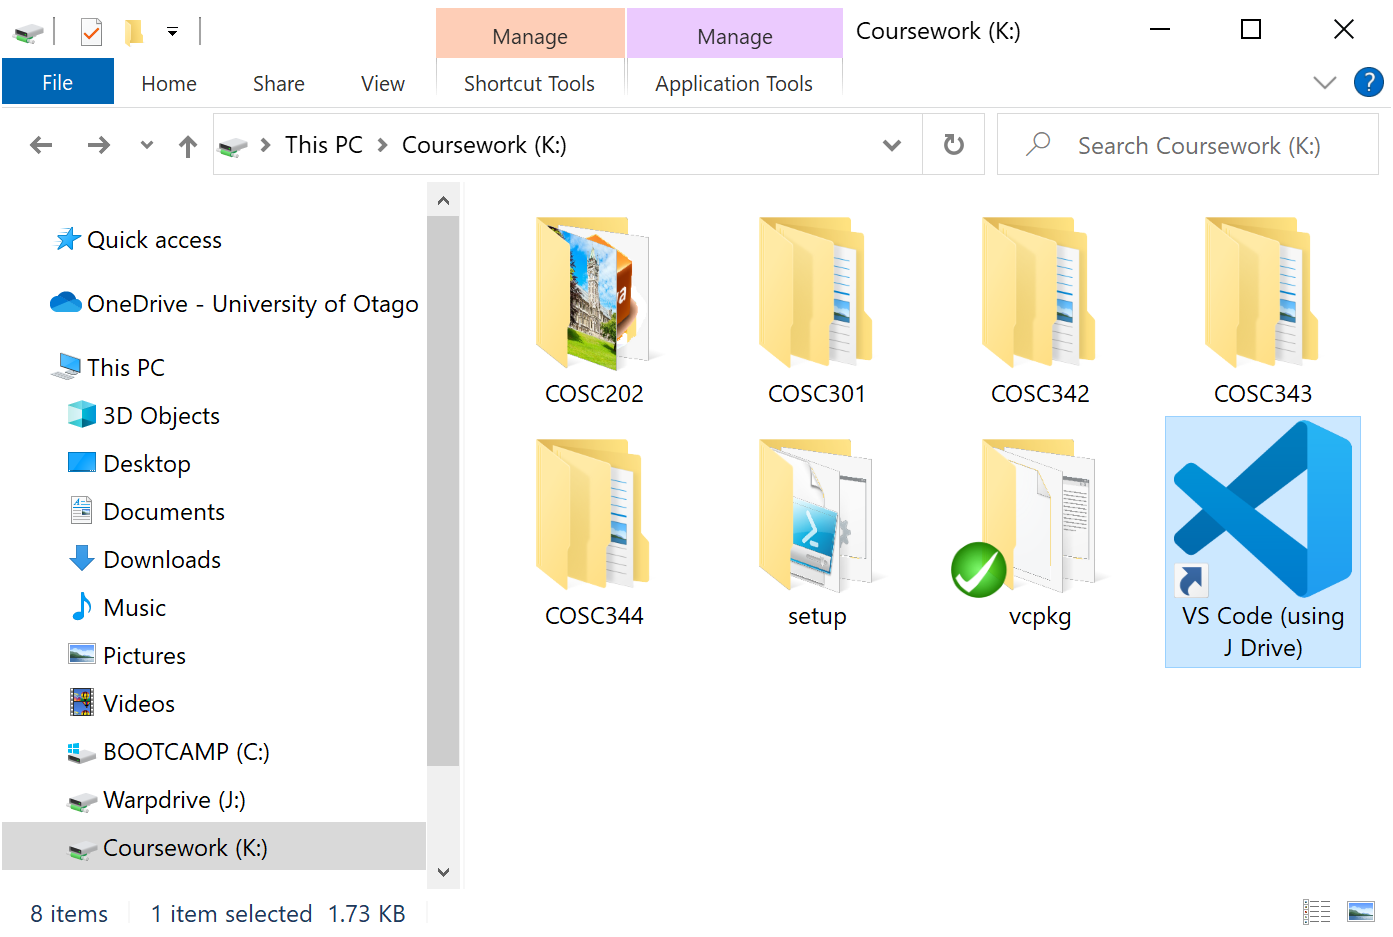
📝 Task 1: Setup Lab Environment
- Run the
ugrad-init.exeunderK:\setup\
- Copy
VS Code (using J Drive)shortcut fromK:\to your Desktop
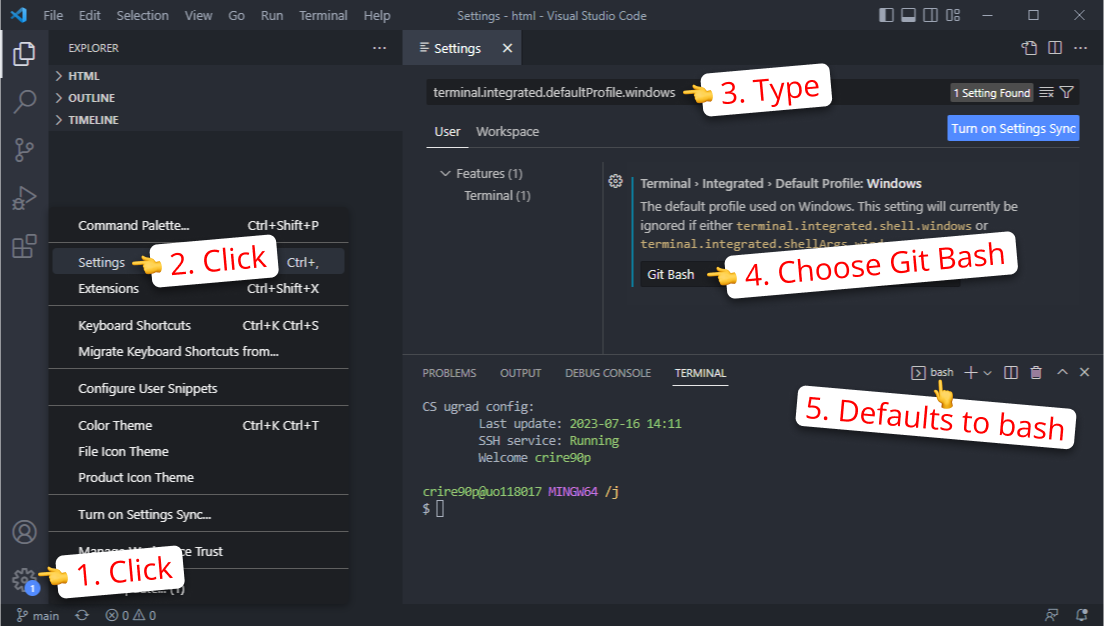
- Update VS Code’s default terminal.
- Open
VS Code (using J Drive)- Change the following setting …
terminal.integrated.defaultProfile.windows
- … to
Git Bash
Git is the world’s most popular Version Control system (VCS); like an incredibly powerful save (and undo) button. Using Git is not necessary for web development, but its use is industry standard by almost every software development company.
✅ TipEven if you learned Git during COSC202 you should still do this lab as there are a couple of changes we will need for Assignment 1.
Usually, when a computer saves a file it will overwrite the previous file; the previous version of the file is gone and if you’re not careful you could accidentally overwrite important data. When you save a file in a Version Control system (like Git), both the new file and the changes from the previous version will be saved. So you can always rewind changes and recover from any accidental mistakes. Git can also be synced to a remote Git server, so even if you spill Redbull on your computer, your project files are still safe.

Comic about Git: xkcd.com/1597
Repository (repo)
- In Version Control systems, a repository is where the file change history is stored. In Git, this is the hidden directory
.git/, usually in the same directory as all your project files. If you delete the.git/directory, you will delete the repo and all of your project’s history.
- In Version Control systems, a repository is where the file change history is stored. In Git, this is the hidden directory
File Tracking
- A tracked file has it’s entire history of changes stored in the repository. If you want to prevent file(s) from being tracked: create a plain-text file called
.gitignorein the project root and include the untracked filename(s).
- A tracked file has it’s entire history of changes stored in the repository. If you want to prevent file(s) from being tracked: create a plain-text file called
Commits
- Version Control systems do not sync files automatically, they need to be instructed exactly when to save and which files to save. Git Commits are these save points, they are the core building block units of a Git project timeline. A commit may contain several file changes and is always tagged with a commit message (which should be a meaningful description of the changes).
- If we wanted our files to be synced continuoulsy we would use SyncThing, DropBox, OneDrive, Google Drive, or iCloud. But these services aren’t designed for tracking source code like Version Control systems are.
File Staging
- Staging is the step before a commit. Staging a file is how we carefully control which files (and which changes) are added to each commit.
Remote Repository
- By default, commits are only stored in a local repository (on your computer inside
.git/), which allows us to easily track and revert file changes. However, Git is best used when the repository is also hosted on a remote server. There are free services like Github or Bitbucket, or you can host your own Git server with GitLab. - The benefits of having a remote server include:
- Accessible from any computer on the internet
- A backup if/when your computer dies
- Easier teamwork and collaboration
- Continuous integration and deployment (more on this later)
- By default, commits are only stored in a local repository (on your computer inside
In this paper we will be using Git to maintain the source code of website(s) that we build. We will also be using Git to deploy our websites to a live server!
You will need the.htmlfiles from Lab 01.
📝 Task 2: Local Git Repo
- If working on your own computer
- download and install git
- Open your Lab 01 folder
- From VS Code,
File > Open Folder- Open Terminal
Terminal > New Terminal- If this is your first time using git, run the following commands
git config --global user.name "Your Name"git config --global user.email "your_email@example.com"- Create a Git repo in this directory
git init --initial-branch=main- git can default to
master, butmainis the new standard.- Stage all the files
git add index.htmlgit add contact.htmlgit add stories.htmlgit add polly.jpg- or stage all files with one command
git add -A- Commit the staged files
git commit -m "first commit"- Check that everything worked
git logcheck the commit historygit statuscheck for unstaged and uncommited filesExpected output:
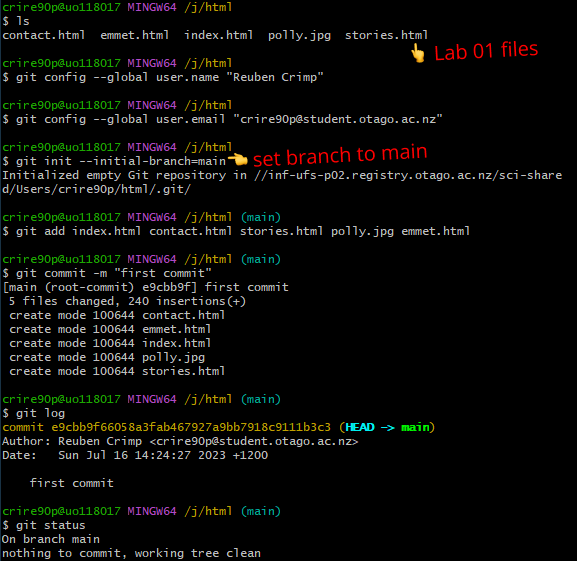
Now we can track file changes in our project,
Next, we need to choose a remote server to host our repository: GitHub or GitLab.
Altitude (altitude.otago.ac.nz) is a Git remote service hosted by the Computer Science department. It’s 100% free, fully featured, and fast!
GitHub (github.com) is the world’s most popular Git remote service. It’s mostly free as some features cost money. The choice is yours to make.
📝 Task 3: Remote Git Server
- Decide on GitHub or GitLab
- GitLab: login to altitude.otago.ac.nz with your student credentials
- GitHub: register an account on github.com
- optionally: register for the Student Developer Pack to access paid features as a student.
- Update git with the correct email address
git config --global user.email "your_email@example.com"- GitLab: use your student email
- GitHub: the email you registered to GitHub with
When pushing/uploading changes to a Git remote server you must authenticate yourself. Since GitHub has deprecated HTTPS authentication (typing your username and password), we will setup SSH Key Authentication as it’s the modern standard.
SSH Keys come in pairs, a public key and a private key. Both keys are strings stored in files. The private key is a guarded secret, but the public key may be distributed freely.
We will give the remote Git Server the public key. Then, during authentication we can prove our identity as we are the only person with the corresponding private key.
📝 Task 4: Setup SSH Authentication
- If using your own Windows computer
- Either intall Git Bash or…
- Enable WSL (Windows Subsystem for Linux)
- Start SSH service agent
- From Git Bash or MacOS Terminal
eval $(ssh-agent -s)- Generate a public and private key pair
ssh-keygen -t ed25519 -C "your_email@example.com"- you must use the same email as GitLab or GitHub account
- accept all the deafults when prompted:
- file name
~/.ssh/id_ed25519- empty / no passphrase
- There will now be 2 files in
~/.ssh/
id_ed25519the private keyid_ed25519.pubthe public key- Add your private key to your keychain
ssh-add ~/.ssh/id_ed25519- Check to make sure the private key was added
ssh-add -l- Copy the public key to your clipboard
- Windows
clip < ~/.ssh/id_ed25519.pub- MacOS
pbcopy < ~/.ssh/id_ed25519.pub- Add your public key to the Git remote server
- GitLab:
Profile > Edit Profile > SSH Keys- give it a name/title
- paste the key (from
id_ed25519.pub)- remove expiration date
- click
Add Key- GitHub:
Profile > Settings > SSH and GPG Keys > New SSH Key- paste the key (from
id_ed25519.pub)- give it a name/title
- remove expiration date
- click
add SSH Key- Test that the key works
- the following command authenticates the private key (in your keychain) with the public key (on the remote server)
- GitLab:
ssh -T git@altitude.otago.ac.nz- GitHub:
ssh -T git@github.comExpected output:
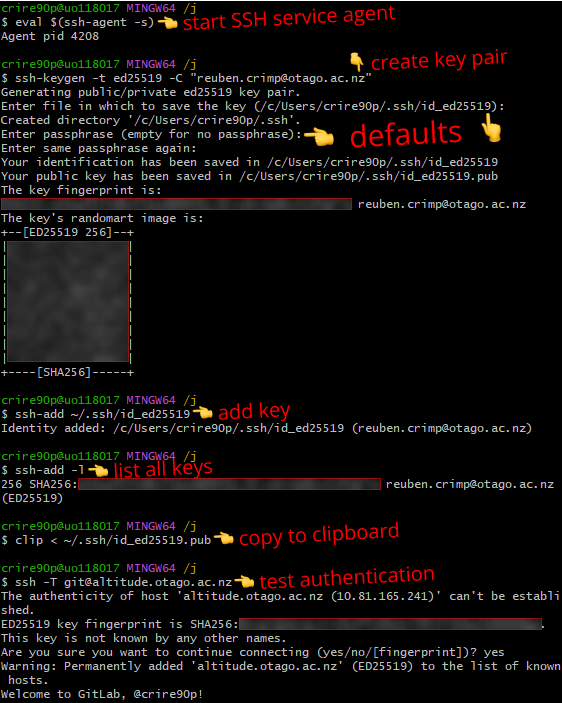
From now on every interaction with the remote Git server will be quick, easy, and secure.
Next, we will push our local Git repo to the remote server.
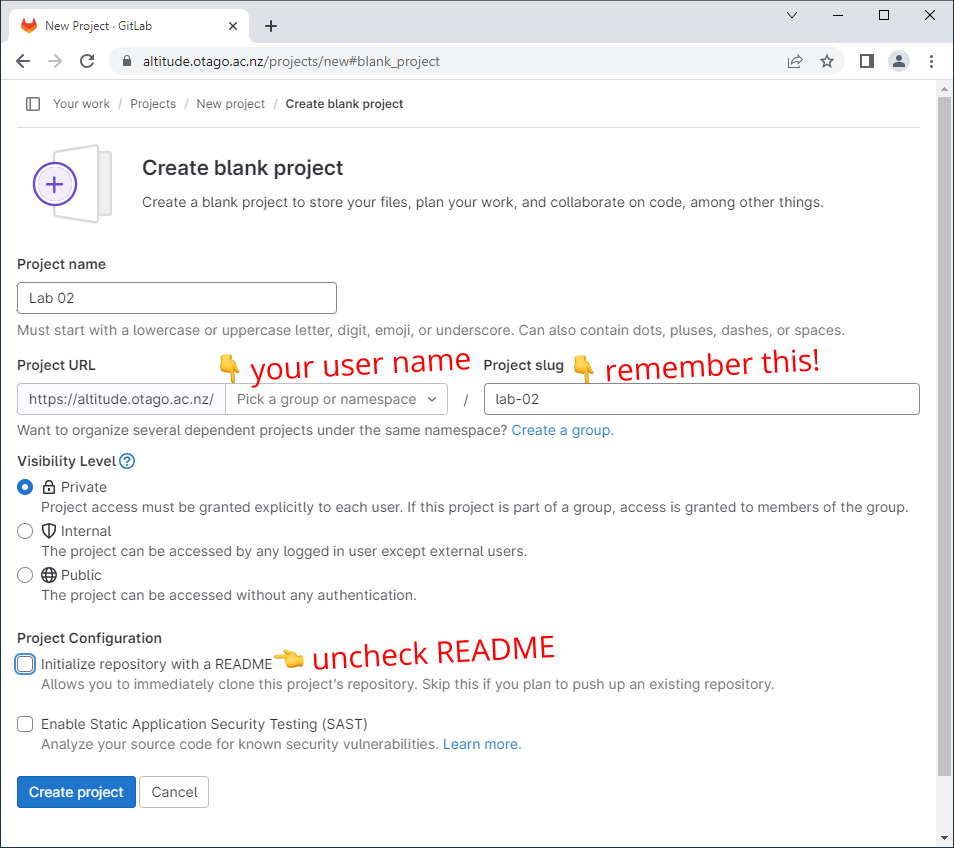
📝 Task 5: Create Remote Repository
- Create a remote repository
- Gitlab
- Login to altiude.otago.ac.nz
- Click New project
- Click Create blank project
- Type in some Project name
- Choose your user name as the Project URL
- Select Private visibility
- Uncheck Initialize repository with a README
- Click Create Project
- GitHub
- Login to github.com
- Click New
- Type in some Repository name
- Select Private
- click Create repository
- Return to the terminal
- navigate (
cd) to our git repo we created earlier- Add the remote server to your local repo
- GitLab:
git remote add origin git@altitude.otago.ac.nz:{username}/{project-name}.git
- e.g.
git remote add origin git@altitude.otago.ac.nz:crire90p/lab-02.git- GitHub:
git remote add origin git@github.com:{username}/{repo-name}.git- Push the latest commit to the remote server
git push -u origin main- Refresh the web browser to ensure everything worked
If
gitdefaulted tomasterbranch, you must rename tomainbefore pushing.git branch -M main git push -u origin main
Next, lets test our remote by making some file changes.
📝 Task 6: Update the repo
- Make some changes to
index.html- Stage the changes
git add index.html- Commit the changes
git commit -m "some changes"- Push the changes
- either
git push- or
git push -u origin mainwhich identifies
- which remote:
origin- which branch:
mainThese are the three commands you should run whenever you update your project. Add. Commit. Push… Add. Commit. Push…
There are a few ways to host your website on the internet.
You could run a local web server on your own computer and configure port forwarding on your home router.
A more popular choice is to use someone elses computer which is already configured and is online 24/7. Some of these services inlcude Amazon’s AWS, Google Cloud, DigitalOcean, etc.
There are many software packages with web server functionality. In the next excercise we will use use Node.js (npm/npx) to host a local web server.
📝 Task 7: Local Web Server
- If you are working on your own computer, install Node.js
- From a terminal navigate (
cd) to your .html file(s)- Run
npm install -g http-server
- on the lab machines you may have to run this command several times before it works.
- Run
npx http-server- Visit localhost:8080 from a web browser
There are almost limitless ways to configure and modify your Node.js server, and we will be looking into some of those options in future labs.
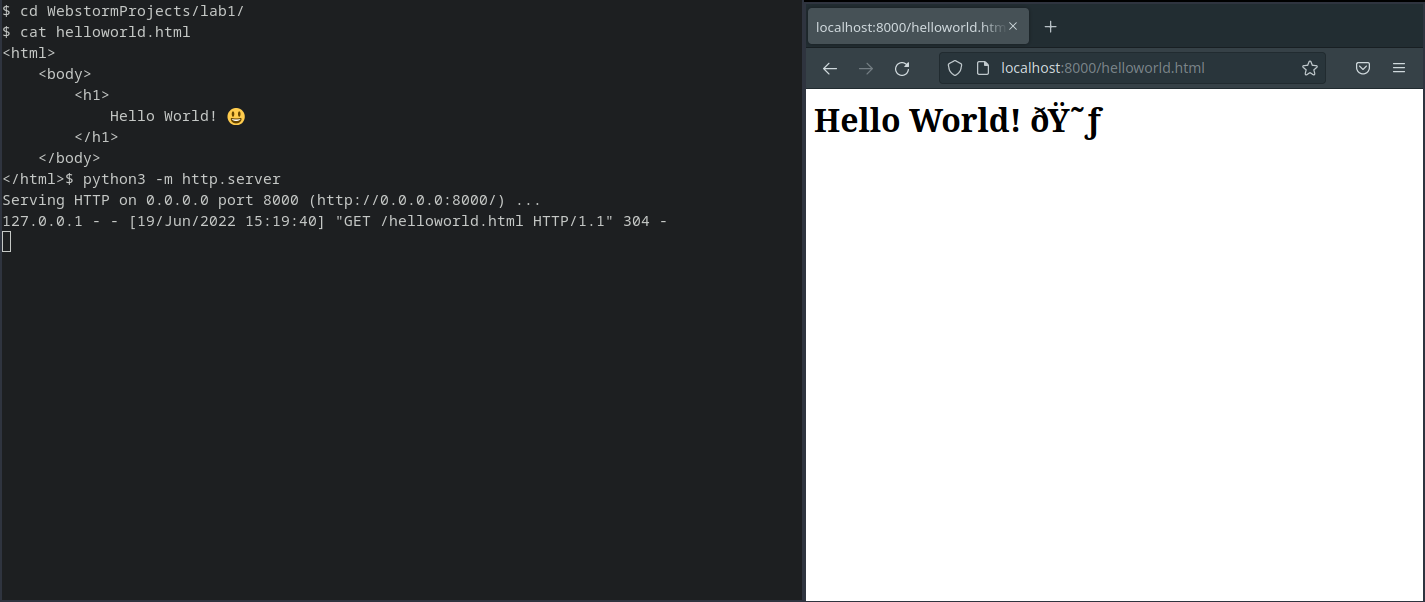
✅ Python Web ServerYou could also use Python to run a web server.
- Install Python 3
- Run
pip install http- With a terminal navigate (
cd) to your .html file(s)- Run
python3 -m http.server- Visit localhost:8000 from a web browser
Lastly we will make our site accessible on the internet using a public web server.
Both GitLab and GitHub offer a service called “Pages”, a free, static, web hosting solution. All we must do is tell the remote how to deploy our repository files as a website.
✅ TipHosting your website like this is a requirement for Assignment 1
Finish the below task if you chose GitLab
📝 Task 8: GitLab Pages
- Create a file in the repo called
.gitlab-ci.yml- Copy the following into the file:
pages:
  stage: deploy
  script:
    - mkdir .public
    - cp -r * .public
    - mv .public public
  artifacts:
    paths:
      - public
  only:
    - main
- Stage, Commit, and Push the file to GitLab
- Check the deployment progress under
- CI/CD > Pipelines
- Make the site visible
- Settings > general > Visibility, project features, permissions
- Click Expand
- Under Pages select Everyone
- Open the URI under
- Settings > Pages > Access pages
- It will look like:
https://{user}.cspages.otago.ac.nz/{repo}/
Finish the below task if you chose GitHub
📝 Task 9: GitHub Pages
- From the repository page on github.com
- Visit Settings > Pages
- Under source choose the main branch
- Click Save
- Check the deployment progress under Actions
- wait for pages build and deployment to finish
- Open the URI under:
- Settings > Pages
- It will look like:
https://{user}.github.io/{repo}/
Getting a job as a programmer requires you to showcase your skills and experience. Building a portfolio website is a great way to do this.
📝 Task 10: Portfolio Website
- Download a free template
- Modify the images/text
- Host it on GitHub Pages
- https://pages.github.com/
- While you could host it on GitLab, GitHub would impress employers more.
- My personal portfolio is here https://rcrimp.github.io
✅ TipThe above task is optional. You could instead use this time to work on Assignment 1.
This lab is worth marks. be sure to get signed off.