Lab 1: HTML Basics
🎯 Lab ObjectiveIn this lab, you will learn the fundamental concepts of HTML documents.
This lab teaches the following concepts:
- HTML Elements
- HTML Tags
- Nesting Elements
- Element Attributes
- Hyperlinks
Table of Contents
The labs are held in Owheo, G.37 or G38 (Lab E or Lab F). The lab exercises are designed to be viewed on Google Chrome. You may instead use your own computer, but you will have to install some development tools.
If you haven’t logged into lab compters before, your login is the same as your your university login. If you cannot log in, ask a demonstrator for help (or anyone else nearby).
Visual Studio Code (VSC) is a flexible IDE designed for modern software development. Conventiently it is already installed on the lab computers.
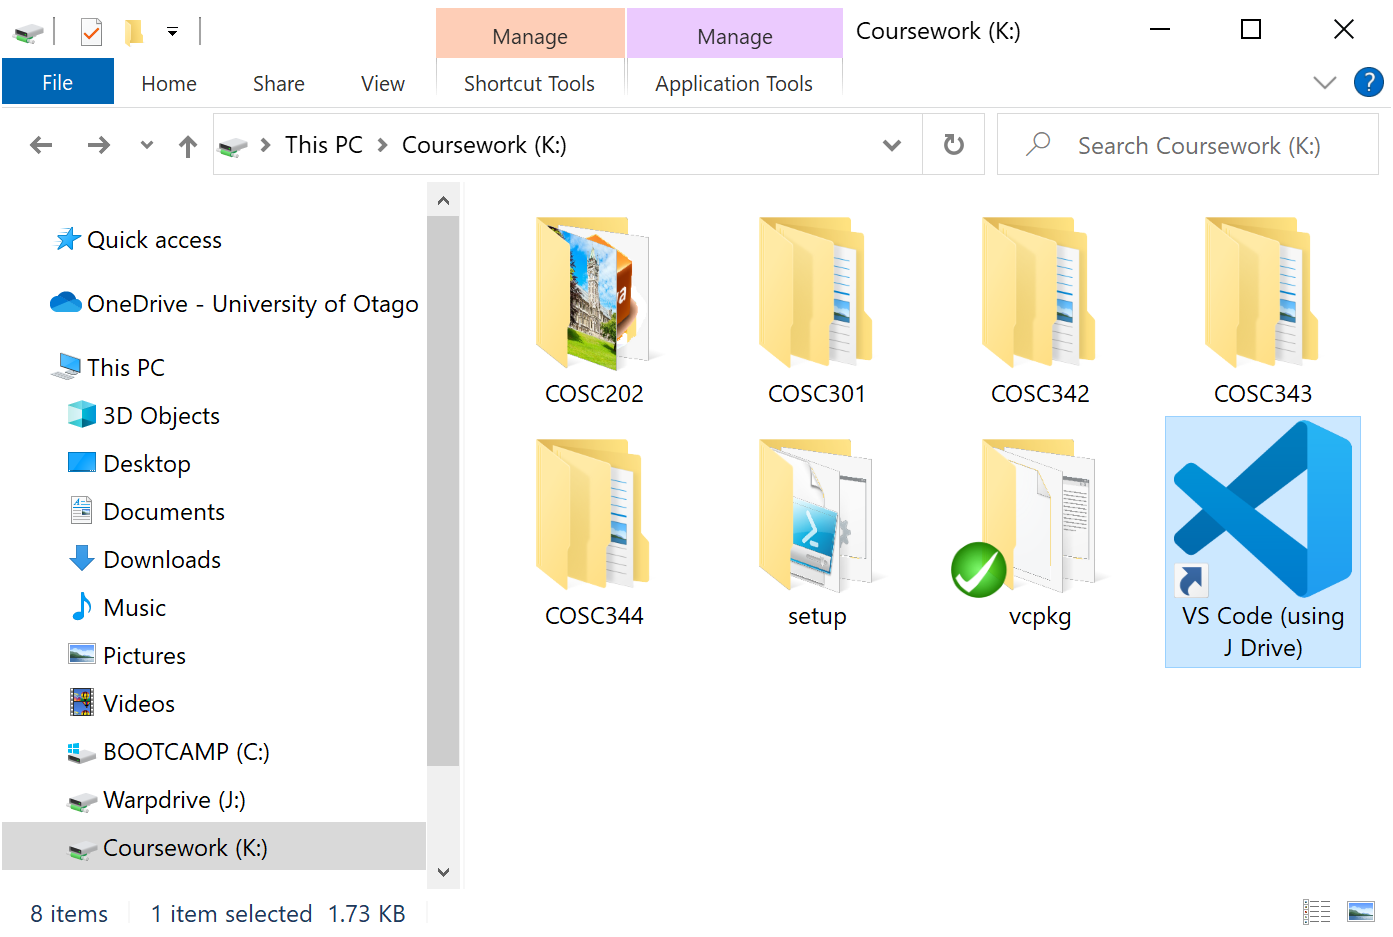
✅ TipIf using the lab computers, use the shortcode to VS Code under
Coursework K:\This shortcut tells VS Code to use J:\ Drive for settings/extensions. This way your settings will load on any lab computer.
- C:\ local storage
- H:\ home drive (small and slow)
- J:\ Warpdrive (fast and large)
- K:\ Coursework (readonly files)
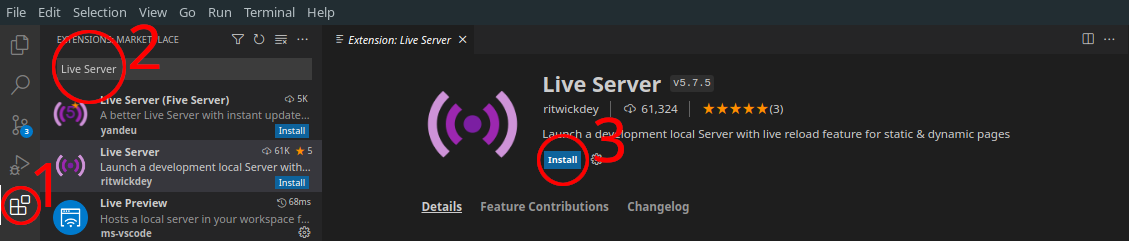
To assist our web development we will install the “Live Server” extension, which will allow us to preview our HTML documents as we write them.
📝 Task 1: Get Visual Studio Code running
- If working from your own computer
- Open Visual Studio Code
- Install the “Live Server” Extension
- Open Extension Marketplace
- Search “Live Server”
- Click Install
✅ Keyboard ShortcutsKnowing all the features (and keyboard shortcuts) is crucial to being a productive developer.
Visual Studio Code keyboard shortcuts:
HTML is not a programming language, it is a declarative language. Programming languages like Python or Java tell the computer how to do things. Declarative languages like HTML tell the computer what it should do. That’s not a great explanation, but it will become clear soon.
Programming languages have control flow. The code defines an order of instructions to be executed. The order of these instructions can be changed with conditionals (like if) and loops (like while). In HTML there is no control flow.
We still write HTML in plain text saved to files; with the .html extension. Web browsers read .html files and render the document. Let’s take a look a simple example. Below is “hello world” in HTML.
We will explain what everything means shortly.
📝 Task 2: Hello World in HTML
- Create a new folder for this lab
- name it something useful, like “Lab01”
- From Visual Studio Code open this folder
File > Open Folder- Create a new file in this folder
Ctrl+nor⌘+n- save the file as
hello_world.html- Type the hello world example above (and save)
- Start the Live Server
There are a few ways to start Live Server:
- A: Right Click “helloworld.html” > Open with Live Server
- B: Click “Go Live” in bottom right
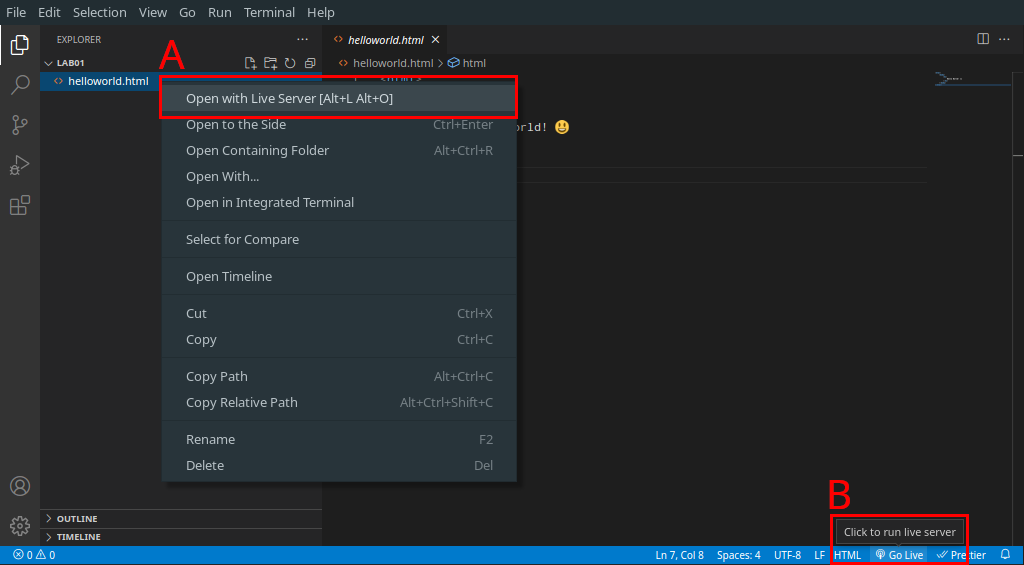
- C: search for “live server” in the Command Palette. Open the Command Palette with the keyboard shortcut
⌘+P(macOS) orCtrl+Shift+P(Win/Linux).

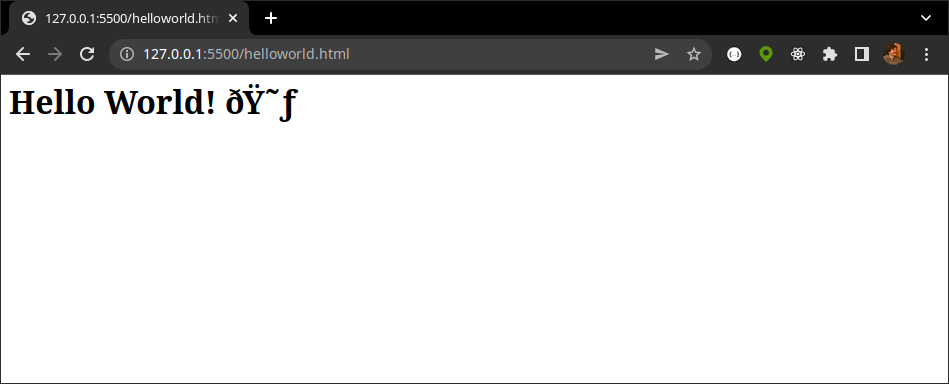
If Live Server doesn’t open a web browser, do so yourself and visit: 127.0.0.1:5500/hello_world.html You should see that our smiley emoji rendered all glitchy, or “Z̷̗͑Ã̸̙L̵̞̍G̴̩̿Ő̴̳”. We will fix this shortly.
✅ Web ServersWeb servers are programs that “serve” HTML files (and other files). You don’t always need a web server to view an HTML document, but it will make things easier as our projects grow.
Thankfully, the Live Server extension handles everything for us.
There are many ways to find bugs in HTML documents. The W3C Validator is probably the best tool to find errors in .html files, like our hello world example.
📝 Task 3: Validate helloworld.html
- Upload your
.htmlfile to the W3C Validator
- Link here: https://validator.w3.org/#validate_by_upload.
- Read through all the errors and warnings before continuing.
✅ W3CThe W3C (World Wide Web Consortium) is a community dedicated to developing international standards for the World Wide Web. The consortium was founded, and is currently led by the inventor of the World Wide Web, Tim Berners-Lee. Essentially, the W3C recommendations are gold standard.
The validator should report 3 errors and 1 warning, and yet, a a modern browser like Chrome can render the document mostly okay. Modern browsers are very tolerant of malformed and invalid HTML because the internet is the wild west of spaghetti code.
In these course we expect you to write valid HTML, outside you may write however you like.
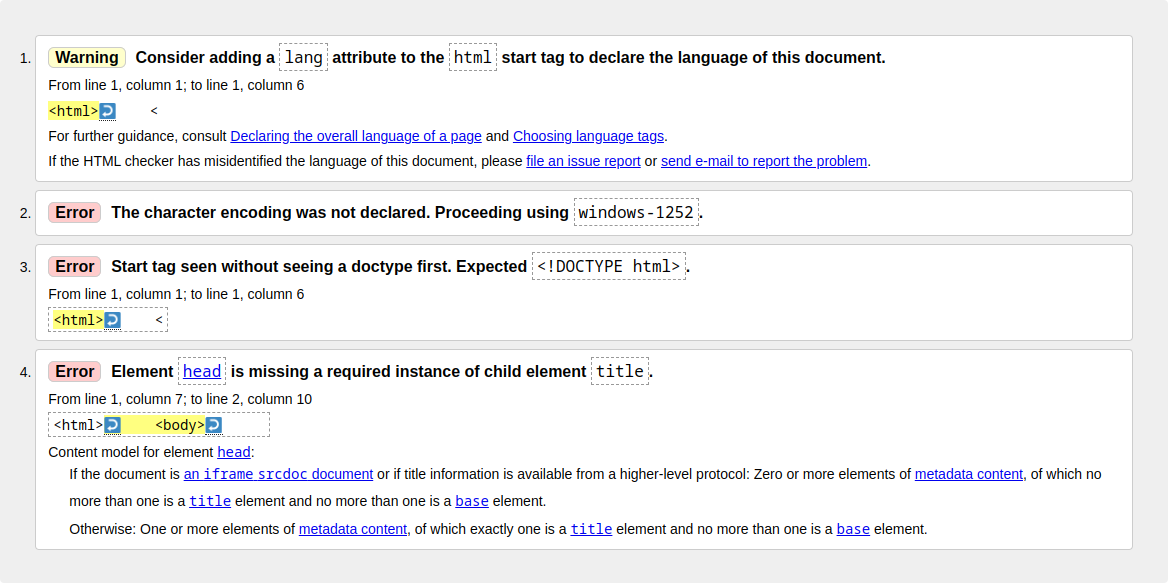
We will fix (and explain) the 4 issues in this order:
- Missing the “DOCTYPE” declaration (#3)
- Missing the Element “head” (#4)
- Missing the “lang” attribute (#1)
- Missing the character encoding declaration (#2)
The missing DOCTYPE declaration is the easiest issues to resolve.
The first line of a plain text file often describes how the rest of the file should be interpreted. For example, the first line of a Python script is usually a shebang. Something like this:
#!/usr/bin/env/ python3

print("hello World! 🐍")
The shebang is not executable Python code, its metadata which informs anyone/anything reading the file that it is a Python script, specifically Python 3. In HTML, the first line should always, always, be the DOCTYPE declaration, and it looks like this:
<!DOCTYPE html>
<html>
    <body>
        <h1>Hello World! 😃</h1>
    </body>
</html>
📝 Task 4: Declare the DOCTYPEAdd the HTML DOCTYPE declaration to yourhelloworld.htmlfile.
✅ HTML versionsThe following DOCTYPE declaration is HTML5
<!DOCTYPE html>HTML5 became an official W3C recommendation in late 2014. However, if for some reason you need to develop a website in HTML4, then you would use a more complicated DOCTYPE declaration:
<!DOCTYPE HTML PUBLIC "-//W3C//DTD HTML 4.01 Transitional//EN" "http://www.w3.org/TR/html4/loose.dtd">These labs are designed for HTML5.
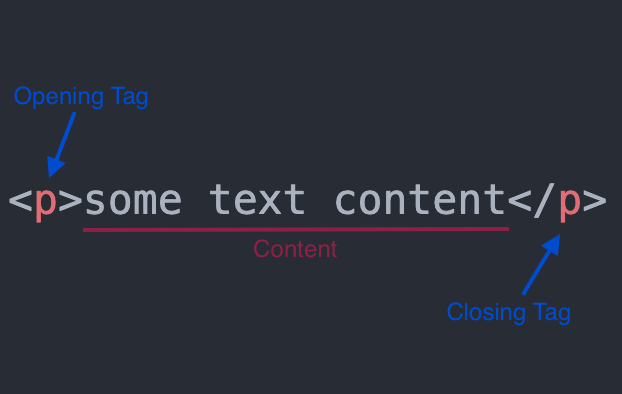
HTML documents are made out of elements. HTML elements are defined with opening and closing tags. Tags are keywords enclosed within “angle brackets” <>.
For a paragraph of text we use a paragraph element, which begins with the opening tag <p> and ends with the closing tag </p> (note the / in the closing tag).
If we refer back to our hello world example again we can see 3 elements, defined by 6 tags (html, body, and h1). These three elements overlap each other, in a way we call nested, like the Russian Matryoshka Doll 🪆🪆🪆
<!DOCTYPE html>
<html>
    <body>
        <h1>Hello World! 😃</h1>
    </body>
</html>
These three elements are:
<html> ... </html>defines the root HTML document.<body> ... </body>defines the body of the HTML document.<h1> ... </h1>defines a heading. Also known as “heading level 1”.
The following diagram shows our 3 nested elements as a Box Model. Where h1 is inside body, and body is inside html.
flowchart TD
    subgraph html
        subgraph body
            direction LR
            subgraph h1
                text2["Hello World! 😃"]
            end
        end
    end
style html fill:#ff03,stroke-width:2px,stroke:#333
style body fill:#4186c988,stroke-width:2px,stroke:#333
style h1 fill:#4186c988,stroke-width:2px,stroke:#333
style text2 stroke:#333,stroke-width:1px
✅ IndentationIn HTML, Indentation is optional. Using whitespace can help show the nested structure, but it doesn’t change how the document will be rendered.
For example, this:
<!DOCTYPE html><html><body><h1>Hello World! 😃</h1></body></html>and this:
<!DOCTYPE html>
<html>
<body>
<h1>Hello World! 😃</h1>
</body>
</html>
… are both the same as our first hello world.
Let’s fix the missing head element issues. And also give our document a title at the same time.
Along with the DOCTYPE declaration, there are 3 more things every HTML file requires:
- html is the root of the HTML document
- everything must be contained within the root
- head is the the document’s metadata
- extra information like: title, author, style, encoding, scripts, …
- body is the required element for the document content
- the actual content of the document (paragrahs, images, etc…)
flowchart
	subgraph html
		direction LR
		subgraph head
			text1["document meta data here"]
		end
		subgraph body
			text2["document content here"]
		end
	end
style html fill:#ff03,stroke-width:2px,stroke:#333
style body fill:#4186c988,stroke-width:2px,stroke:#333
style head fill:#4186c988,stroke-width:2px,stroke:#333
style text1 fill:#0000,stroke:#3338,stroke-width:2px,stroke-dasharray:10
style text2 fill:#0000,stroke:#3338,stroke-width:2px,stroke-dasharray:10
📝 Task 5: Declare the HTML elements head and title
- Insert a
<head></head>element to your.htmlfile.
headbelongs insidehtmlbut outsidebody.headcomes beforebody.- Insert a
<title></title>element insidehead- Give your document a title
- by inserting text within the
titleelement.
The Box Model of our document should now look something like this:
flowchart TD
	subgraph html
        direction LR
        subgraph head
            subgraph title
                text1["my custom title :-)"]
            end
        end
        subgraph body
            direction LR
            subgraph h1
                text2["Hellow World! 😃"]
            end
        end
    end
style html fill:#ff03,stroke-width:2px,stroke:#333
style head fill:#4186c988,stroke-width:2px,stroke:#333
style title fill:#4186c988,stroke-width:2px,stroke:#333
style body fill:#4186c988,stroke-width:2px,stroke:#333
style h1 fill:#4186c988,stroke-width:2px,stroke:#333
style text1 stroke:#333,stroke-width:1px
style text2 stroke:#333,stroke-width:1px
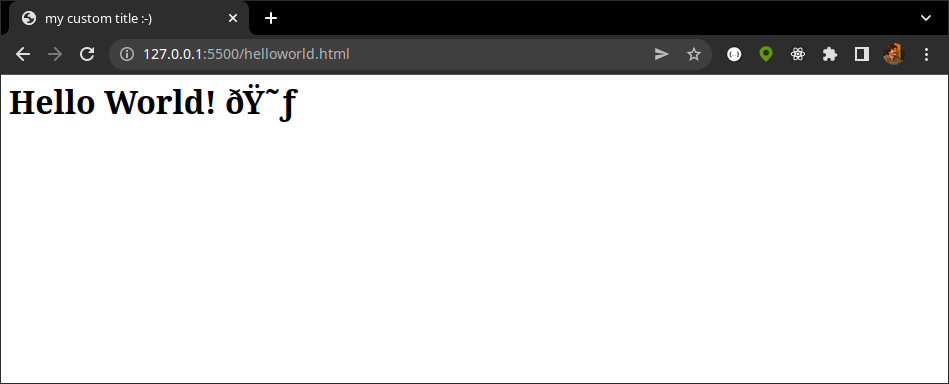
A web browser should now render your custom title in the window tab.
Let’s fix the emoji next!
HTML attributes add extra information for elements. Attributes always appear in the opening tag (never in the closing tag). Attributes are defined in name="value" pairs.
It is good practice to use the lang attribute to declare the language your web page is writtin in.
Declaring the language (e.g. English / Te Reo) can help the web browser to render the document. e.g. some languages render text from right-to-left. Declaring the language is also basic Search Engine Optimization (SEO). If a Search Engine knows the language a document is written in, it will show the document only to people who speak that language.
English
<html lang="en">
New Zealand English
<html lang="en-nz">
Māori
<html lang="mi">
✅ Multi-Lingual HTML DocumentsIf an HTML document needs to contain several languages, you may set the
langattribute on specific elements.<body> <h1 lang="en">hello everyone 👋</h1> <h1 lang="mi">Kia ora tātou 👋</h1> <h1 lang="sm">Talofa tagata uma 👋</h1> <h1 lang="zh-cn">大家好 👋</h1> </body>
📝 Task 6: Declare the lang attributeDeclare the language of your HTML document.
- Give your
<html>tag alangattribute- Set the attribute to
"en","en-nz", or"mi"
Unicode is an international standard for text and emoji characters. UTF-8 encoding is the most popular implementation of Unicode because it is backwards compatible with older encoding implementations like ASCII. If we declare UTF-8 our emoji will magically work.
✅ Unicode and UTF-8If you would like to learn more about UTF-8 watch Tom Scott talking about UTF-8 here.
📝 Task 7: Declare the charset encodingDeclare your document’s character set as UTF-8 encoding.
- Insert a
<meta>tag inside yourheadelement.- Give your
<meta>element acharsetattribute.- Set the
charsetattribute to"UTF-8".<head> <meta charset="UTF-8"> </head>
✅ TipThe<meta>element is special as it requires only 1 tag, a self-closing tag. We call these Empty Elements. Another Empty Element is<img>for the Image Element.
The Box Model of your document should now look something like this:
flowchart TD
    subgraph html
        l(["lang=“en”"])
        direction LR
        subgraph head
            direction LR
            subgraph title
                direction TB
                text1["my custom title :-)"]
            end
			subgraph meta
                c(["charset=“UTF-8”"])
            end
        end
        subgraph body
            direction LR
            subgraph h1
                text2["Hellow World! 😃"]
            end
        end
    end
    style c fill:#f79,stroke:#333,stroke-width:2px
    style l fill:#f79,stroke:#333,stroke-width:2px
    style html fill:#ff03,stroke-width:2px,stroke:#333
    style head fill:#4186c988,stroke-width:2px,stroke:#333
    style meta fill:#4186c988,stroke-width:2px,stroke:#333
    style title fill:#4186c988,stroke-width:2px,stroke:#333
    style body fill:#4186c988,stroke-width:2px,stroke:#333
    style h1 fill:#4186c988,stroke-width:2px,stroke:#333
    style text1 stroke:#333,stroke-width:1px
    style text2 stroke:#333,stroke-width:1px
Semantic Elements provide structure to HTML documents. Building web pages with them helps with both accessibility browsers (e.g. screen readers for the sight impaired), and also SEO. If a search engine can better understand the structure of your web page, it can extract better information.
Let’s build a bigger web page with several of these semantic elements.
📝 Task 8: Create index.htmlUse what you have learned so far to create an HTML5 file using Blueprint below.
- Create a new file called
index.html- Insert
- HTML doctype
- tags for the
htmlelement- tags for the
headandbodyelements (insidehtml)- Insert the following semantic elements (inside
body)
headernavmainfooter- Insert the rest of the tags/attributes/text from the Blueprint below.
- The
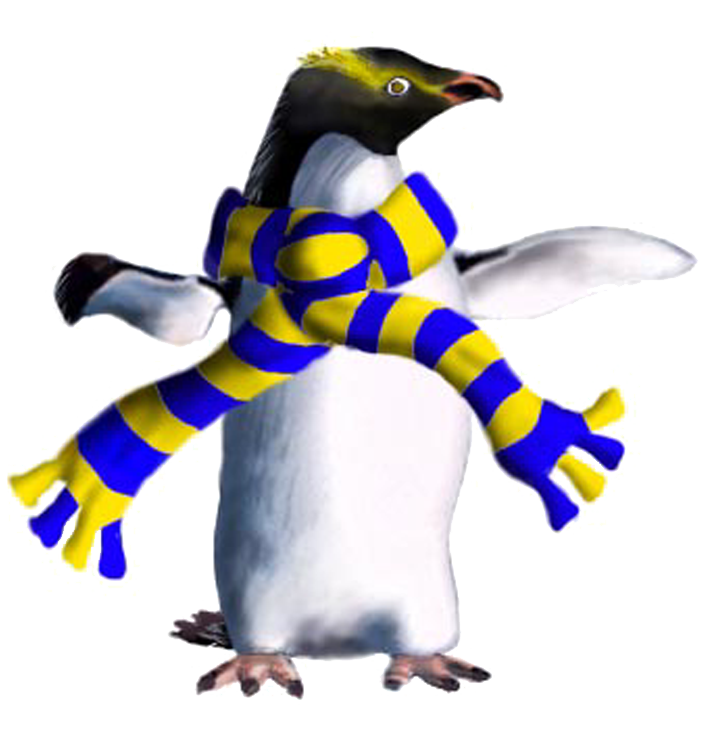
<img>element needs the file: polly.jpg saved into the same directory asindex.html- Upload
index.htmlto the W3C Validator
- ensure it reports 0 errors and 0 warnings
Each element in this blueprint is explained in the table beneath.
flowchart TD
    subgraph html
        l(["lang=“en”"])
        direction LR
        subgraph head
            subgraph meta
                c(["charset=“UTF-8”"])
            end
            subgraph title
                direction TB
                text1["Polly's Travel Blog"]
            end
        end
        subgraph body
            direction LR
             subgraph header
                subgraph h1
                    text2["Polly's Travel Blog"]
                end
            end
            subgraph nav
                direction LR
                subgraph navTitle["h2"]
                    Navigation
                end
                subgraph ul
                    subgraph navList1["li"]
                        subgraph navLink1["a"]
                            direction LR
                            href1(["href=“index.html”"])
                            navName1["Home"]
                        end
                    end
                    subgraph navList2["li"]
                        subgraph navLink2["a"]
                            href2(["href=“stories.html”"])
                            navName2["Stories"]
                        end
                    end
                    subgraph navList3["li"]
                        subgraph navLink3["a"]
                            href3(["href=“contact.html”"])
                            navName3["Contact"]
                        end
                    end
                end
            end
			subgraph main
				subgraph section
					direction LR
					subgraph sectionHeader["h2"]
						text4["Polly the Penguin 🐧"]
					end
					subgraph img
                        direction LR
						src(["src=“polly.jpg”"])
                        alt(["alt=“Photo of Polly”"])
					end
					subgraph sectionP["p"]
						text5["Stories about my life as a penguin!"]
					end
				end
				subgraph section2["section"]
					subgraph articleHeader["h2"]
						text6["Leaving Home"]
					end
					subgraph articleP["p"]
						text7["Today I travel for Antarctica!"]
					end
                    subgraph articleP2["p"]
						text8["I will bring my favourite scarf."]
					end
				end
			end
            subgraph footer
                subgraph footerLink["p"]
                        text3["© Copyright 2022 by Polly. No rights reversed."]
                end
            end
        end
    end
    style l fill:#f79,stroke:#333,stroke-width:2px
    style c fill:#f79,stroke:#333,stroke-width:2px
    style href1 fill:#f79,stroke:#333,stroke-width:2px
    style href2 fill:#f79,stroke:#333,stroke-width:2px
    style href3 fill:#f79,stroke:#333,stroke-width:2px
    style src fill:#f79,stroke:#333,stroke-width:2px
    style alt fill:#f79,stroke:#333,stroke-width:2px
    style html  fill:#ff03,stroke-width:2px,stroke:#333
    style head  fill:#4186c955,stroke-width:2px,stroke:#333
    style meta  fill:#4186c955,stroke-width:2px,stroke:#333
    style title fill:#4186c955,stroke-width:2px,stroke:#333
    style body fill:#4186c955,stroke-width:2px,stroke:#333
    style header fill:#4186c955,stroke-width:2px,stroke:#333
    style h1 fill:#4186c955,stroke-width:2px,stroke:#333
    style nav fill:#4186c955,stroke-width:2px,stroke:#333
    style navTitle fill:#4186c955,stroke-width:2px,stroke:#333
    style ul fill:#4186c955,stroke-width:2px,stroke:#333
    style navList1 fill:#4186c955,stroke-width:2px,stroke:#333
    style navLink1 fill:#4186c955,stroke-width:2px,stroke:#333
    style navList2 fill:#4186c955,stroke-width:2px,stroke:#333
    style navLink2 fill:#4186c955,stroke-width:2px,stroke:#333
    style navList3 fill:#4186c955,stroke-width:2px,stroke:#333
    style navLink3 fill:#4186c955,stroke-width:2px,stroke:#333
    style sectionHeader fill:#4186c955,stroke-width:2px,stroke:#333
    style img fill:#4186c955,stroke-width:2px,stroke:#333
    style sectionP fill:#4186c955,stroke-width:2px,stroke:#333
    style articleP2 fill:#4186c955,stroke-width:2px,stroke:#333
    style articleHeader fill:#4186c955,stroke-width:2px,stroke:#333
    style articleP fill:#4186c955,stroke-width:2px,stroke:#333
    style footerLink fill:#4186c955,stroke-width:2px,stroke:#333
    style section fill:#4186c955,stroke-width:2px,stroke:#333
	style main fill:#4186c955,stroke-width:2px,stroke:#333
    style section2 fill:#4186c955,stroke-width:2px,stroke:#333
    style footer fill:#4186c955,stroke-width:2px,stroke:#333
    style text1 stroke:#333,stroke-width:1px
    style text2 stroke:#333,stroke-width:1px
    style text3 stroke:#333,stroke-width:1px
    style text4 stroke:#333,stroke-width:1px
    style text5 stroke:#333,stroke-width:1px
    style text6 stroke:#333,stroke-width:1px
    style text7 stroke:#333,stroke-width:1px
    style text8 stroke:#333,stroke-width:1px
The below tables lists the elements we have seen so far.
For a full reference of HTML elements, check the Mozilla web docs.
| Tag(s) | Purpose | Parent Element | Self-closing |
|---|---|---|---|
<html>...</html> | Root element of every HTML page | no | |
<head>...</head> | Metadata for web browsers and SEO | <html> | no |
<body>...</body> | Content of the document | <html> | no |
<meta> | Extra information | <head> | yes |
<title>...</title> | Document title | <head> | no |
<header>...</header> | Semantic Element for the page header | <body> | no |
<footer>...</footer> | Semantic Element for the page footer | <body> | no |
<main>...</main> | Semantic Element for the main content | <body> | no |
<nav>...</nav> | Semantic Element for the site navigation | no | |
<section>...</section> | Semantic Element for a section | <main> | no |
<a>...</a> | A “link”, or anchor to a url (hyper-link) | no | |
<p>...</p> | Paragraph of text | no | |
<h1>...</h1> | Header level 1 | no | |
<h2>...</h2> | Header level 2 | no | |
<ul>...</ul> | Bullet list (Unordered) | no | |
<li>...</li> | List item | <ul> | no |
<img> | Image embed | yes |
✅ Image ElementThe Image Element has a few special characteristics.
<img src="url/filename.jpg" alt="Description of the image">
- The img element uses a self-closing tag (like the meta element)
- The src attribute is a url, which points to the image source.
- The url could point to anywhere on the internet (hot linking)
- Or, it could point to a local file, with an absolute or relative path.
- The alt attribute is an alternative description of the image.
- for SEO and accessibility browsers (e.g. screen readers).
Web links or hyperlinks are an important concept for the web. They allow us to link HTML pages together to create an interconnected web of pages.

In HTML, hyperlinks are created with Anchor Elements with the <a> tag. Clicking on an anchor element will load that HTML page.
Below are two examples of hyperlinks, the first has a relative URL that links a local HTML document, the second has an absolute URL that links to another website.
An anchor tag does nothing without the href attribute (hyperlink reference). The value of the href attribute is the destination we want our link to go, which is either a relative URL or an absolute URL.
📝 Task 9: Create a multi-page siteIn this task we will create a multi-page site.
- Start with
index.htmlfrom the previous task(s).- Create 2 copies in the same directory
stories.htmlcontact.html- Change the
h1element(s) of each page to something more descriptive
html > body > header > h1- Change the main content of the 2 new pages to something else
html > body > main- For anchor elements that link to their own page, change the href to
"#!"- Test your sites page navigation by clicking the hyperlinks in the
<nav>element
✅ TipThe hash value
"#"in a href indicates a URL fragment and is used to link directly to a specific element within a page.For example, the below link uses the URL fragment
#Examplesso clicking the link will open the page and scroll down to the Example section on the page.https://en.wikipedia.org/wiki/URI_fragment#Examples
<a href=https://en.wikipedia.org/wiki/URI_fragment#Examples>https://en.wikipedia.org/wiki/URI_fragment#Examples<a>Using the href value
#!is standard practice to link nowhere.
Along with HTML documents, anchor tags can link to various different resource files on the internet. The href URL may refer to: images, videos, audio, zip files etc. Modern web browsers will open many file types (images, video, pdf, etc.) but if the resource file is not supported, clicking the link will simply download file, the default behaviour.
Link other resources
<a href="polly.jpg">an image</a>
<a href="data.zip">a download</a>
Preview
Absolute URLs begin with the protocol e.g https: in https://www.google.com/. The protocol tells the web browser how to retrieve the page. The 3 most common are https:, http:, and ftp:.
There are also Resource Scehemes which are very similar, the two we will look at are mailto: and tel: Which identify an email address and a phone number respectively.
Link email and phone
<a href="mailto:name@mail.nz" >email</a>
<a href="tel:+64034798397" >phone</a>
Clicking the above links on a smart phone should open an email app or phone app.
📝 Task 10: Create some contact links
- Create 3 anchor elements in the
contact.htmlpage
- Somewhere in
html > body > main > section- Make one link to another website with
https:- Make one link to an email address with
mailto:- Make one link to a telephone number with
tel:
✅ TipThe anchor element may also have a
targetattribute, which specifies where to open the link. In the current window or in a new window/tab.<a target="_self" href="https://google.com/" >open in this window</a> <a target="_blank" href="https://google.com/" >open in a new window or tab</a>
Last section! 🎉
Writing HTML can be tiresome which is why Emmet was created. Emmet is like auto complete for HTML, and Visual Studio Code has Emmet built in.
Let’s start off by generating some HTML boilerplate with Emmet. If you open a blank file in VS Code (with a .html extension) and type !, it will trigger an Emmet Abbreviation.
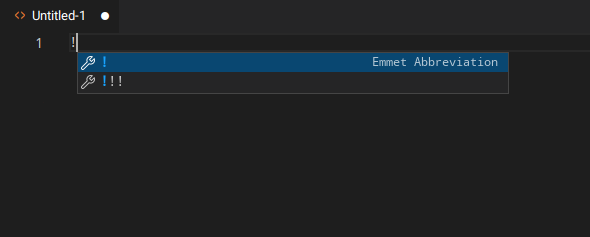
Pressing enter will generate the following HTML boilerplate:

That is just 1 of many Emmet abreviations. There are 3 other abbrevations you may find useful:
>creates a child element+creates a sibling element*creates multiple elements
You can chain these abbrevations together in order to create a complex structure of HTML elements. To understand what that all means you could read the Emmet documentation, or watch the demonstration video below which finishes the previous lab excercise in less than a minute!
Below are the Emmet abbreviations used in the above demo.
!!!html>head+bodyheader>h1nav>ul>li*3>amain>section>h2+img+psection>h2+p*3footer>pmeta[charset=UTF-8]
✅ Emmet Cheat SheetIf you want to become a Emmet power user read this cheat sheet: https://docs.emmet.io/cheat-sheet/
(or at the very least bookmark it for later)
📝 Task 11: Try out Emmet
- Test out Emmet
- try the single exclamation mark:
!- try the triple exclamation mark
!!!- Recreate
index.htmlusing Emmet abbreviations- Can you recreate
index.htmlwith a single Emmet abbreviation?
This lab is worth marks. be sure to get signed off.